15 Easy Nail Art Techniques You Can Master at Home (Even Beginners Can Do #5!)
Getting creative with your nails can be a fun way to express yourself! If you’re looking to dabble in nail art but feel overwhelmed by the intricate designs often showcased online, don’t worry!
We’ve compiled a list of 15 easy nail art techniques that are perfect for beginners and can be done right in the comfort of your home. From simple dots to stunning gradients, you’ll find methods that not only elevate your nail game but also ignite your playful side. Grab your favorite polish and let’s make those nails pop with creativity!
1. Dots Galore

The dot technique is the perfect starting point for any nail art adventure! All you need is a dotting tool or even a bobby pin to create mesmerizing patterns. Simply dip your tool in your desired polish and gently dot it onto your nails. Play around with different colors to create intricate designs or just a simple polka dot pattern.
To achieve a professional look, start by applying a base coat. This not only protects your nails but also provides a smooth surface for the polish. Then, apply your base color; white, black, or a soft pastel can work wonders as a background. Once dry, grab your dotting tool and start your dot design! Alternate colors for a fun twist or create a gradient effect by using different shades of the same color.
Don’t forget to seal it all with a top coat to ensure the design lasts longer! The dotted look is playful, trendy, and adaptable to any occasion, making it a must-try.
2. Striped Perfection

Stripes can be both chic and casual, making them a versatile choice for nail art. You can create bold, thick stripes or delicate, thin ones depending on your mood! Using striping tape makes this technique super easy. Just place the tape on your nails in your desired pattern, paint over with your polish, and peel the tape away for perfect lines.
For a classic look, try alternating colors; a white base with black stripes creates a timeless effect. If you want to get creative, use multiple colors for a rainbow effect. Remember to let each layer dry completely to avoid smudging. Striped nails can be dressed up with gems or glitter for special occasions or kept simple for an everyday look. This technique is all about having fun and showing off your playful side!
3. Ombre Magic

The ombre effect is a stunning way to blend colors seamlessly, giving your nails a dreamy look. This technique might sound complicated, but it’s easier than you think! Start by choosing two or three complementary colors and a makeup sponge.
Apply your base coat and let it dry. Next, paint each color horizontally on the sponge and dab it onto your nails, starting from the cuticle and moving towards the tips. This technique requires some practice, but the results are worth it! You can even add a glitter top coat for some extra sparkle. Remember that patience is key; let each layer dry before applying the next for the best results. With ombre nails, you can express yourself and switch up your style depending on the colors you choose. It’s all about creativity!
4. Floral Fantasy

Floral designs add a touch of femininity and can brighten up any day. You can create delicate flowers on a simple base using a small brush or dotting tool. Start by painting your base color and letting it dry completely. Then, with a contrasting color, create small flower shapes using dots for petals and a tiny dot for the center.
Vary the sizes and colors of your flowers for a more whimsical look. Adding some leaves, using a small brush with green polish, can make your design pop. Don’t forget to finish with a clear top coat to preserve your artwork! Floral nail art can be adapted for any occasion, whether it’s a casual day out or a special event. It’s all about embracing the beauty of nature!
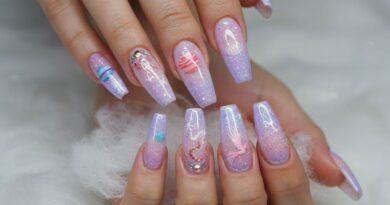
5. Glitter Gradient

Who doesn’t love a little sparkle? The glitter gradient is a dazzling way to make your nails stand out! This technique combines a solid color with a gradual shimmer, creating a breathtaking effect. Start with your favorite polish as a base and apply it evenly.
Once that’s dry, take a makeup sponge, dip it in your glitter polish, and lightly dab it on the tips of your nails, gradually moving down. This creates that beautiful gradient effect. You can use different colors for the base and glitter to create unique combinations, or keep it monochromatic for a more subtle look. Remember to seal it with a top coat to keep that glitter intact. The glitter gradient is perfect for parties, holidays, or anytime you want to feel fabulous!
6. Marble Effect

The marble effect is all about elegance. With a little practice, you can achieve this stunning look at home. All you need is a few contrasting colors and a small brush. Start by applying a base coat and letting it dry. Then, using a small brush, create swirls of different colors on top. You can also use a toothpick for finer details!
To really achieve that marble look, dab some polish on and drag it through different colors for a blended effect. It’s a good idea to work quickly before the polish dries. Finish with a top coat to seal the design and enhance the shine. Marble nails can elevate any outfit, making them perfect for both casual and formal occasions. It’s all about showing your sophisticated side!
7. Negative Space

Negative space nail art is a trendy technique that takes advantage of the natural nail. It’s modern, chic, and surprisingly simple to do! Start with a clear or nude base coat, and use tape to block off areas where you don’t want polish. Paint over the exposed areas with a bold color, and let dry.
Once dry, carefully remove the tape to reveal that chic negative space! This style allows your natural nails to shine while adding a pop of color. You can experiment with different shapes and patterns to create unique designs. One of the best things about negative space is its versatility; you can dress it up with glitter or keep it minimalist for an everyday look. The key is to have fun with it!
8. Watercolour Wonders

Watercolor nails are an artistic approach to nail art that creates a soft, dreamy effect. To achieve this look, start with a white or light base coat. Then, using a small brush, apply different colors with a bit of water to create a translucent effect.
The key is to use sheer layers, allowing the base to peek through. Dab your brush lightly to create a splashed effect, which gives a beautiful watercolor illusion. You can layer different colors for a more complex design. Always finish it off with a top coat to seal in your masterpiece. Watercolor nails are perfect for spring and summer, letting you showcase your artistic flair and love for color!
9. Geometric Shapes

Geometric shapes are a great way to create a modern, stylish look on your nails. This art form is all about angles, lines, and shapes. Start with a base coat and allow it to dry completely. Then, use striping tape to create shapes like triangles or squares on your nails. Paint over the tape with your chosen colors and let dry before removing the tape.
You can mix and match colors for a bold statement or stick with monochromatic shades for a classy vibe. Geometric designs can be customized to fit your style and are great for any occasion. Finish with a top coat to keep those lines sharp and defined. It’s a fun way to show off your love for modern art!
10. Textured Nails

Adding texture to your nails creates a unique visual effect that stands out! You can achieve this through different methods, like using textured polish or adding embellishments. Start with your base color and let it dry. Then, apply a textured top coat for that extra dimension.
Another way to add texture is by using glitter, beads, or even fabric strips! Each technique offers a different feel and look. Textured nails are playful and can be customized for any occasion. Plus, they make for an exciting conversation starter! Seal your design with a top coat to protect your creation. Don’t be afraid to try different combinations and unleash your inner artist!
11. Stars and Skies

Celestial nail art brings a magical touch to your fingertips. This design can be achieved using a dark base color, like midnight blue or black, creating the perfect canvas for your stars. After applying your base coat, use a small brush or dotting tool to create stars and planets in white or metallic colors.
You can add a gradient effect in the background to mimic the night sky, using a sponge to blend colors. For added flair, incorporate tiny gemstones to represent stars or moons. This dreamy nail art is perfect for anyone who loves the cosmos and can make you feel like you’re carrying a piece of the night sky with you!
12. Heartfelt Love

Nothing says love like heart designs on your nails! This nail art technique is especially popular around Valentine’s Day but can be embraced any time you want to spread some joy. Start with a soft pink or red base coat, allowing it to dry.
Then, using a dotting tool or a small brush, create heart shapes on your nails. You can make them solid or leave them outlined for a chic look. Experiment with different colors for a playful vibe! Heart nail art is not only adorable but also a great way to show off your personality and spread love wherever you go. Finish with a top coat to make your love shine!
13. Ripped Newspaper

For a fun twist, try the ripped newspaper technique! It creates a unique, edgy look that’s totally Instagram-worthy. Start with a light base coat and let it dry. Next, cut small pieces of newspaper or magazines. Using a sponge dipped in rubbing alcohol, press the paper onto your nails, letting it sit for a few seconds before removing.
This will transfer the print onto your nails! You can mix up the types of paper for different effects and colors. Finish with a clear top coat to preserve your design. It’s a quirky and trendy way to showcase your creativity!
14. Marbleised Water Dip

The water marble technique is stunning but requires a bit more patience. Start by filling a cup with water and dropping different nail polishes into it to create a swirling effect. Using a skewer or toothpick, swirl the colors together.
Next, dip your nail into the design, ensuring it makes contact with the water surface. This technique requires practice to perfect, but the results are worth it! The marbled look can be customized with any colors you desire. Finish with a top coat to seal in your design. It’s a glamorous way to add a unique flair to your nails!
15. Seasonal Themes

Embrace the seasons with themed nail art that reflects the beauty around you! From autumn leaves to winter snowflakes, the seasonal theme can be a fun way to switch up your nail art. Start with a base color that resonates with the season—like warm reds and browns for fall or cool blues and whites for winter.
Utilize stamps or hand-painted designs to add seasonal elements, and don’t forget to incorporate glitter for that extra flair! Seasonal nail art is a fantastic way to celebrate the time of year and express your creativity. Plus, it’s always fun to have nails that match the season’s vibe!
Conclusion

With these 15 easy nail art techniques, you’re well on your way to becoming a DIY nail artist!
No matter your skill level, these ideas are approachable and fun, encouraging you to let your creativity flow. Don’t shy away from experimenting with colors and styles to find what best represents you. Dive in, get creative, and enjoy the process of making your nails a canvas.