18 DIY Nail Designs You Can Do at Home (Even If You’re a Beginner
Nail art is like a tiny canvas for your creativity, and it’s never been easier to express yourself with stunning designs right at home!
Whether you want to add a pop of color, a fun design, or a touch of sparkle, there’s a nail art project for everyone. From simple dots to intricate patterns, these DIY ideas are designed for all skill levels. You don’t need to be a pro to achieve beautiful results – just a little patience and your favorite nail polish!
Let’s dive into 18 fabulous, easy DIY nail designs that will have you feeling like a nail art guru in no time.
1. Classic French Tips with a Twist

French tips are timeless, but why not spice them up a little?
Instead of the usual white tips, use bright colors! Try a neon pink or a soft pastel shade for a fresh take on this classic style. Start with a nude or sheer base coat and let it dry completely. Then, use nail tape to create clean lines before applying your chosen color to the tips. You could even add a glitter topcoat for an extra sparkle that’s perfect for a night out!
– Use a fine brush for precision.
– Experiment with different colors for the tips.
– If you mess up, don’t stress! You can always use a little remover to clean the edges.
This fun twist on a classic design is not only easy but also super chic, making it suitable for any occasion.
2. Dotting Delight

Who knew dots could be so delightful?
Using a dotting tool or a toothpick, you can create intricate patterns on your nails in no time. Start with a solid color as your base, then use contrasting colors to add dots in varying sizes across your nails. You could go for a polka dot effect or create flowers and other fun shapes!
Suggestions:
– Mix and match colors for a playful look.
– For a more detailed design, try layering dots.
– Don’t worry about perfect placement; an organic look can be very charming!
This design is super fun and forgiving – perfect for beginners eager to experiment with patterns.
3. Water Marble Wonders

Water marbling sounds fancy, but it’s easier than it looks!
Fill a bowl with water and drop nail polish into it. Use a toothpick to swirl the colors together and create a unique design. Dip your nail into the water, and voila – a stunning marble effect! This technique is all about experimentation, so don’t be afraid to try different color combinations.
– Use a base coat to protect your nails from staining.
– Work quickly before the polish dries on the surface of the water.
– Keep some nail polish remover handy for clean-up!
Water marbling allows you to create endless designs and is always a conversation starter!
4. Striped Styles

Stripes are not just for jailbirds!
You can create striped nail designs using tape or a striping brush for a chic and modern look. Use contrasting colors like black and white or go for a bold color palette. Start with a base coat and let it dry, then use tape to outline your stripes before painting over them.
Suggestions:
– Use washi tape for a fun edge.
– Experiment with diagonal, horizontal, or vertical stripes.
– Mix thin and thick stripes for a trendy look.
Stripes are versatile and can range from subtle to eye-catching, making them perfect for any mood!
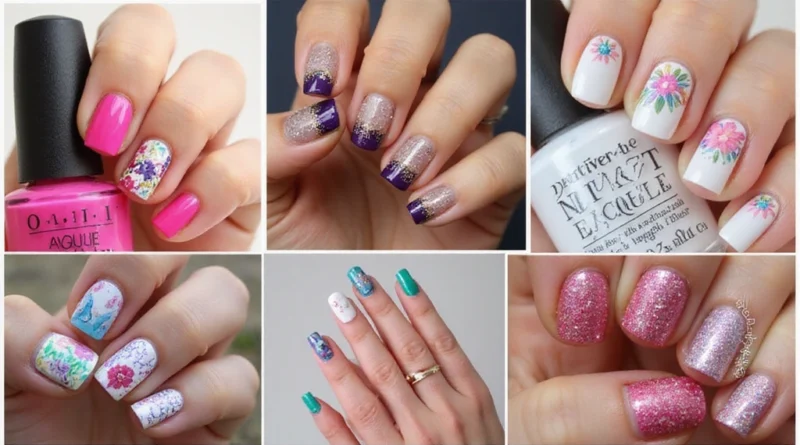
5. Floral Fantasy

Bring a little nature to your nails with floral designs!
Using a small brush or dotting tool, paint simple flowers on your nails. You can stick to one color or make a bouquet with different shades. Start with a light base, and once dry, create flower shapes in the center of each nail or accentuate just a few nails with floral art for a more subtle look.
– Try different flower types like daisies or roses.
– Add green leaves for an extra pop.
– Don’t stress about precision; organic shapes add charm!
Floral designs can make you feel fresh and cheerful, perfect for any season.
6. Glitter Gradient

Glitter can take your nail game to another level!
For a gorgeous glitter gradient, start with a solid base color. Once it’s dry, gently apply glitter polish from the tips downwards, gradually decreasing the amount as you move towards the base. This creates a soft fade effect that’s simply stunning!
Suggestions:
– Layer different glitter sizes for depth.
– Pair with a glossy top coat for maximum shine.
– Remember to allow each layer to dry before applying the next!
This design is perfect for parties or special occasions, adding sparkle without being overly flashy.
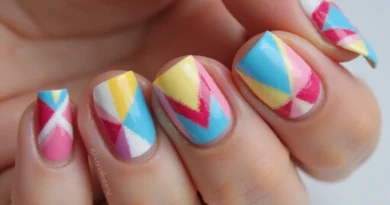
7. Geometric Shapes

Geometric patterns are super trendy and easy to create!
Using nail tape, you can form triangles, squares, or other shapes on your nails. Choose a bold color for the base and a contrasting shade for the design. After applying the base coat, use the tape to section off areas, paint over them, and remove the tape for sharp lines.
– Mix colors and shapes for a unique look.
– Ensure the base coat is fully dry before taping.
– Use a top coat to smooth out any uneven surfaces.
This design is sleek and modern, perfect for those who love a bit of edge.
8. Ombre Effect

The ombre nail look is all about blending colors seamlessly.
Choose two or three shades that transition well together. Use a makeup sponge to dab the colors onto your nail and blend them together. Start with the lightest shade at the base and finish with the darkest at the tips!
Suggestions:
– Add a touch of glitter at the tips for an extra pop.
– Don’t rush the blending; take your time for the best results.
– Seal with a top coat for longevity.
Ombre nails can be as subtle or as bold as you want, making them adaptable for any occasion.
9. Metallic Magic

Shiny, metallic nails can add instant glam!
Metallic polishes create a stunning reflective effect that catches the eye. You can paint all your nails a single metallic shade or mix it with matte colors for a striking contrast. Don’t forget to use a good base coat to help the metallic polish adhere!
Suggestions:
– Silver and gold are classics, but don’t shy away from bold colors like blue or green.
– Pair with a matte top coat on alternating nails for an edgy vibe.
– Ensure to apply thin layers for a smooth finish.
Metallic nails are perfect for making a statement, adding that extra flair to your look.
10. Tie-Dye Dreams

Bring back the 70s with a tie-dye nail effect!
Using a few bright colors, create a swirling design reminiscent of the iconic tie-dye pattern. Start with a white base, then add drops of various colors. Use a toothpick to swirl them around until you achieve your desired effect. This fun and vibrant design is perfect for summer!
– Avoid over-mixing colors to retain the vibrance.
– You can use a sponge to dab some areas for more texture.
– Finish with a top coat to protect your design.
Tie-dye nails are a playful way to express individuality and creativity!
11. The Drip Effect

Dripping nail art is a fun and edgy trend!
This design mimics paint drips, perfect for those who want something a little different. Start with a solid color for your base, and use a contrasting polish to create drip effects at the tips. You can use a small brush or a dotting tool to shape the drips for more accuracy!
Suggestions:
– Play with color combinations like black and neon or pastels and whites.
– Use a top coat to secure the design.
– Experiment with different drip lengths for variation.
The drip effect adds a unique flair that stands out in a crowd.
12. Negative Space Nails

Negative space nails are all about leaving parts of your nail bare for a chic look!
You can create geometric patterns or simple lines while allowing the base of your nails to show through. Start with a clear or nude base and apply tape to mark off areas that you don’t want to paint. Fill in the sections with your chosen color, then remove the tape for a clean finish.
Suggestions:
– Experiment with sharp lines or soft curves.
– Use two or three colors for more depth.
– Top it off with a high-shine top coat for brilliance.
This minimalist style is perfect for those who want something modern yet stylish.
13. Jewel-Toned Nails

Rich, jewel-toned colors can elevate your nail game!
Think emerald greens, sapphire blues, and deep ruby reds. These colors not only look luxurious but also suit any season. Use a glossy topcoat to enhance the shine of your jewel tones for an extra pop!
Suggestions:
– Try adding a matte topcoat to some nails for contrast.
– Use glitter accents for a touch of glam.
– Pair jewel tones with simple designs to keep them looking chic.
Jewel-toned nails make a bold fashion statement and are perfect for those looking to add a touch of elegance.
14. Simple Checkerboard

Checkerboard nails are a fun retro look!
Begin with a solid base color and then use tape to create a checkerboard pattern. Once the base dries, tape off sections and paint the alternating squares in a contrasting color. You can keep it classic with black and white or go wild with bright colors!
Suggestions:
– Make sure the base coat is completely dry before applying tape.
– Thin brushes work well for detailing.
– Add a glossy top coat to smooth things over.
Checkerboard nails are playful and eye-catching, perfect for adding some fun to your look.
15. Stenciled Art

Stencils can make nail art super easy!
You can buy pre-made nail stencils or create your own. Apply a base coat, let it dry, and then place the stencil where you want the design. Use a sponge to dab your polish onto the stencil, then carefully remove it for a neat design!
Suggestions:
– Use contrasting colors for high impact.
– Layer stencils for more complex designs.
– Finish with a top coat to protect your art.
Stenciled nails allow for precision and creativity without the hassle of freehand painting.
16. Color Blocking

Color blocking is all about bold colors and clean lines!
Use tape to section off parts of your nail and paint them different colors. You can go for a single color per nail or mix multiple shades on one nail for a fun effect. This design works best with bright, contrasting colors to truly stand out!
– Use a matte top coat for a modern twist.
– Keep the shapes simple for a chic look.
– Make sure each layer dries completely before taping.
This trendy style is perfect for those wanting to make a statement!
17. Holographic Shine

A holographic finish can give your nails an otherworldly glow!
Using holographic nail polish, start with a base coat and apply the holographic polish for a dazzling effect. This design catches the light beautifully, making your nails shimmer with every movement. Perfect for a night out or just to add some sparkle to your everyday look!
Suggestions:
– Pair with a matte top coat for an added contrast.
– Make sure to use thin layers of polish for the best shine.
– Add a glitter accent nail for added glam.
Holographic nails are not just a trend; they’re a stunning way to express your individuality!
18. Personal Touch with Nail Art Pens

If you’re up for a bit of freehand artistry, nail art pens are your best friend!
These pens allow for precise designs, whether you want to doodle, add patterns, or write a word. Start with a base coat, let it dry, and then use the pen to create your design. Personalize it with your initials or a small symbol that means something to you!
Suggestions:
– Try practicing on paper first to get a feel for the pen.
– Keep your designs simple if you’re a beginner.
– Seal with a glossy top coat.
Nail art pens add a unique personal touch, making your nails truly one-of-a-kind!
Conclusion

Embrace your creativity and explore the world of DIY nail art!
With so many fun and easy designs to choose from, there’s no limit to what you can create right at home. Whether you prefer bold graphics or delicate floral patterns, your nails can reflect your personality and style. So grab your favorite polishes and get started on those fabulous nail designs today!
Explore more beauty posts here