18 Half-Up Loop Techniques That Look Complex
Have you ever scrolled through social media, seen a gorgeous, intricate half-up hairstyle full of elegant loops and twists, and immediately thought, “I could never do that”? You’re not alone. These styles look like they require a professional hairstylist, magical fingers, and an hour of spare time. But what if we told you that the secret to these stunning looks isn’t complexity, but a handful of simple techniques used in clever ways?
The Foundation: Tools and Prep for Perfect Loops
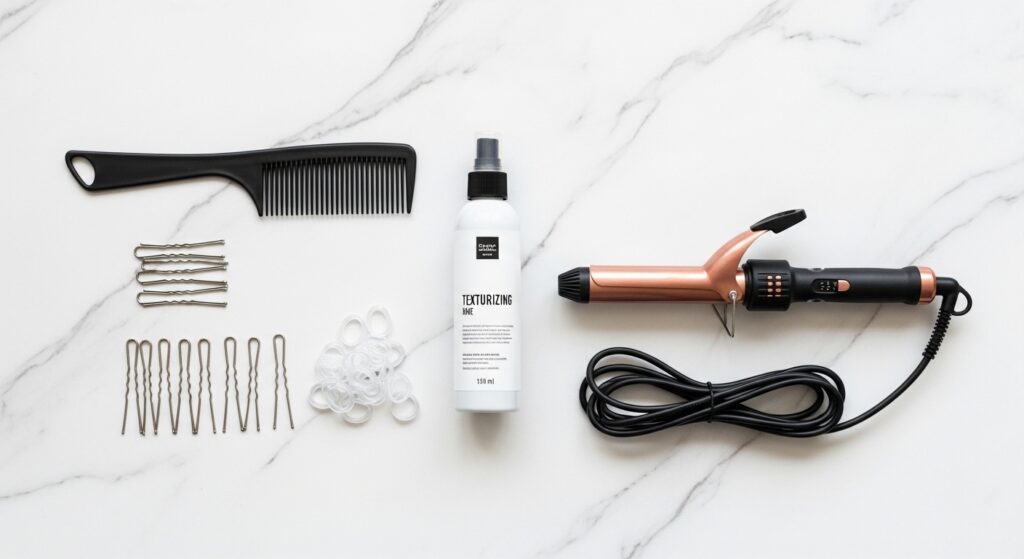
Before we dive into the techniques, let’s set the stage for success. The right preparation and tools are what transform a messy attempt into a polished masterpiece. Start with day-old hair or use a texturizing spray. Slightly dirty hair has more grip and holds styles better than freshly washed, slippery hair. If your hair is fine or very soft, a light-hold mousse at the roots can provide necessary volume and staying power.
Your tool kit is simple but essential. You’ll need a rattail comb for clean parts, a set of bobby pins that match your hair color, clear elastics for securing sections invisibly, and a few small, hidden hair elastics. A curling iron or wand can be helpful for adding texture beforehand, as wavy or curled hair makes loops appear fuller and hides small imperfections more easily. Don’t forget a light-hold hairspray for setting your finished look without making it stiff or crunchy.
Section 1: Twist and Loop Magic (Beginner-Friendly)
These styles are your entry point into the world of loops. They use simple twists as the building blocks for beautiful, dimensional looks.
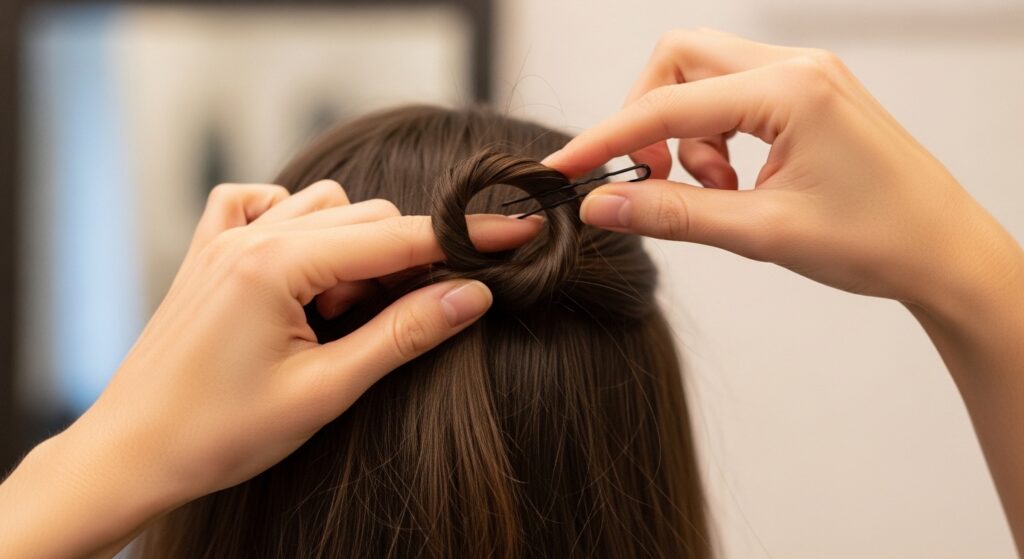
1. The Classic Twist-Back Loop: Take two sections of hair at your temples. Twist each one backwards and secure them together at the back of your crown with a clear elastic. Gently pull on the sides of the twist to create a soft, loose loop. This is the most fundamental loop technique.
2. The Triple Twist Cascade: Create three horizontal sections in your crown area. Twist the top section back and pin it. Then, incorporate hair from the sides into the second twist, looping it under the first. Repeat for the third twist, creating a cascading, looped effect down the back of your head.
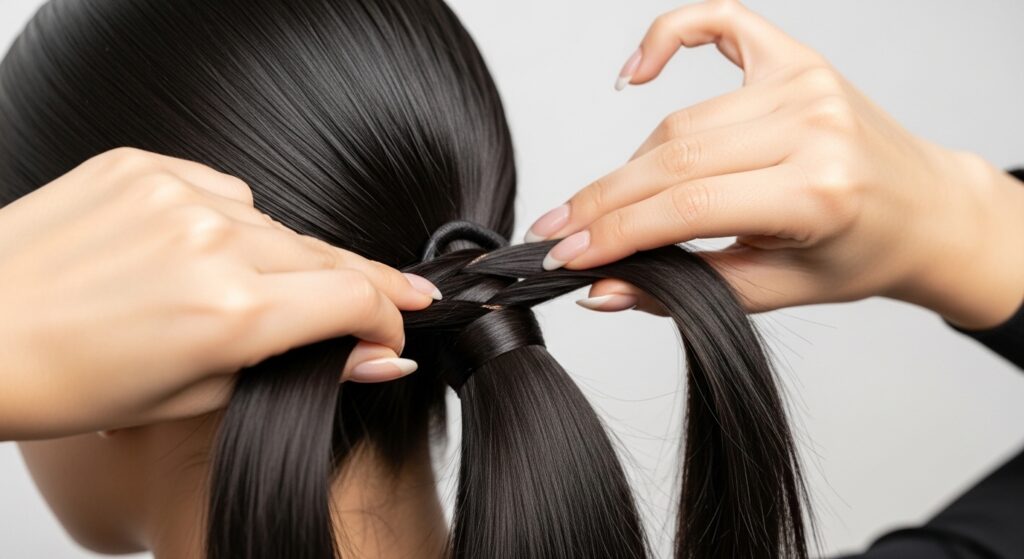
3. The Rope Twist Loop Bun: Create two rope twists (twisting two sections around each other) from the front of your head, meeting at the back. Instead of pinning them flat, tie them into a small, loose bun or knot, letting the ends flow out to form a looped bun centerpiece.
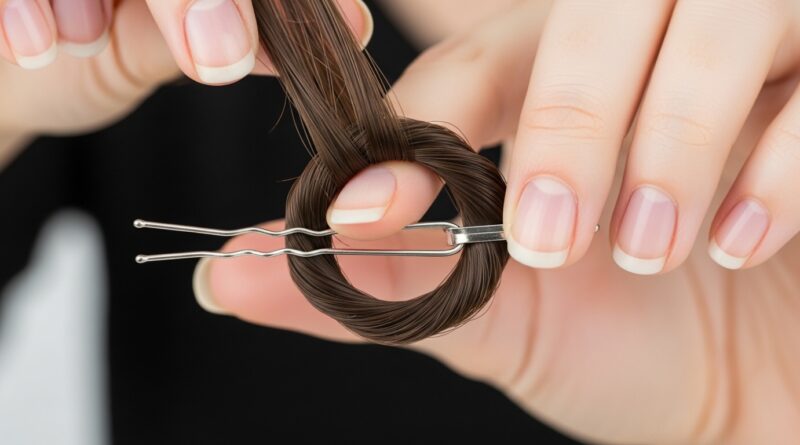
4. The Hidden Elastic Twist: Create a small half-up ponytail. Split the ponytail in two, creating a hole above the elastic. Flip the tail up and through the hole, but only pull it halfway through to create an instant, perfect loop. Secure with a bobby pin underneath.
Section 2: Braided Loop Elegance (Intermediate)
Incorporate braids to add intricate detail and texture to your looped styles. These look especially complex but often just involve strategic pinning.
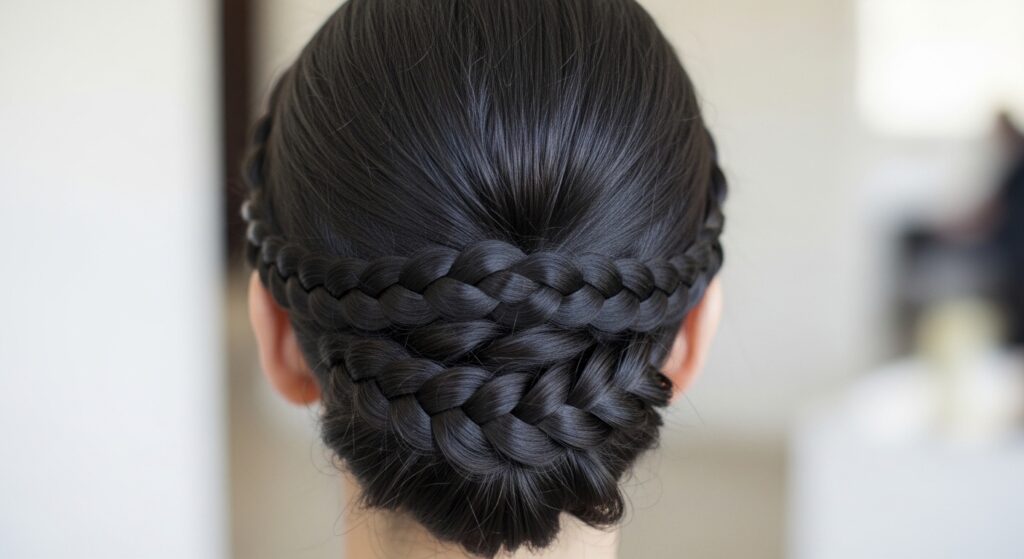
5. The Dutch Braid Frame Loop: Create two Dutch braids (braids inverted, so they pop out) starting at your temples, braiding back to your ears. Secure the ends, then cross them over the crown of your head, pinning them to form a looped frame around your face. Let the remaining hair flow down.
6. The Fishtail Loop Accent: Create a small fishtail braid with a front section of hair. Pull it back into a half-up ponytail, but before securing the final wrap of the elastic, pull the braid only halfway through to create a loop with a beautiful fishtail texture.
7. The Pull-Through Braid Loop: Create a series of small ponytails down the center of your half-up section. Split each ponytail and connect it to the next, but gently pull each section to create soft, braid-like loops between the elastics. This creates a stunning, dimensional ladder effect.
8. The Side-Swept Rope Loop: On one side of your head, create a rope twist from the hairline back towards the ear. Secure it, then gently pull apart the twist to loosen it into a wide, loopy braid. Sweep it across the crown and pin it on the opposite side, allowing the end to blend into your down hair.

Section 3: Knotted and Wrapped Designs (Artistic Flair)
Knots are a quick way to create instant loops and interesting shapes. They look incredibly artistic but are deceptively simple to execute.
9. The Double Knot Infinity Loop: Take two front sections. Tie them together once in a simple overhand knot. Then, before tightening the second knot, pull the loops wide and large, creating an “infinity” or figure-eight shape. Secure the ends underneath with pins.
10. The Wrapped Knot Bun: Create a half-up ponytail. Twist the ponytail into a rope and wrap it around the base to form a bun. Instead of tucking the end under, tie it in a loose knot on top of the bun, letting the ends stick out to create a looped, messy-chic finish.
11. The Sidewinder Wrap Loop: Take a front section and begin twisting it back. As you twist, wrap the strand around two fingers to create a loop, then pin that loop to your head. Continue twisting and wrapping new loops, pinning them in a winding path towards the back of your ear.
12. The Celtic Knot Inspired Loop: This looks ultra-complex but is just strategic overlapping. Create two twists from opposite sides of your head. Cross them over each other at the back, then bring the ends around and tuck them through the “windows” created by the cross, pinning securely to form an interlaced, knotted look.
Section 4: Voluminous and Textured Loops (For Maximum Impact)
These techniques focus on creating height, volume, and a touch of romantic drama. They’re perfect for special events.
13. The Teased Pouf Loop: Backcomb the crown section of your half-up hair lightly for volume. Smooth the top layer over the teasing, then gather it into a half-up style. Before securing the final elastic pull, pull the hair only partially through to create a large, voluminous loop that sits like a soft pouf.
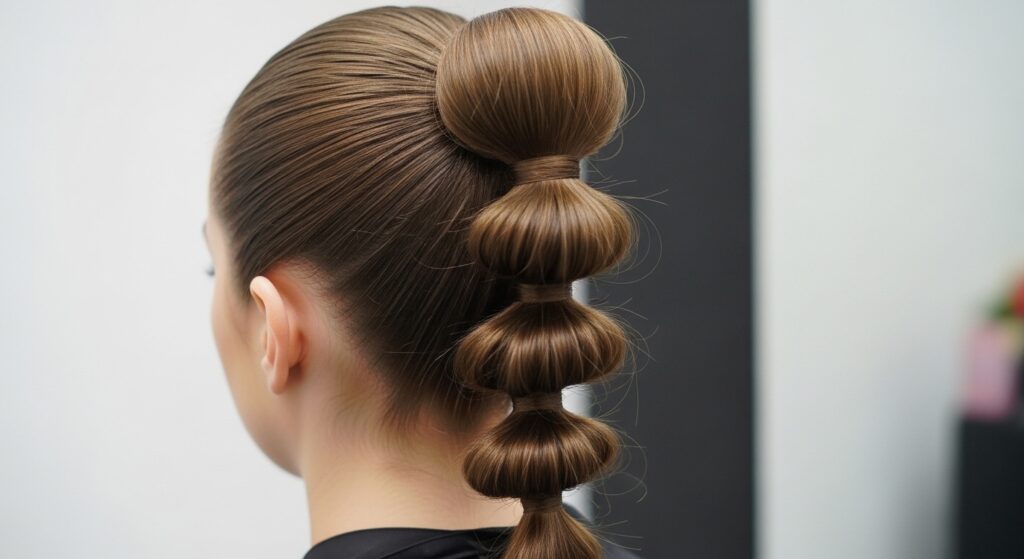
14. The Bubble Loop Ponytail: Create a high half-up ponytail. Place several elastics down the length of the ponytail at even intervals. Gently pull and tug on the hair between each elastic to create large, rounded “bubbles” or loops. This is playful, modern, and full of texture.
15. The Gibson Tuck Variation: Create a deep half-up section. Twist it loosely and form a large, horizontal loop at the back of your head, tucking the ends under and pinning them. This creates a beautiful, voluminous roll or loop that sits like a headband. Pull out a few face-framing pieces for softness.
16. The Criss-Cross Volumized Loop: Take two large front sections. Cross them over each other at the back of your head, pinning to create lift at the crown. Then, take the ends of each section and loop them under, pinning them to form two interlocking loops. This style gives incredible height and structure.
Section 5: Elegant and Elaborate Updos (Advanced Illusion)
These are your show-stoppers. They look like they belong on a red carpet but are built by combining the simpler techniques above.
17. The Laced Loop Updo: Start with a Dutch braid on one side, feeding in hair until you reach the nape. On the other side, create a simple twist. Cross and “lace” the twist through the segments of the Dutch braid, pinning as you go, to create an intertwined, looped effect that looks like elaborate lacework.
18. The Triple Loop Infinity Bun: Create three separate half-up loops (using the Hidden Elastic method) stacked vertically down the back of your head. Then, take the remaining down hair and all the loop ends, twist them together, and wrap them around the base of the loops to form a bun, seamlessly integrating the loops into a stunning, complex-looking updo.
Pro Tips for Making Your Loops Last All Day
Creating the loop is only half the battle; keeping it pristine is the other. First, always cross your bobby pins. Pinning two pins in an “X” formation provides ten times the grip of one pin. Second, for fine hair, use a texture spray or dry shampoo at the roots before styling to give the pins something to hold onto.
If a loop feels flat, gently tug on the sides of the twist or braid after it’s secured to plump it up. Finally, use a light-hold, flexible hairspray. Spray from a distance, focusing on the pinned areas, to lock in the style without making it stiff or crunchy. A single well-placed pin hidden under a loop is always better than five visible ones.
Conclusion: Embrace the Art of the Loop
The world of half-up loops is all about creativity and illusion. As you’ve seen, what appears to be a complex, unattainable hairstyle is often just a twist, a knot, or a braid pinned in a clever way. The key is to start with the simpler techniques and build your confidence. Don’t be afraid to practice, pull things apart, and try again. Hair is forgiving, and these styles are meant to have a slightly soft, romantic feel—so a little imperfection only adds to the charm.
So, grab your pins and elastics, choose your first technique, and start looping. You have 18 new ways to transform your everyday hair into something extraordinary. Remember, the goal isn’t perfection; it’s creating a beautiful, intricate-looking style that makes you feel confident and polished. Now, go create some hair magic!