22 T-Shirt Curl Methods That Reduce Frizz Dramatically
If you have curly hair, you’re intimately familiar with the eternal battle against frizz. Humidity, friction from towels, and even well-meaning styling techniques can leave your curls looking more like a puffball than perfect ringlets. But what if the secret to smooth, defined, and happy curls was already sitting in your dresser drawer? Enter the humble T-shirt.

The Foundation: Why a T-Shirt Beats a Towel Every Time
Before we dive into the methods, let’s understand the why. Terry cloth towels are designed for maximum absorbency on your skin, but their textured surface is a nightmare for delicate curl patterns. Those tiny loops catch and lift the hair cuticle—the outer layer of your hair shaft. When the cuticle is raised, moisture escapes unevenly, and the hair becomes prone to frizz and breakage. A cotton T-shirt, with its smoother surface, allows water to be gently absorbed without roughing up the cuticle. This means your hair dries with its natural pattern intact, leading to smoother, shinier, and more defined curls with significantly less frizz.

Section 1: Post-Wash Drying & Plopping Techniques
These methods are for your immediate post-shower routine, focusing on removing water and encouraging curl formation with minimal disturbance.
1. The Classic Microfiber Alternative: Simply use a clean, dry T-shirt to scrunch water out of your hair. Lean forward, place the shirt under your hair, and scrunch upwards gently.
2. The Basic Plop: Lay a T-shirt flat on a surface. With your hair flipped forward, lower the center of the shirt onto the back of your head. Wrap the sides around and tie the sleeves in front.
3. The Long-Hair Plop: Use a long-sleeved shirt for extra fabric. Follow the basic plop method but use the sleeves to fully envelop longer, thicker hair.
4. The Twisted Crown Plop: After the basic plop, twist the remaining fabric at the top into a loose, soft bun on your crown to secure it without a tight knot.
5. The “Shingle & Plop”: Apply your stylers to very wet hair, gently shingling a few sections for definition, then immediately plop to set the pattern.

Section 2: Styling & Defining Methods
Go beyond drying and use your T-shirt as an active styling tool to enhance definition and clump your curls.
6. T-Shirt Scrunching: After applying gel or cream, use the T-shirt to scrunch your curls. This removes excess product and water while encouraging curl formation without stickiness.
7. The “Pulse Scrunch”: Hold a section of hair in the T-shirt at the ends and gently pulse your hands upward towards your scalp to encourage tight curl formation.
8. The Root Lift Technique: Once hair is partially dry, place the T-shirt under the roots at the crown and lift gently for volume without frizz.
9. Curl Clamping: For individual wonky curls, wrap the strand in a small section of the T-shirt and hold for 30 seconds to reshape it.
10. The Smoothing Glide: For wavy or looser curl patterns, gently glide the T-shirt down sections of hair from root to tip to smooth the cuticle.

Section 3: Overnight & Protective Styling
Protect your curls while you sleep and wake up with refreshed, frizz-free hair.
11. The Pineapple Pouch: Put your hair in a loose, high pineapple ponytail. Drape a T-shirt over the pineapple, letting the ponytail rest in the body of the shirt, and tie the sleeves loosely underneath.
12. The Buff-Style Wrap: Cut the torso of a shirt into a large tube (a DIY hair buff). Slip it over your head and pull your hair through from the bottom, then roll it up to your hairline.
13. The Medusa Wrap: Section damp hair into 3-4 loose twists. Wrap each twist with a strip of T-shirt fabric to protect them overnight.
14. The Satin-Lined Hood: Place a satin scarf over your hair, then use a T-shirt tied around your head to create a soft hood that keeps the scarf in place.

Section 4: Refresh & Revive Techniques
Breathe new life into day 2, 3, or 4 curls without starting from scratch.
15. The Steam Refresh: Hang a damp T-shirt in the bathroom while you shower. Use the warm, damp shirt to gently scrunch and revive curls with the steam.
16. The Targeted Dampen: Dampen a small corner of a T-shirt with water or a refresh spray and use it to re-scrunch only the frizzy sections.
17. The Product Redistribution: Use a slightly damp T-shirt to scrunch hair that has leftover product. This can reactivate stylers and smooth new frizz.
18. The Frizz Spot Treatment: For a single frizzy area, wrap the section in a piece of T-shirt, hold for a minute, and release.

Section 5: Advanced & Creative Methods
For those ready to experiment further for impeccable results.
19. The “Shirt-Diffusing” Method: Place a T-shirt over your hand and use it as a barrier between your hair and the diffuser. This disperses airflow even more gently.
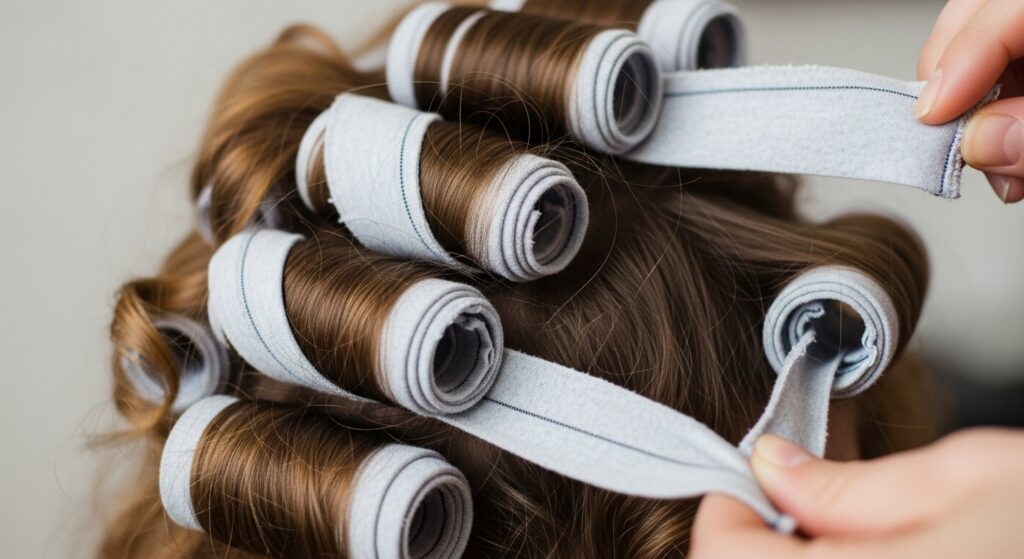
20. The T-Shirt Roller Set: Cut a T-shirt into long strips. Roll damp hair sections around them and tie the ends to create soft, fabric-covered curl rollers.
21. The Hybrid Plop-Diffuse: Plop for 15-20 minutes to remove excess water, then use the “shirt-diffusing” method to finish drying for maximum volume and minimum frizz.
22. The Cuticle Sealer: Once hair is 100% dry, take a completely dry T-shirt and gently smooth it over the surface of your hair in a downward motion to seal the cuticle for ultimate shine.
Your Frizz-Free Curl Journey Starts Now
Transforming your curl care routine doesn’t require expensive tools or complex rituals. As these 22 T-shirt curl methods prove, sometimes the most effective solutions are the simplest. By embracing the gentle power of a T-shirt, you’re choosing to work with your hair’s natural texture, not against it. You’ll reduce mechanical damage, lock in moisture effectively, and say goodbye to a significant portion of the frizz that’s been holding your curls back.
Start by swapping your towel for a T-shirt next wash day. Master the plop. Experiment with a refresh technique. Each step is a move toward healthier, happier, and dramatically less frizzy curls. Your perfect T-shirt and your perfect curls are waiting.