Finger Waves Tutorial: Art Deco Elegance Step-by-Step
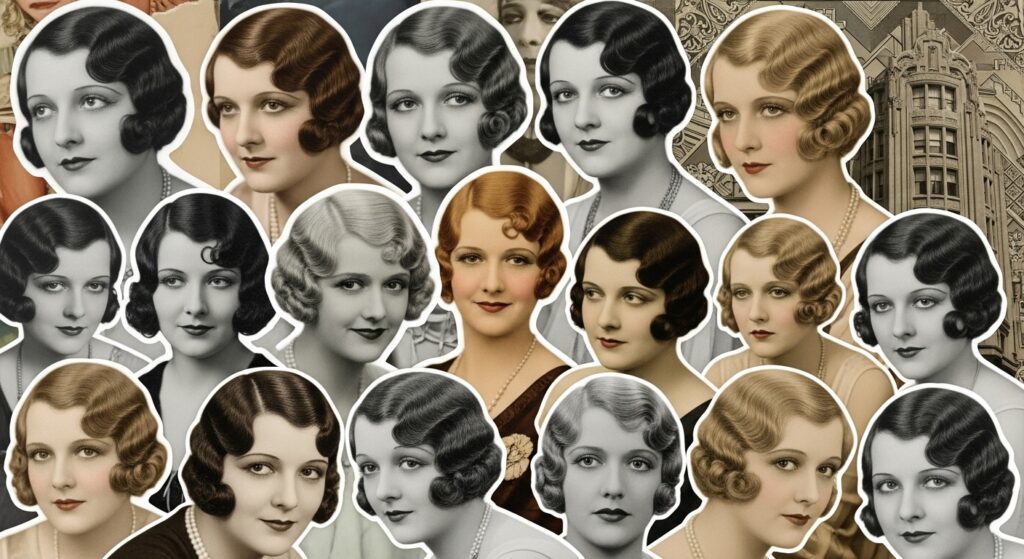
Close your eyes and imagine the roaring 1920s. The sound of jazz fills the air, flapper dresses swish across dance floors, and an air of rebellious elegance defines the era. At the heart of this iconic style? The finger wave hairstyle. More than just a vintage look, finger waves are a testament to the artistry of hairstyling, a sculptural masterpiece that frames the face with soft, S-shaped undulations.
Once the signature of silver screen sirens like Josephine Baker and Jean Harlow, this Art Deco-inspired look has made a triumphant return to modern red carpets and fashion editorials. It whispers of old Hollywood glamour while shouting modern confidence. But let’s be honest, achieving those perfect, glossy waves can seem like a daunting task reserved for professional stylists.
Fear not! This comprehensive finger waves tutorial is designed to demystify the process. We will guide you through every step, from prepping your hair to setting the final hold, so you can recreate this timeless elegance right at home. Get ready to channel your inner flapper and master the art of the wave.
The Allure of the Wave: A Brief History
Before we dive into the how-to, it’s fascinating to understand the why. Finger waves emerged in the 1920s, a decade defined by social and cultural revolution. Women were cutting their hair short into bobs as a symbol of liberation, moving away from the long, restrictive styles of the Victorian era. But short hair needed new forms of expression.
Enter the finger wave. This style was the perfect complement to the sleek, geometric lines of the Art Deco movement that influenced architecture, fashion, and design. The waves themselves are like ocean currents frozen in time, a harmonious blend of organic form and precise structure. They were a way for women to maintain a sense of sophistication and artistry with their new, shorter locks.
The style required skill and patience, often created using waving irons or, as the name implies, just the fingers and a good setting lotion. Today, we have more advanced tools at our disposal, but the fundamental technique remains a beautiful, hands-on art form. Mastering it connects you to a rich history of beauty and self-expression.
Gathering Your Tools: The Finger Wave Toolkit
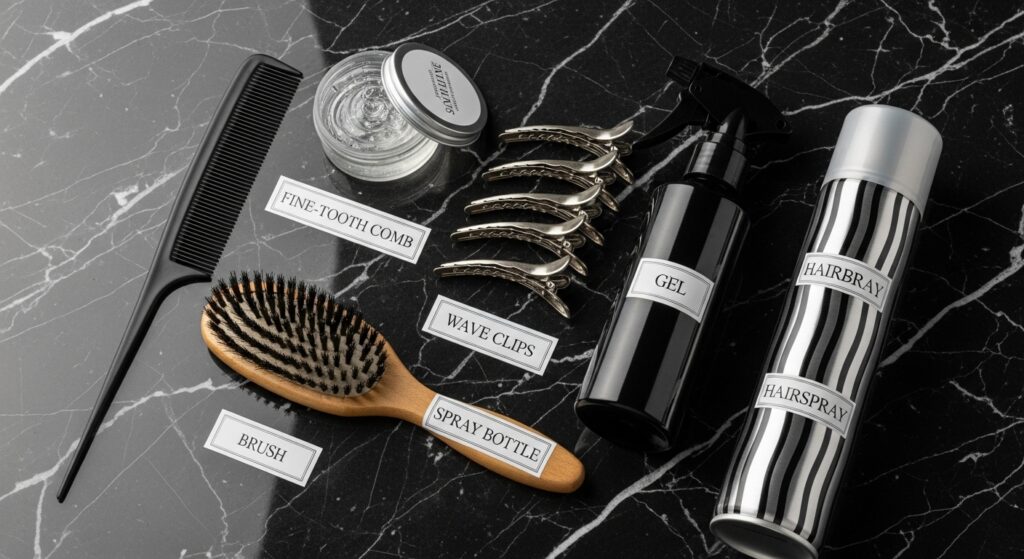
Just like any artist, you need the right tools to create your masterpiece. Trying to create finger waves without the proper supplies is a recipe for frustration. Here’s what you’ll need to assemble before you begin:
A Fine-Tooth Comb: This is non-negotiable. You need a comb with very fine, closely spaced teeth to create clean, sharp parts and to guide the hair into precise waves. A wide-tooth comb simply won’t give you the control required.
Strong-Hold Gel or Setting Lotion: For modern finger waves, a strong-hold, alcohol-free gel is your best friend. Look for one that provides a firm hold without flaking. Traditional setting lotion also works wonderfully and gives that authentic vintage finish. You’ll need something that can keep the hair in place as you work.
A Small Boar Bristle Brush or Denman Brush: This is used for smoothing the hair into place before you start waving and for blending sections seamlessly.
Wave Clips (or Duckbill Clips): These are the secret weapon. While any small clips can work in a pinch, professional wave clips are designed to pinch the wave perfectly without leaving creases. Duckbill clips are a great and widely available alternative.
A Spray Bottle with Water: Your hair needs to be damp to work with, not soaking wet. A spray bottle allows you to maintain the perfect level of moisture throughout the styling process.
Hairspray with Maximum Hold: Once your waves are set, you need a final blast of hairspray to lock them in place for hours on end.
Optional but Helpful: A Curling Iron (with a clamp): For beginners or those with stubborn hair, using a curling iron to set the waves after clipping can provide extra insurance for a long-lasting style.
Prepping the Canvas: Getting Your Hair Ready
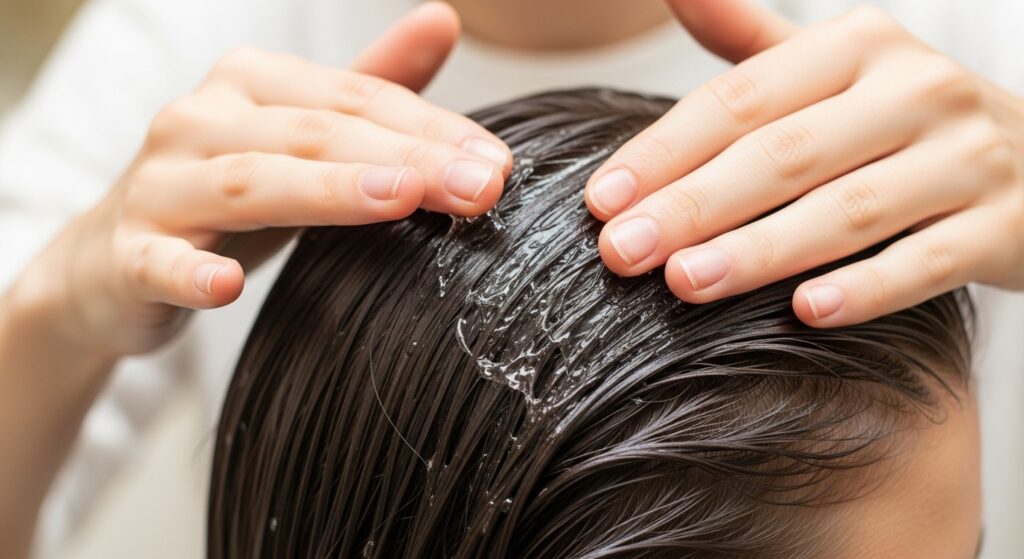
Preparation is 90% of the success when it comes to finger waves. You cannot create this style on dry, unconditioned, or freshly washed hair. The ideal base is hair that was washed the day before or has some natural texture and oil to provide grip.
Start by ensuring your hair is thoroughly dampened with your spray bottle. It should be wet enough to be pliable but not so wet that water is dripping. Next, apply your gel or setting lotion evenly throughout the hair. Use your comb to distribute the product from roots to ends, ensuring every strand is coated. This product will provide the hold and definition for your waves.
Then, using your boar bristle or Denman brush, smooth your hair back away from your face. You want a sleek, flat base to work on. If you have any bumps or lumps at this stage, smooth them out. The back of your hair can be styled into a simple, sleek chignon or left down, but the focus for the finger waving will be on the top and side sections.
Pro Tip: If your hair is very slippery or fine, applying a light-hold mousse before the gel can add extra texture and grip, making the waves easier to form and hold.
The Step-by-Step Finger Waves Tutorial
Now for the main event. Take a deep breath, be patient with yourself, and let’s create some waves. We’ll focus on the classic style across the top of the head.
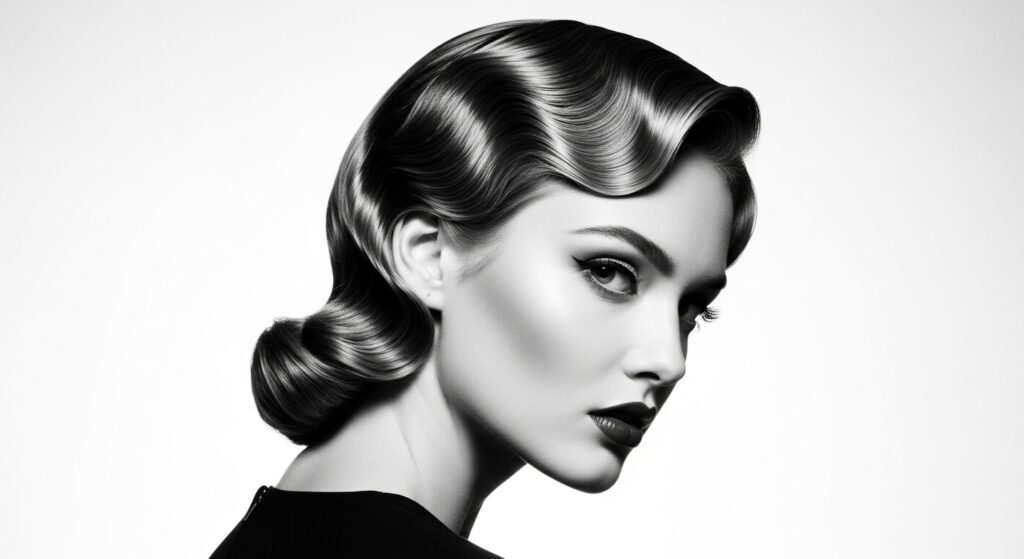
Step 1: Create Your First Ridge. On one side of your head, take a horizontal section of hair at the front, about two inches back from your hairline. Using the fine-tooth comb, comb the section straight down over your forehead. Now, with the index and middle finger of your non-dominant hand, press down on the hair about an inch from the scalp, creating a “C” shape curve facing downwards. This is the base of your first wave.
Step 2: Form the First Wave. While holding that curve with your fingers, take the tail of the comb and place it just above your fingers. Gently push the hair up and over your fingers to create the crest of the wave. You are essentially creating an “S” shape. The part of the hair above your fingers will become the peak, and the part below is the trough.
Step 3: Pin the Wave in Place. This is where the clips come in. Carefully slide a wave clip or duckbill clip over the crest of the wave you just formed, pinching it firmly against your scalp. The clip should hold the wave’s shape securely. Remove your fingers. You should see a clear, defined ridge.
Step 4: Move Back and Repeat. Directly behind the first clip, take another horizontal section of hair, incorporating the ends from the first section. Repeat the process: comb the hair down, press with your fingers to create the downward “C,” and use the comb to push the hair up and over to form the next crest. Clip it in place. You are now building a sequence of waves.
Step 5: Create the Opposite Wave. Once you have two or three waves going back on one side, it’s time to start the pattern on the other side of your head. The goal is symmetry. Repeat the exact same process on the opposite side, mirroring the wave pattern. The crests on one side should align with the troughs on the other, creating a continuous, flowing pattern across your head.
Step 6: Connect the Waves. As you work towards the crown, the sections from both sides will meet. Use your comb to blend them seamlessly, ensuring the wave pattern continues without a harsh part in the middle. You may need to use smaller clips here to hold the connection points.
Step 7: Let it Set (or Heat Set). Once all your waves are clipped in place, you have two options. For the most authentic and firm hold, let your hair air dry completely. This could take a while. For a faster and often more resilient set, use a blow dryer on a low, cool setting to dry the hair thoroughly with the clips in. For an even stronger set, you can carefully go over each pinned wave with a curling iron, heating the shape while it’s still clipped.
Step 8: The Grand Reveal. Once your hair is completely dry and cool to the touch, it’s time for the magic moment. Gently and slowly remove each clip, starting from the back. Try not to shake or tousle your hair.
Step 9: Lock it In. Do not run your fingers through your hair! Instead, take your maximum-hold hairspray and give your entire style a generous mist, holding the can about 10 inches away. This will seal the waves and fight off any humidity that might try to ruin your hard work.

Troubleshooting Common Finger Wave Challenges
Your first attempt might not be perfect, and that’s okay! Here are solutions to common problems:
Problem: The waves are frizzy and not defined.
Solution: This usually means your hair wasn’t damp enough or you didn’t use enough product. Ensure every strand is coated with gel and that the hair is uniformly damp (not dry in spots) before you start.
Problem: The waves fall out as soon as I remove the clips.
Solution: The hair wasn’t completely dry. Patience is key. Make absolutely sure your hair is 100% dry before removing the clips. Using a blow dryer or curling iron to heat-set can make a world of difference.
Problem: I can’t get the waves to be symmetrical.
Solution: Use a mirror and constantly check both sides as you work. Start with smaller sections until you get the hang of it. Remember, practice makes perfect. Don’t get discouraged.
Problem: The clips are leaving dents or the style looks “overworked.”
Solution: Be gentle when applying and removing clips. Once the clips are out and the hairspray is applied, you can use the very tip of a tail comb to gently lift and loosen any areas that look too flat or dented.

Styling Your Finger Waves: From Day to Night
The classic finger wave is stunning on its own, but you can adapt it to suit any occasion. For a soft, daytime look, after setting the waves, gently loosen them with your fingers (without completely breaking them apart) for a more romantic, less severe effect.
For ultimate vintage glamour, pair your waves with a deep side part and a bold red lip. Tuck one side behind your ear and add a dazzling Art Deco hairpin or a fresh flower for a touch of flapper authenticity.
You can also incorporate finger waves into modern hairstyles. Try creating just a few waves at the front of an otherwise down-styled bob, or use the technique to create a stunning, textured wave pattern on one side of a sleek ponytail or updo. The contrast between the structured waves and a loose style is incredibly fashionable.
Finger waves are a versatile and powerful style. They are a celebration of hair as an art form, a nod to history, and a bold fashion statement all in one. With this guide, a bit of practice, and a lot of hairspray, you are well on your way to mastering this iconic look. So go ahead, get waving, and let the glamour of a bygone era inspire your next beautiful hairstyle.