
21 Feed-In Braid Techniques for Natural-Looking Edges
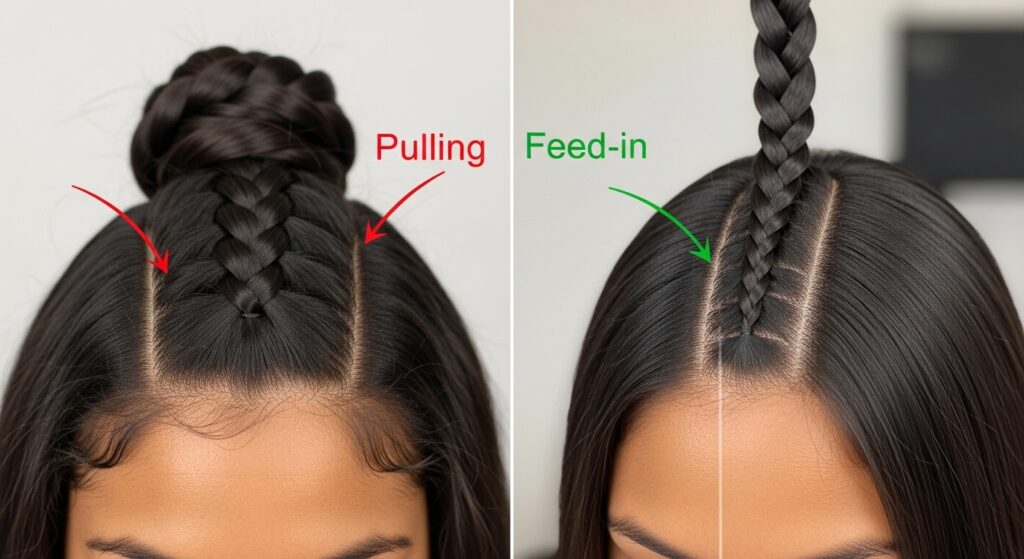
If you’ve ever winced at the sight of a braid style that starts too thick, pulls too tightly, or leaves your precious edges exposed and stressed, you understand the struggle. The quest for a protective style that looks natural, feels comfortable, and preserves your hairline is real. Enter the feed-in braiding technique, the game-changing method that has revolutionized how we approach braids, cornrows, and twists. Unlike traditional braiding that starts with a large chunk of hair, feed-in braiding gradually adds hair, creating a seamless, tapered look that mimics natural hair growth and offers unparalleled gentleness on your edges.
What Are Feed-In Braids and Why Do Edges Matter?
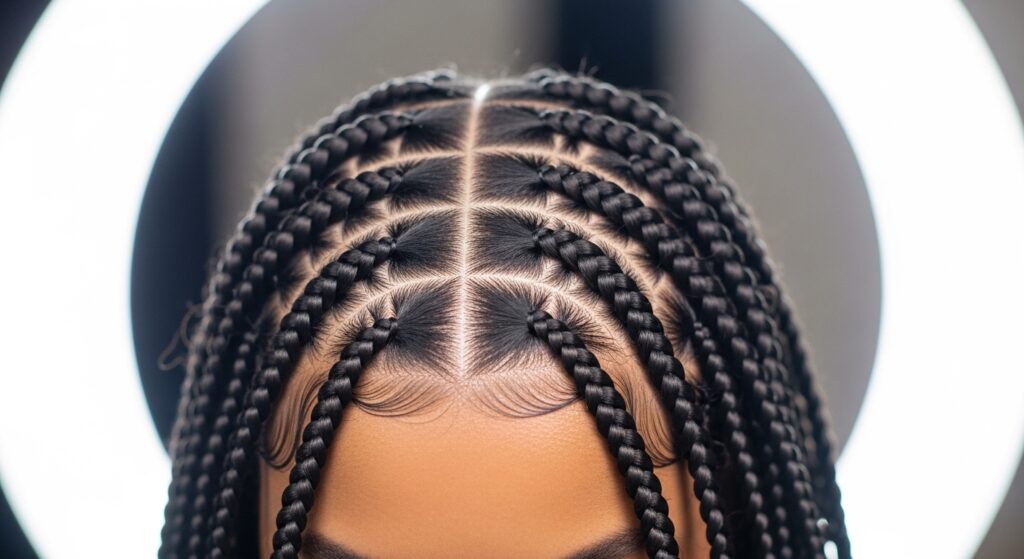
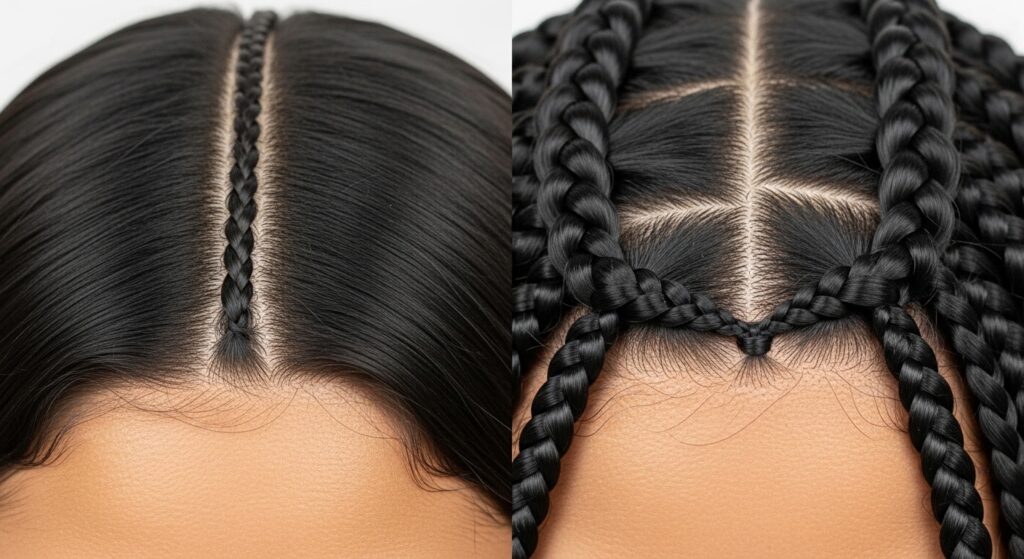
At its core, the feed-in technique is a braiding method where you start with a small section of natural hair and gradually “feed” in additional braiding hair as you plait. This creates a gradual increase in volume, avoiding the bulky, heavy start of a traditional braid. The result? A braid that appears to grow directly from your scalp, with a thin, natural-looking beginning that blends perfectly with your edges.
Why is this so crucial for edges? Your edges, or the hair around your temples and forehead, are often the most fragile. They are susceptible to breakage from tension, weight, and constant manipulation. A poorly installed braid that starts too thick or is pulled too tight can cause traction alopecia. The feed-in method distributes weight and tension evenly, significantly reducing stress on the hair follicle. It’s not just a styling choice; it’s a protective strategy for long-term hair health.
The Foundation: Mastering the Basic Feed-In Technique
Before exploring the 21 styles, you must understand the basic mechanics. The classic feed-in is the building block for everything else.
Step 1: Section and Part. Create a clean, small triangular or rectangular section at the hairline where you want the braid to begin.
Step 2: Start with Natural Hair. Take a very small subsection of your natural hair within that section. Divide it into three strands.
Step 3: The First Feed. Braid one stitch (a cross-over). Before the second stitch, pick up a small piece of braiding hair and add it to the strand that is about to be crossed over. Combine it with your natural hair strand.
Step 4: Continue Feeding. Repeat this process, adding small amounts of braiding hair to two of the three strands with every stitch or every other stitch, depending on the desired thickness gradient. The key is small, incremental additions.
Step 5: Secure and Continue. Once you’ve fed in enough hair to reach the desired full thickness, continue braiding normally to the ends.

21 Feed-In Braid Techniques for Every Style
Now, let’s apply the foundational technique to a world of beautiful styles. These techniques vary in pattern, direction, and braid type, but all prioritize your edges.
For Classic & Timeless Looks
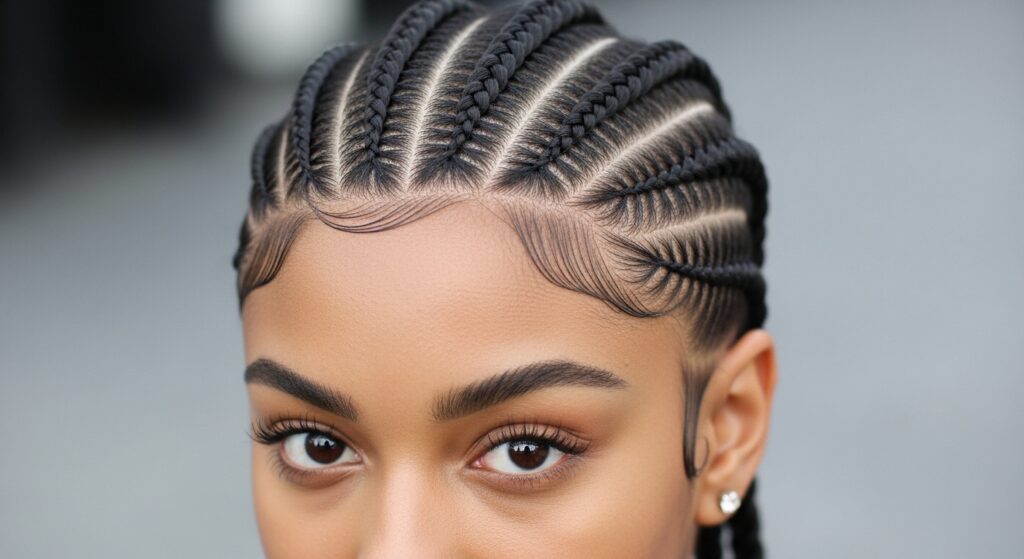
1. The Classic Feed-In Cornrow: The staple. Straight-back cornrows using the feed-in method for a sleek, professional look.
2. Curved Feed-In Cornrows: Cornrows that follow the curve of your head, perfect for creating circular patterns or framing the face.
3. Feed-In Triangle Parts: Using triangle-shaped parts at the scalp for a geometric, eye-catching start to your cornrows.
4. Feed-In With a Deep Side Part: A dramatic side part with feed-in braids cascading down one side, elegant and sophisticated.
For Bold & Creative Statements
5. Feed-In Goddess Braids: Larger, singular cornrows (often 5-7 total) done with the feed-in technique for a bold yet natural regal look.
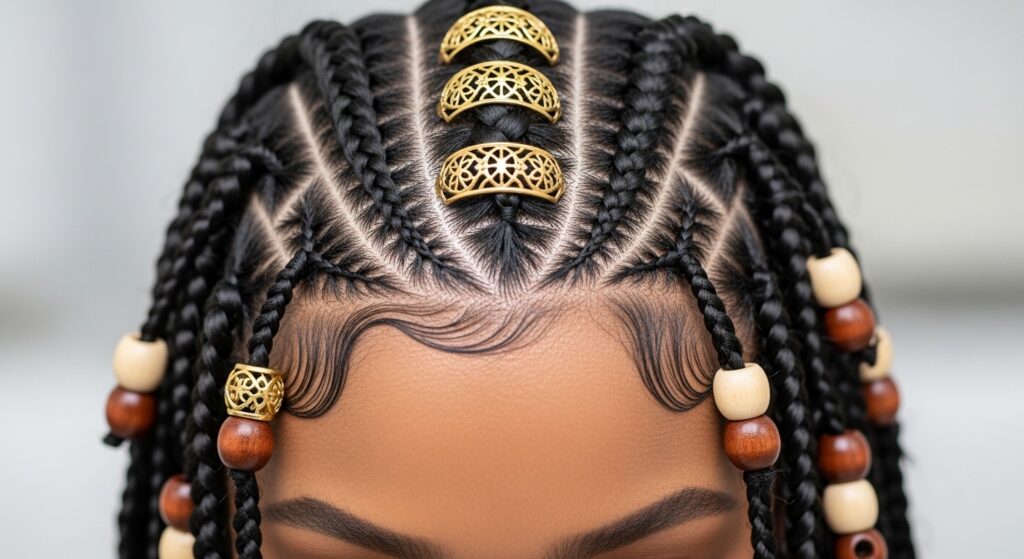
6. Feed-In Into Fulani Braids: Incorporating the signature elements of Fulani braids—like a central cornrow, decorative beads, and shell accents—with a gentle feed-in start.
7. Feed-In Ladder Braids (Track Braids): Creating the illusion of “rungs” on a ladder by leaving small gaps of scalp between sections of feed-in braids.
8. Feed-In Butterfly Braids: Combining the feed-in start with the trendy, layered butterfly loc technique for a voluminous, textured effect.
For Length & Volume Illusions
9. Feed-In With Knotless Braids: The ultimate for a natural look. This technique uses the feed-in method without the traditional knot, creating an even more seamless transition from scalp to braid.
10. Feed-In Passion Twists: Applying the feed-in technique to soft, bouncy passion twists for a lightweight, romantic style with protected edges.
11. Feed-In Spring Twists: Similar to passion twists but with a tighter, spring-like coil. The feed-in method prevents heaviness at the root.
12. Feed-In With Human Hair: Using human braiding hair for the feed-in process allows for seamless blending, especially if the color matches your natural hair, and enables styling with heat.
For Intricate Patterns & Artistry
13. Feed-In Into a Mohawk Pattern: Braiding the sides with feed-in cornrows that converge into a majestic mohawk of braids or twists down the center.
14. Feed-In Circular Crown Braid: Creating a crown braid that starts at the hairline with feed-in braids that circle the head.
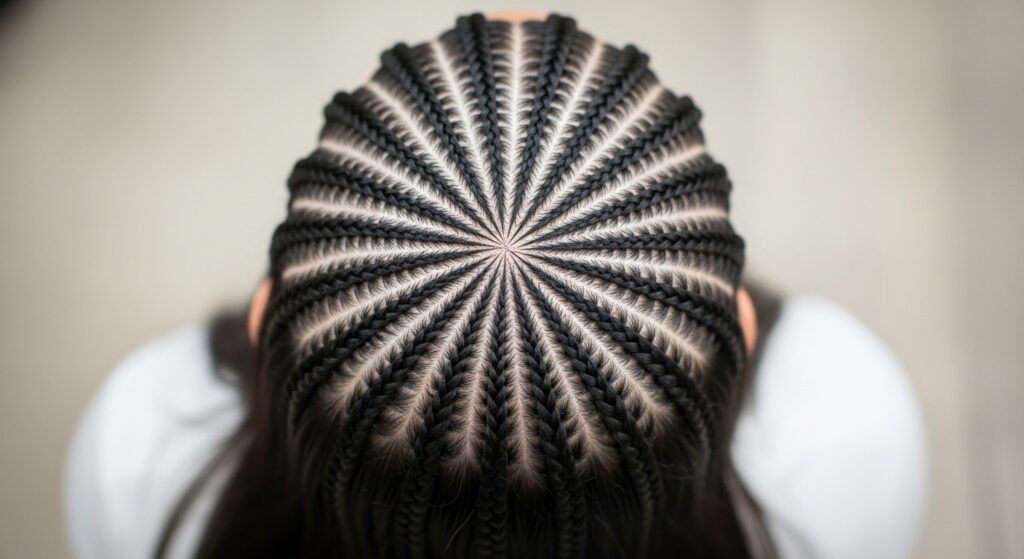
15. Feed-In Star Pattern: A complex, beautiful pattern where cornrows radiate out from a central point on the crown, all started with the feed-in method.
16. Feed-In Basketweave Pattern: Cornrows woven in a criss-cross, basket-like pattern. The feed-in technique is essential to keep the intricate parts tension-free.
For Short Hair & TWA Protection
17. Feed-In Micro Braids on Short Hair: Demonstrating that short hair can be braided. Using the feed-in method with very small braiding hair to attach braids to a TWA without excessive tension.
18. Feed-In Frontals with Cornrowed Back: Creating a protective style where the front hairline is done with ultra-fine feed-in cornrows that blend into a frontal or leave-out, while the back is in larger cornrows.
19. Feed-In Faux Hawk for Short Hair: A bold, raised style on the top of the head, with the sides done in very flat feed-in cornrows to accentuate the shape.

For the Ultimate Edge Focus
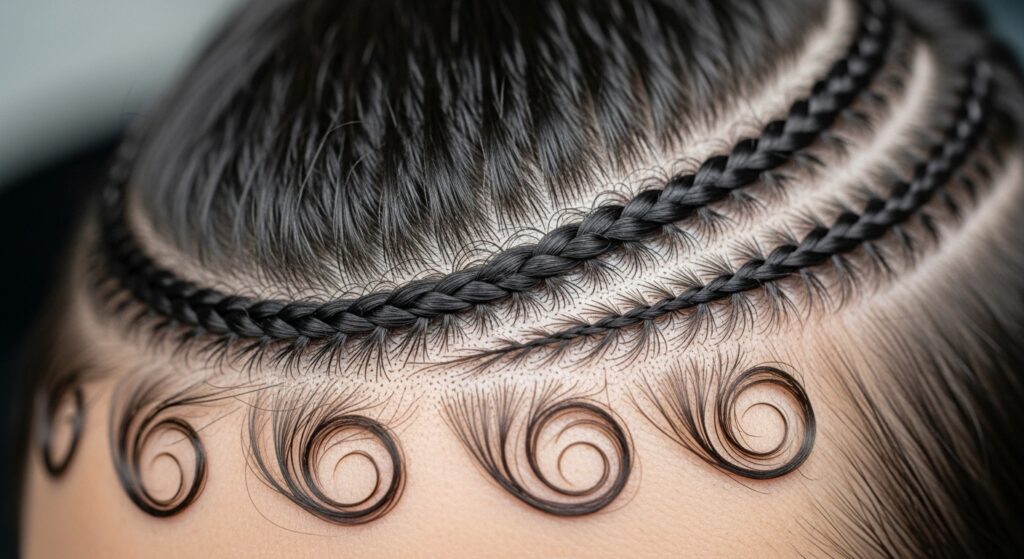
20. The Baby Hair Feed-In: Specifically designing the first 1-2 inches of the braid with extremely fine feeds to create the illusion of baby hairs, which are then styled with gel.
21. Feed-In with Leave-Out Blending: Strategically leaving out tiny sections of your natural hair at the parting during the feed-in process. This leave-out is then curled or flattened to blend over the braid start, making it utterly undetectable.
Pro Tips for Flawless, Healthy Edges with Feed-Ins
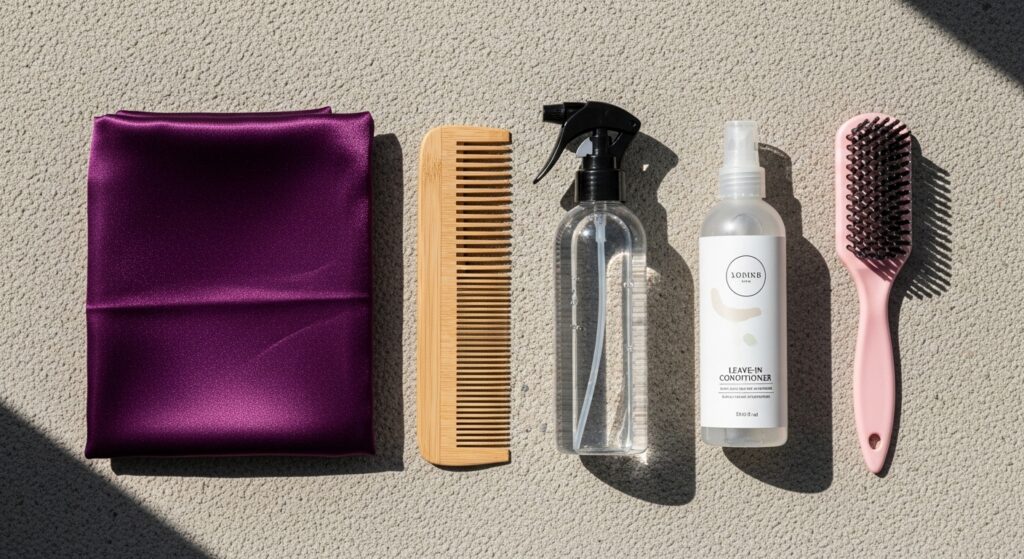
1. Moisturize and Prep: Always start on clean, deeply conditioned hair. Apply a lightweight leave-in conditioner and a small amount of edge control or gel only to the hair being braided, not the scalp.
2. Tension is the Enemy: The braid should be snug enough to lie flat but never cause pain, redness, or bumps. If it hurts, it’s too tight.
3. Size Matters: For the most natural look, the initial piece of natural hair should be no thicker than a dental floss strand. The first few feeds of braiding hair should be equally thin.
4. Nighttime Care: Protect your style and edges by sleeping on a satin or silk pillowcase and wearing a satin bonnet or scarf. Gently tie down edges with a satin scarf if needed.
5. Listen to Your Scalp: If you experience itching or soreness after a few days, it’s a sign of tension. Don’t suffer through it. Consider taking the style down to prevent damage.
Conclusion: Embrace Your Style, Protect Your Crown
The beauty of feed-in braid techniques lies in their perfect marriage of aesthetics and hair health. You no longer have to choose between a stunning style and the well-being of your edges. With these 21 techniques in your arsenal, you have the freedom to express yourself creatively while giving your natural hair the gentle protection it deserves.
Remember, mastery takes practice. Start with the basic cornrow, be patient with your hands, and prioritize gentle tension above all else. Your edges will thank you for years to come, and you’ll enjoy every head-turning, natural-looking style you create. Now, go forth and braid with confidence!