Trends 30 Dainty Chain Links Weaving Through Protective Braids
Okay, let’s be real. We all love a good protective style, but sometimes you just want to feel a little extra. A little more *you* while your natural hair gets a break. That’s where the magic of tiny chain links comes in.
This isn’t about heavy, clunky jewelry. It’s about delicate, dainty chains woven right into your braids, adding a whisper of shine and a whole lot of personality. It’s the perfect bridge between laid-back and luxe.
And the best part? It’s surprisingly simple to do. Whether you’re rocking box braids, cornrows, or twists, I’ve got everything you need to know. Let’s dive into how this tiny trend can totally transform your look.
Why Dainty Chains Are a Game-Changer
First off, this trend is all about subtlety. Unlike chunky hair cuffs, these thin chains blend seamlessly with your hair. They catch the light just enough to make people look twice.
It’s a form of quiet luxury for your hair. You’re not screaming for attention, but you’ve definitely got that polished, intentional vibe. It works for everything from a casual day out to a fancy event.
- Adds personal style without removing your protective style.
- Incredibly lightweight so it won’t weigh your braids down.
- Versatile – you can go for a single chain or a whole cascade.
What You’ll Need to Get Started
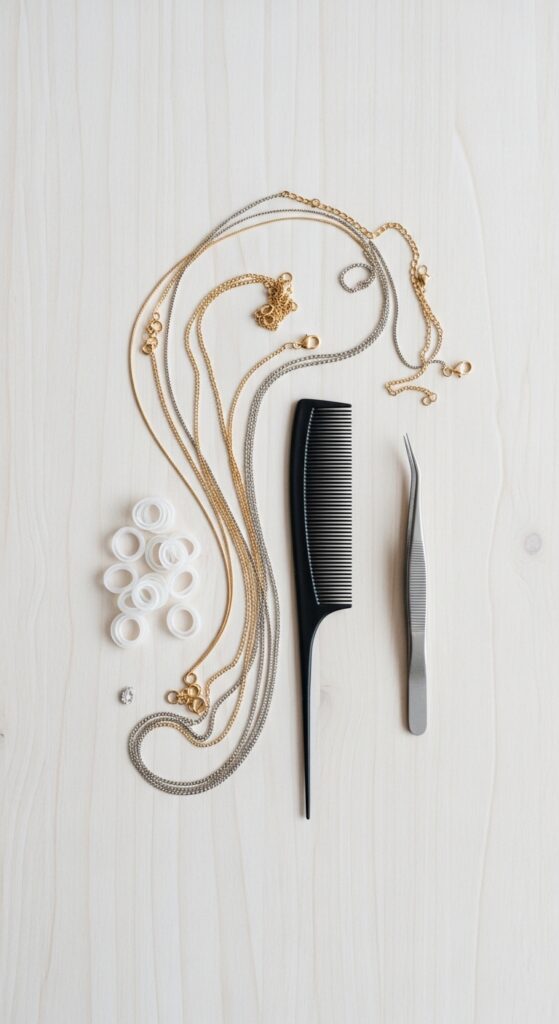
You don’t need much! The key is finding the right chains. Look for ones that are thin, lightweight, and preferably with small links. You can find these at craft stores or online.
You’ll also want a tail comb for precise sectioning and some tiny, clear hair elastics. A pair of tweezers can be a huge help for threading the chain through. That’s honestly the core of your toolkit.
- Dainty chains (gold, silver, or rose gold).
- Clear mini hair elastics.
- A tail comb for parting.
- Tweezers or a small bobby pin to help thread.
Prepping Your Braids for Chains
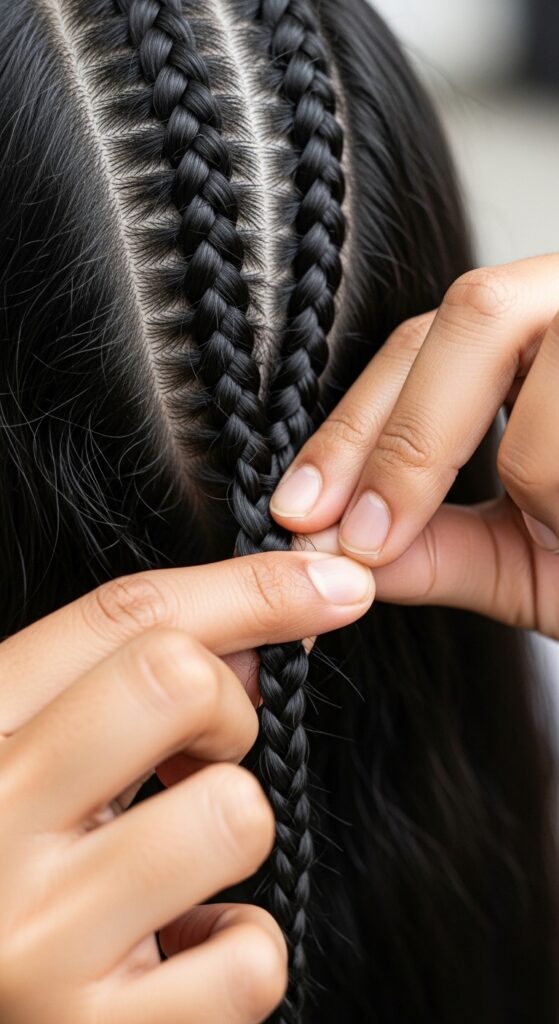
Start with clean, dry braids. If your braids are fresh, make sure they’re completely dry before you start adding any metal. This helps prevent any moisture getting trapped.
Take a moment to plan your design. Do you want chains on every braid? Just a few? Mapping it out in your head first saves time. Gently smooth the braid you’re working on so it’s neat.
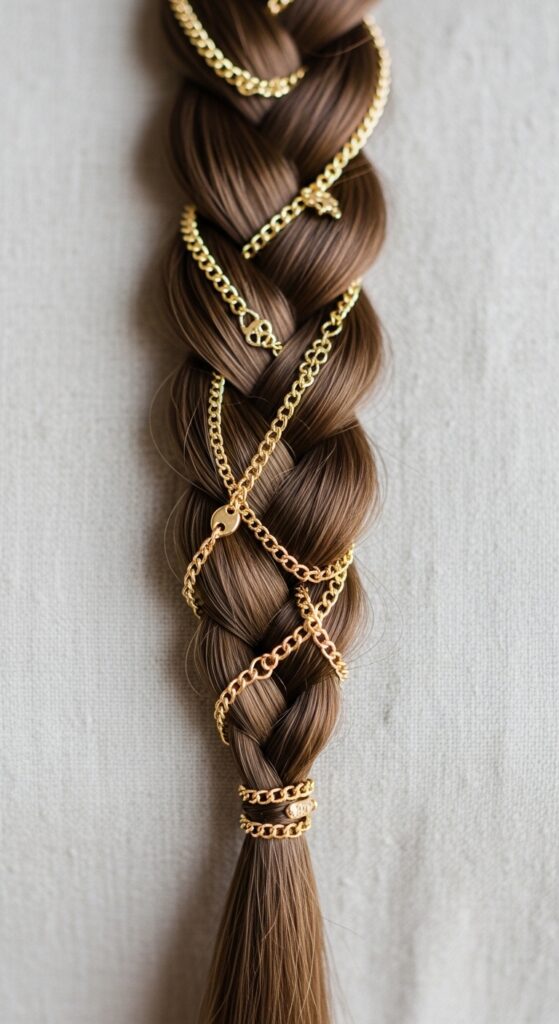
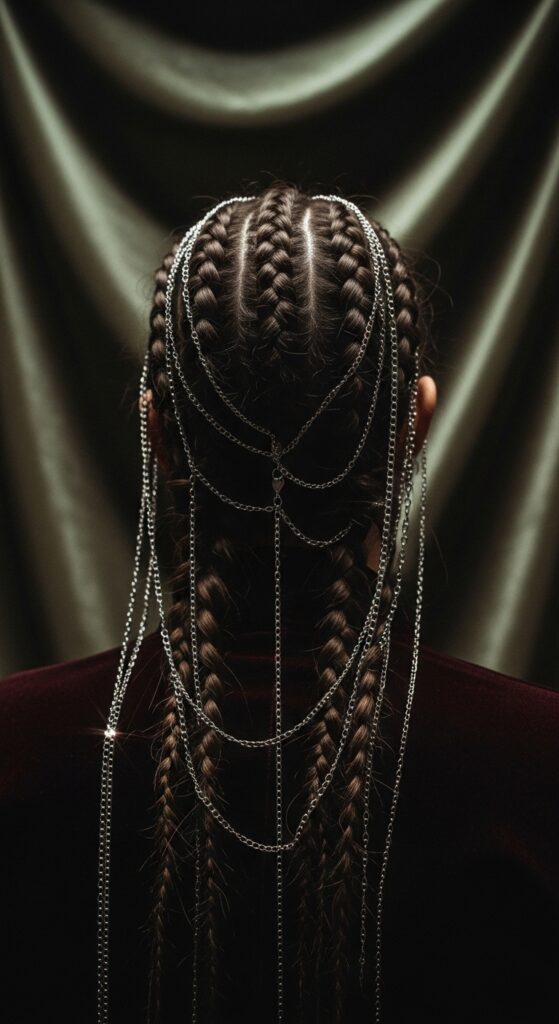
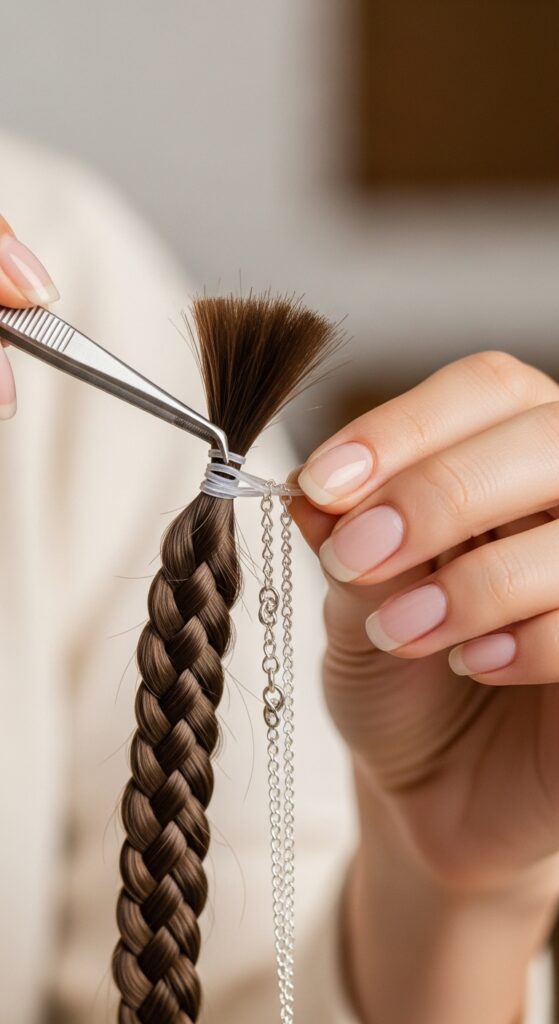
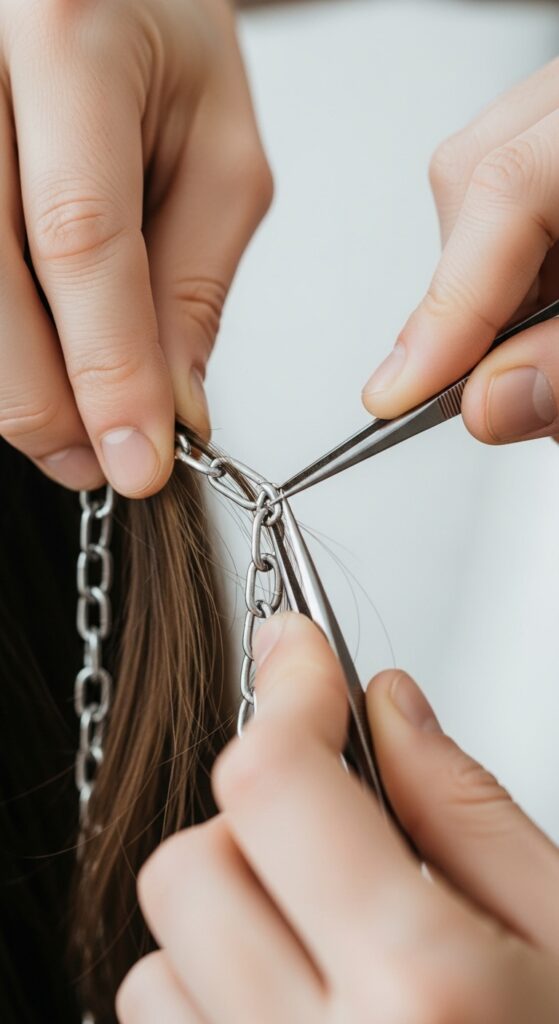
The Basic Weaving Technique: Step-by-Step
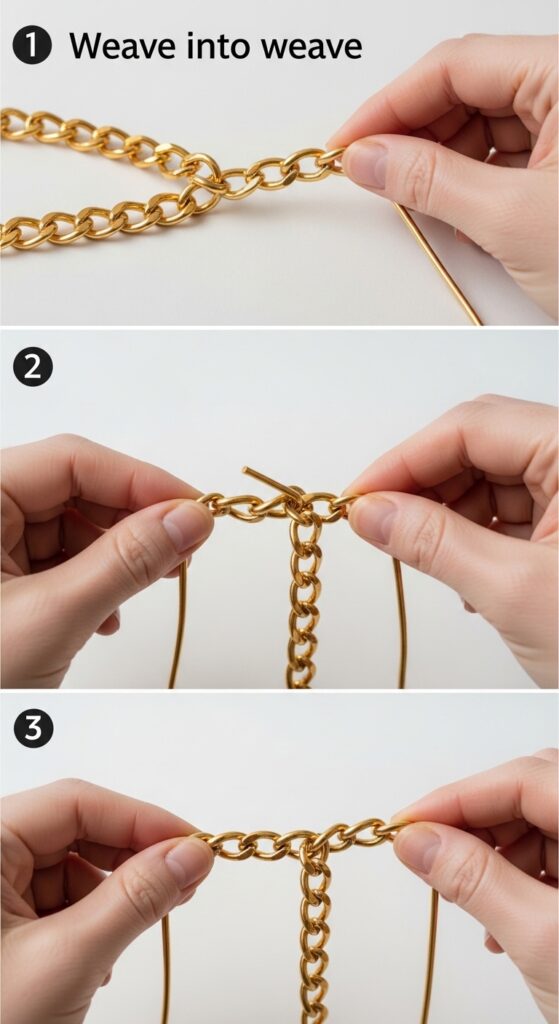
- Cut your chain to your desired length, adding an extra inch.
- Use the tail comb to gently lift a small section of the braid near the root.
- Place one end of the chain under that lifted section.
- Begin “weaving” it by going over and under the braid’s sections down its length.
- At the end, use a tiny clear elastic to secure the chain to the braid tip.
Securing the Chains Safely
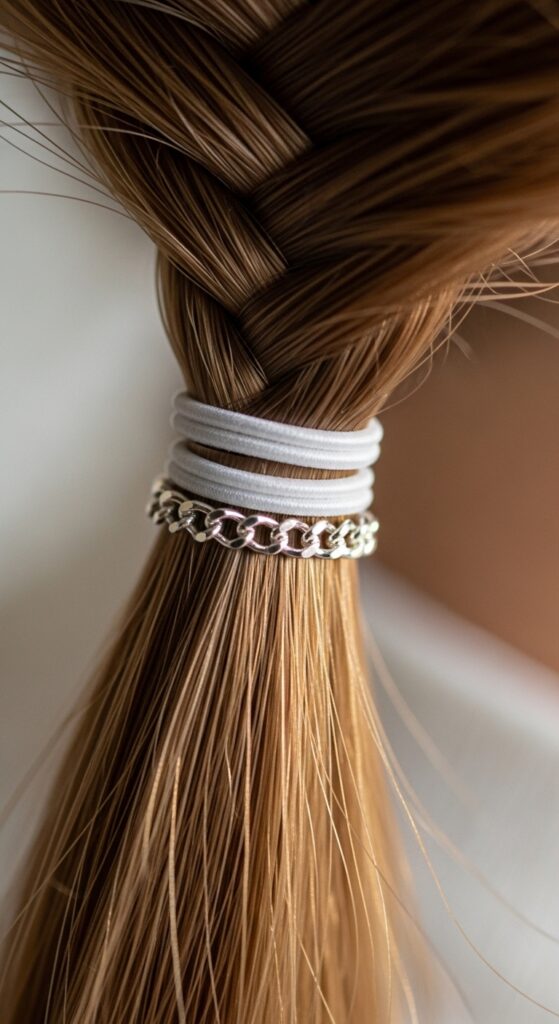
Securing the chain is crucial. You don’t want it slipping out and getting lost. The best method is to use those tiny, clear elastics. They’re virtually invisible and hold really well.
Loop the elastic around the end of the braid and the end of the chain a few times. Make sure it’s snug but not pulling your hair too tight. Give it a gentle tug to test the hold.
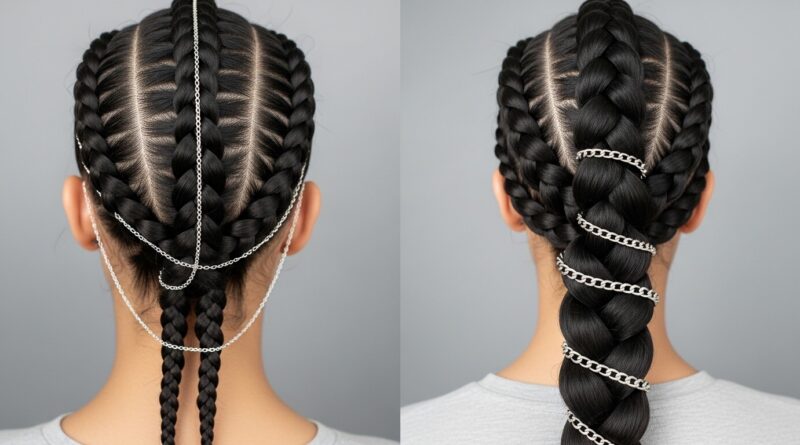
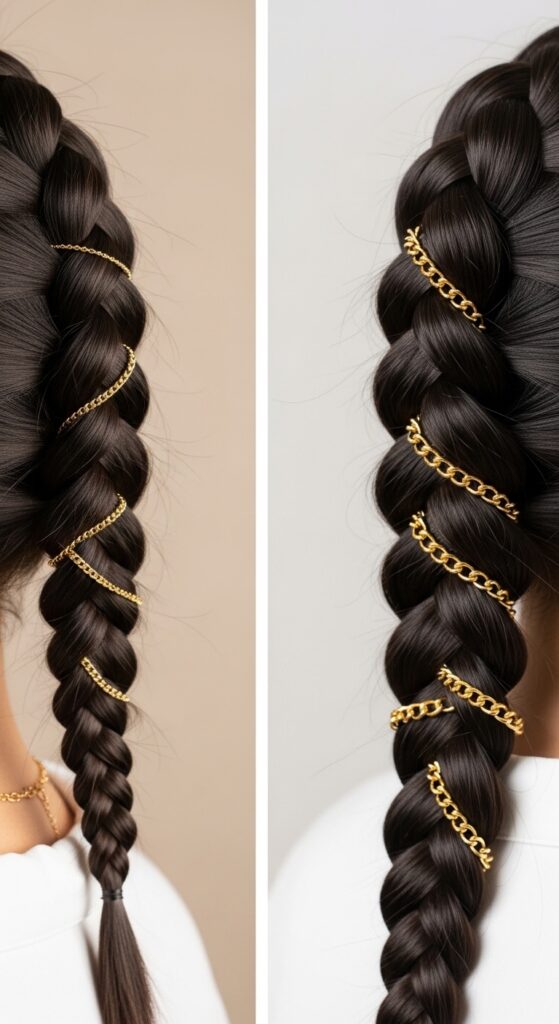
Design Idea 1: The Single Statement Braid
This is the perfect entry-level look. Choose one braid, maybe the one that frames your face, and add a single, beautiful chain. It’s minimalist, chic, and so easy.
It gives off major “old money hair” energy—that effortless, one-perfect-detail look. It works with any braid size and is a great way to test the trend without committing to a full head.
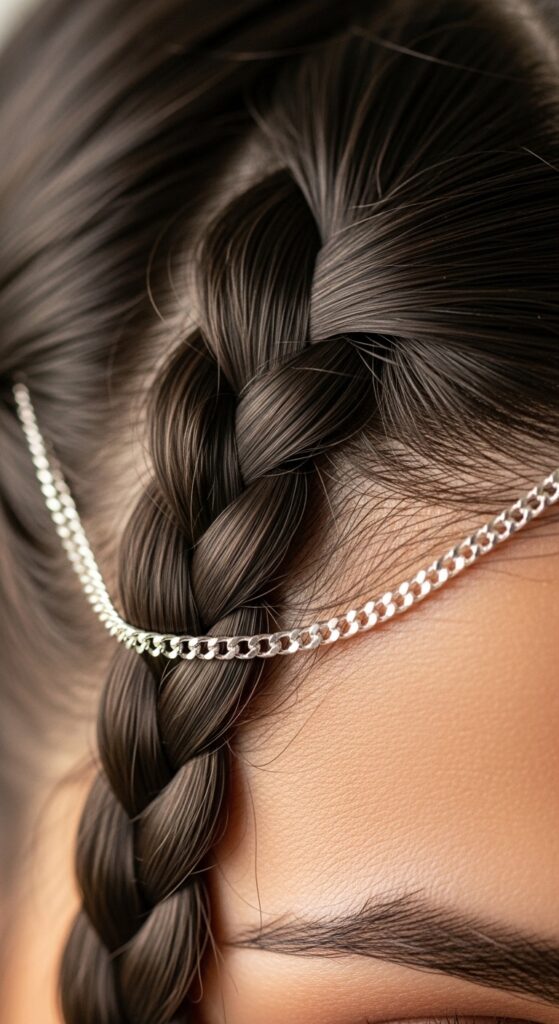
Design Idea 2: The Symmetrical Side Accent
For a balanced look, add chains to two braids symmetrically. Think the two braids that fall along your temples or the first two braids in a cornrow style.
This creates a beautiful, framed look for your face. It feels intentional and polished, like a piece of living jewelry. It’s a step up from the single braid but still understated.
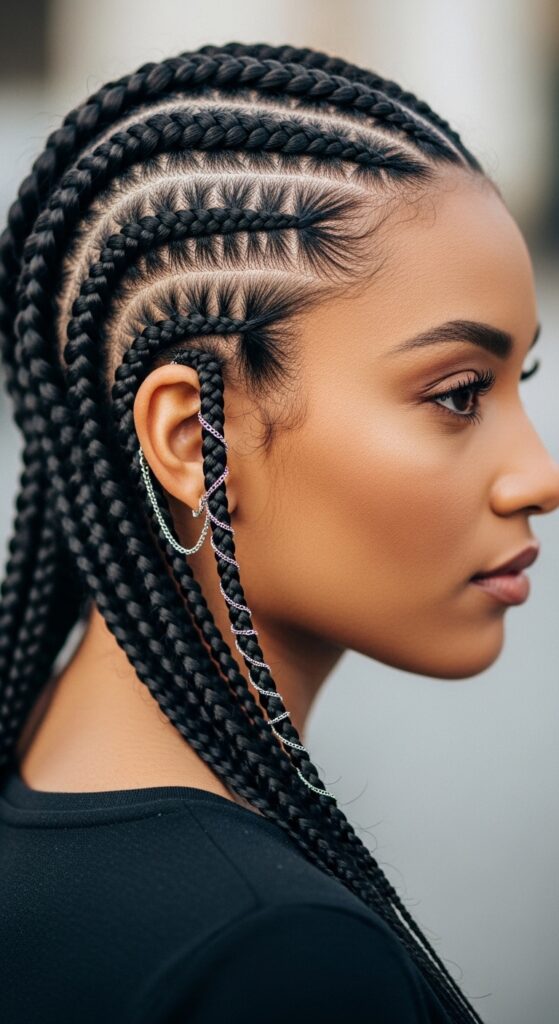
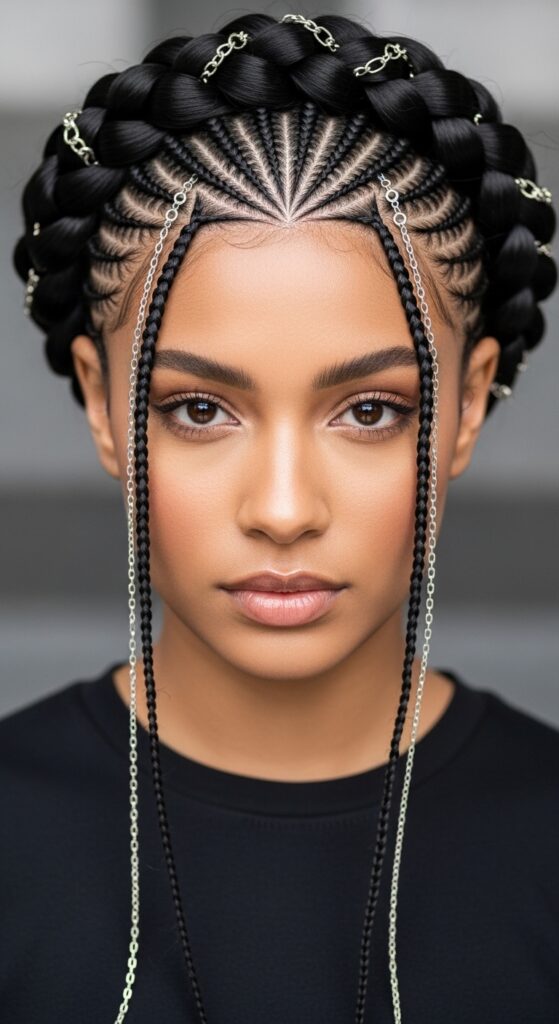
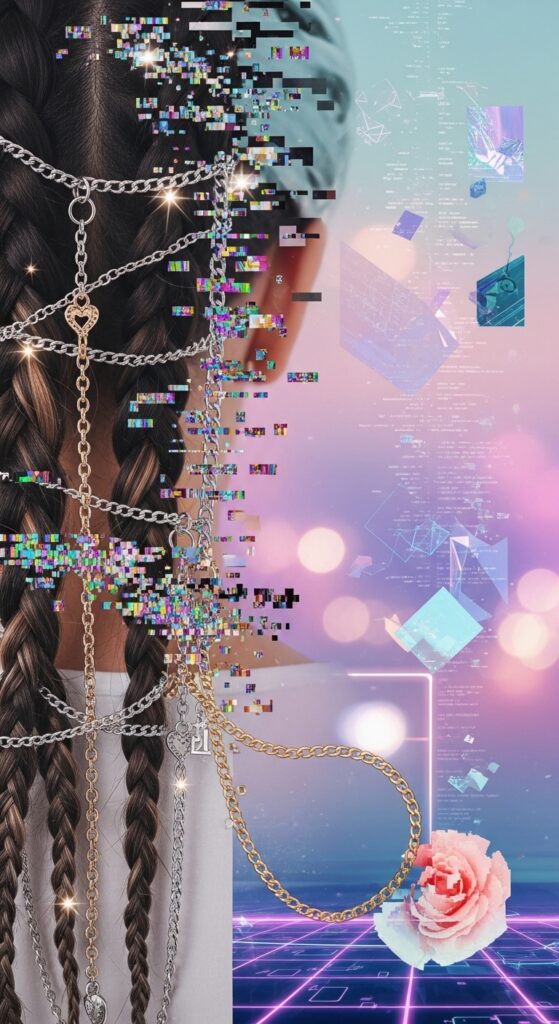
Design Idea 3: The Full Crown Glory
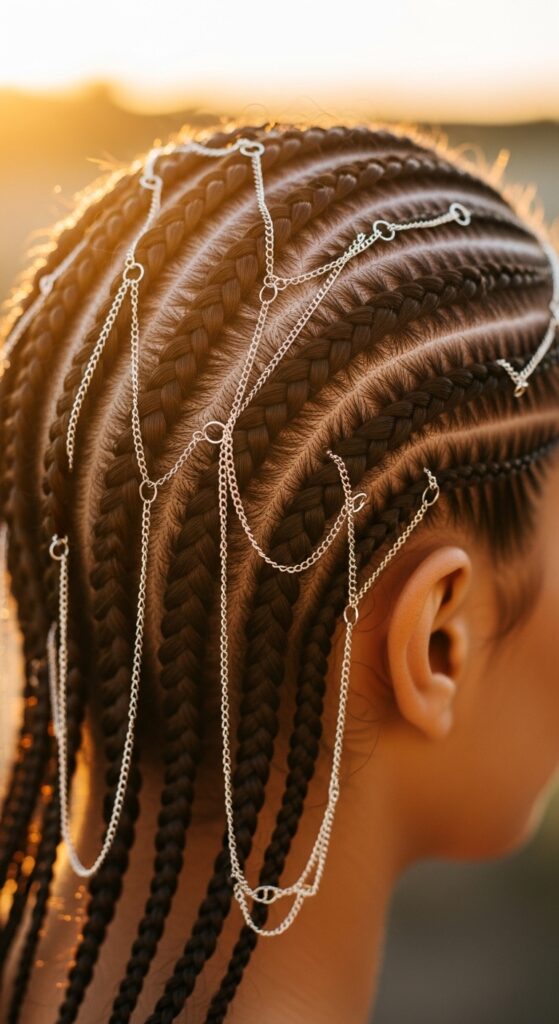
Ready to go all out? Add chains to the braids along your crown or along a specific part line. You don’t have to do every single braid—every other one creates a gorgeous, scattered effect.
This is a true showstopper. When you move, the light catches all these little points of shine. It’s a perfect blend of protective style practicality and red-carpet glam.
Mixing Metals for a Modern Twist
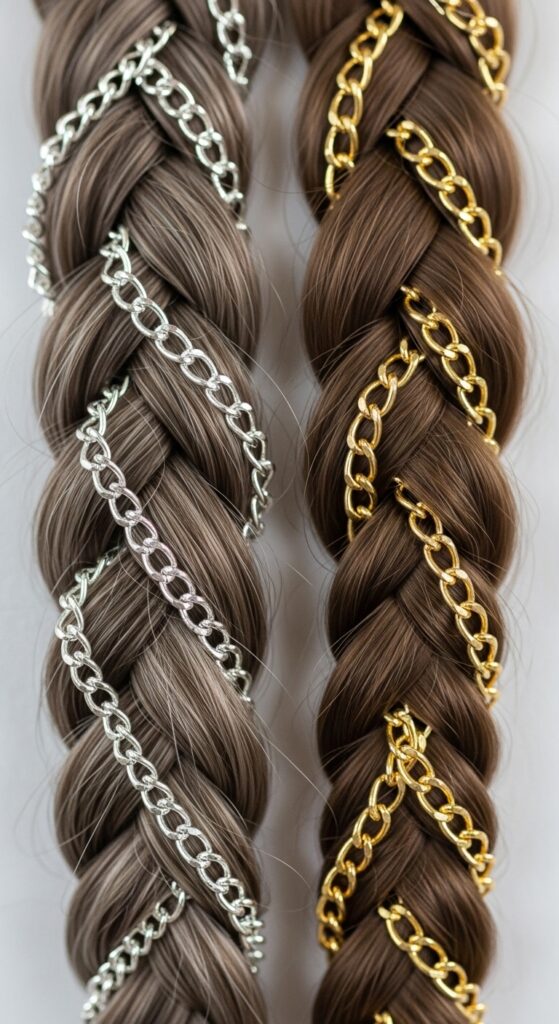
Don’t be afraid to mix gold and silver! This isn’t your grandma’s jewelry rule. Mixing metals looks modern, cool, and very intentional. Try a gold chain on one braid and a silver on another.
This approach works perfectly with the “glitchy glam hair” vibe—taking something beautiful and adding an unexpected, edgy twist. It feels personal and fashion-forward.
How to Match Chains to Your Braid Size
Scale matters. For smaller, knotless braids, stick with the finest chains you can find. They should complement, not overwhelm, the delicate braid.
For larger box braids or thicker cornrows, you can opt for a chain with slightly bigger links. It will still look dainty relative to the braid size and will be more visible.
Blending This Trend with 2026 Hairstyles
This trend fits right into the softer, more personal direction of 2026 hairstyles. Think less about loud statements and more about meaningful details. It’s a tactile, wearable art.
You can see how this delicate detail would pair with the softness of a quiet luxury bob or the edge of romantic goth hairstyles. It’s a versatile accent for any style mood.
The Romantic Goth Hair Connection
Speaking of romantic goth hairstyles, dainty chains are a perfect fit. Swap gold for oxidized silver or gunmetal chains woven through dark braids.
It adds that medieval, elegant touch that defines the look—think less scary, more poetic. It’s a beautiful way to accessorize a vampire haircut or deep, dark hair color.
A Nod to the Hime Cut & Asymmetry
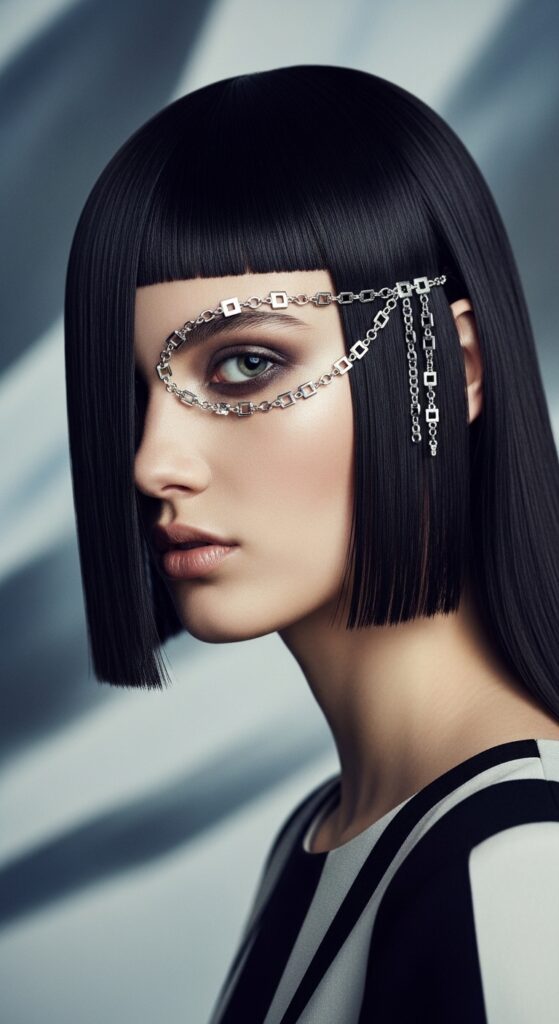
Love the dramatic shape of a hime cut or an asymmetrical lob? The principle is the same: one stunning detail. If you have a bold cut, adding a chain to just one precise section amplifies the artistry.
It highlights the intentionality of the cut. This works beautifully on blunt bangs or that longer front section of a hime style.
Taking Care of Your Braids With Chains
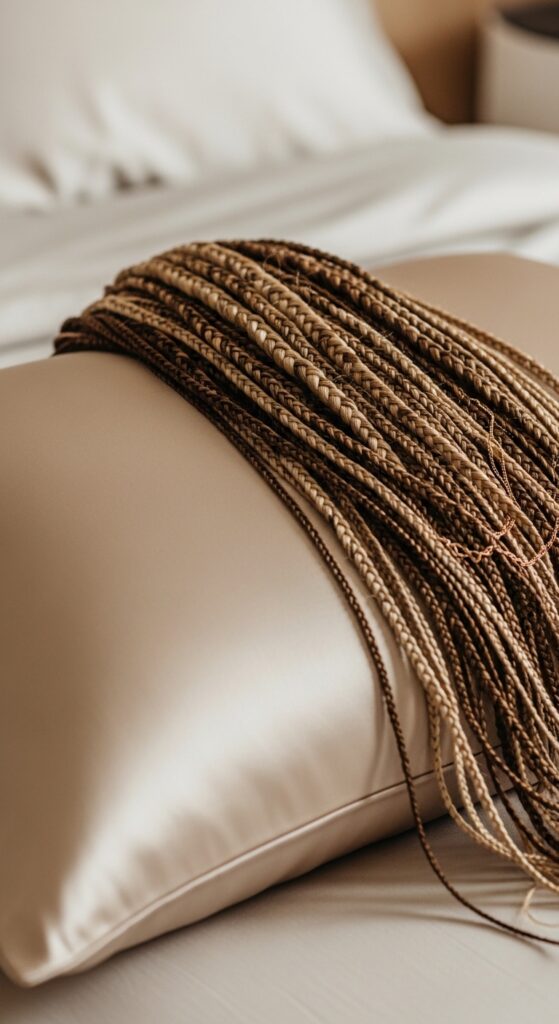
Sleep with a silk scarf or on a silk pillowcase. This prevents the chains from catching and pulling on your hair or the fabric. When washing, you can leave them in, but be gentle.
Just let the water and diluted shampoo flow over the braids. Avoid vigorous scrubbing right where the chains are secured to keep everything in place.
How to Remove the Chains Gently
When it’s time to take them out, don’t just pull! Carefully snip the tiny clear elastic at the end of the braid with small scissors. Once the end is free, you can gently unweave the chain.
Go slowly to avoid tugging on your hair. If a link gets caught, use your tweezers to gently loosen it. Patience is key here.
Where to Shop for the Best Chains
I love looking in the jewelry findings section of craft stores like Michaels or Joann. Online, Etsy is a treasure trove for unique, delicate chains. Search for “flat curb chain” or “delicate cable chain” in 1mm width or less.
You can also repurpose old, broken necklaces! Just make sure the metal is hair-friendly if you have sensitivities.
Answering Your Biggest Safety Concern
The biggest worry is tension or damage. The key is to weave the chain loosely. It should lie against the braid, not pull it tight. Never secure a chain so it’s pulling at your roots.
Listen to your scalp. If anything feels tight or uncomfortable, redo it. Protective styling should always protect first.
Making It Your Own: Personalization Tips
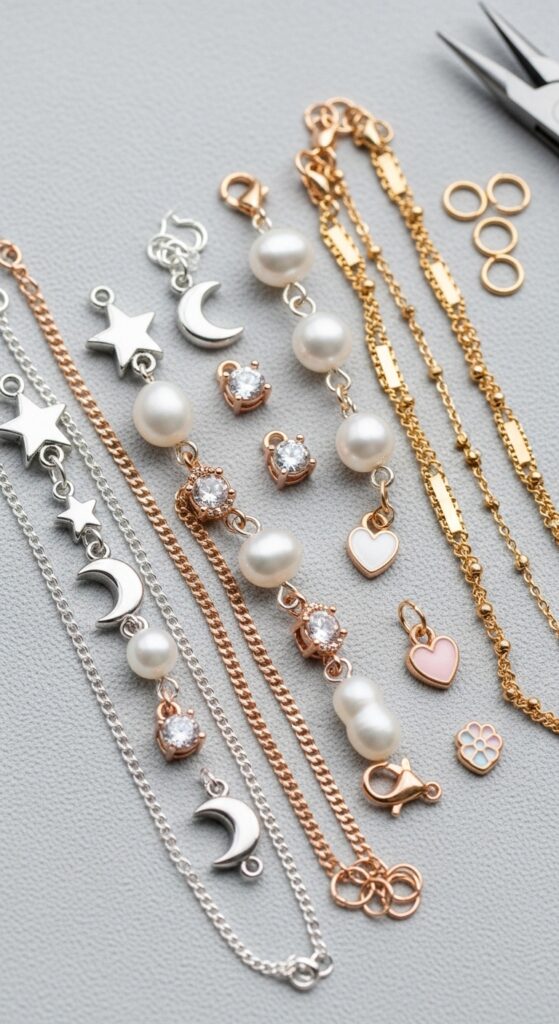
Add tiny charms! Thread a small star, moon, or pearl charm onto the chain before you weave it. You can also use different colored chains, like rose gold or black enameled.
This is where you get to shine. Your hair is your canvas, and these chains are your paint. Create patterns, spell initials, or just go for random beauty.
Temporary vs. Semi-Permanent Placement

For a temporary look, just weave the chains on the surface and secure them at the ends. They can easily come out at night. For a more “set” look, weave them more intricately and secure at both root and tip.
This semi-permanent style is great for a special event or vacation week where you want the look to last without daily fuss.
What to Do If a Chain Snags
Don’t panic! Stop moving immediately. Gently hold the braid above the snag to relieve tension. Use your fingers or tweezers to slowly work the hair strand out of the chain link.
Forcing it will break your hair. A little bit of oil (like jojoba) on the snagged hair can sometimes help it slide out more easily.
Sharing Your Look: Photo Tips
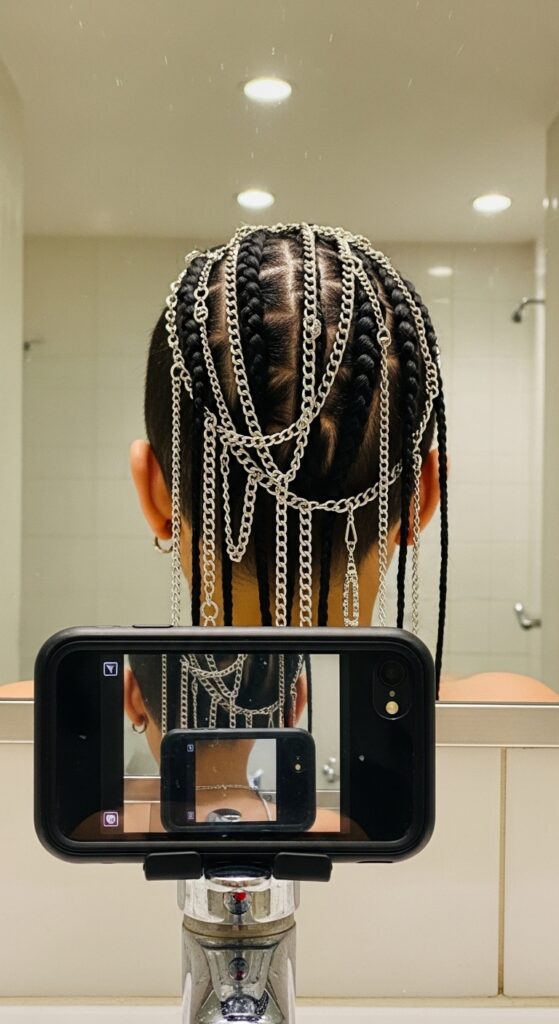
Natural light is your best friend for capturing the shine. Get a friend to take photos, or use a hand mirror to position your phone for a back-of-head shot.
Close-ups are great for showing the detail, but don’t forget a full-shot to show off the overall effect. The movement is what makes it magical, so a quick video can be stunning.
Your Next Style Evolution
Once you master this, think about other ways to add delicate details. Tiny ribbons threaded through? Mini freshwater pearls? The world of hair accessories just got a lot more interesting.
This trend bridges the gap between classic protective styling and the personal touch we all crave. It shows that hair beauty is in the details.
So, there you have it! Everything you need to add a little secret sparkle to your protective styles. It’s one of those simple tricks that makes you feel put-together and creative at the same time.
I love how hair trends are moving towards these personalized, meaningful touches. It’s less about following one strict look and more about finding what makes you feel most like yourself. Even when your hair is tucked away, you can still let your style shine through.
Save this post to Pinterest to keep these ideas handy for your next braid day! And I’d love to know—which design idea are you trying first? Tell me in the comments below!