Carved Tips: Precision End Work
In the world of woodworking, where do projects truly succeed or fail? Often, it’s not in the grand, sweeping curves or the impressive joinery you first notice. The real test of a craftsman’s skill lies in the final details—the crisp edges, the seamless transitions, the invisible seams. This is the domain of precision end work, the often-overlooked but utterly critical phase we call Carved Tips. It’s the difference between a piece that looks handmade and one that looks professionally crafted.

Why End Work Demands Special Attention
End grain is the most vulnerable and challenging part of any wood piece. Think of wood as a bundle of tiny straws. When you cut across these straws (creating end grain), you expose open channels that absorb finish unevenly, tear out more easily under tools, and behave differently under stress than long grain. A poorly executed end cut can ruin the fit of a joint, create a visual eyesore, or become a weak point in your construction.
Precision end work, therefore, isn’t just about aesthetics; it’s about integrity and longevity. A perfectly fitted tenon end ensures a strong joint that will withstand decades of seasonal wood movement. A meticulously chamfered or rounded table leg end prevents splintering and adds a refined touch felt by the hand. By focusing on carved tips, you move from assembly to true craftsmanship.

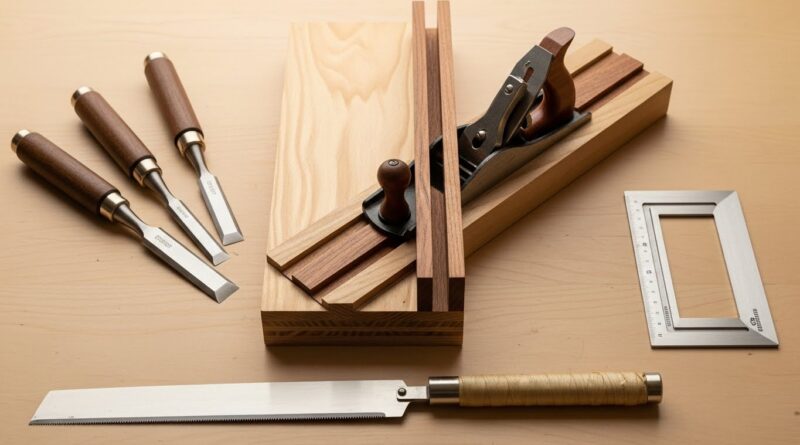
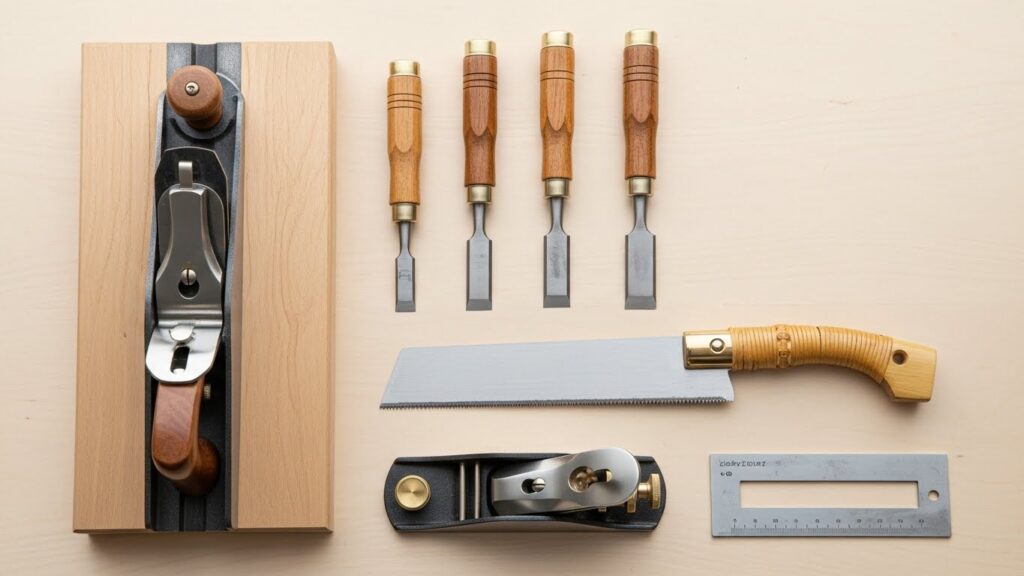
The Essential Toolkit for Flawless Carved Tips
You cannot win the battle against ragged end grain with dull tools. Precision requires instruments designed for control and sharpness. While power tools like table saws and routers set the stage, the final act belongs to hand tools.
The Indispensable Chisel: A set of razor-sharp, high-quality chisels is non-negotiable. For paring end grain, a sharp bench chisel (preferably with a bevel edge for getting into corners) is your primary weapon. The sharpness allows you to slice, not crush, the wood fibers.
The Precision Block Plane: A low-angle block plane is a game-changer for trimming end grain. Its bed angle allows the blade to slice through the tough fibers cleanly. Use it for fine-tuning the length of a workpiece or cleaning up saw marks.
The Shooting Board: This simple jig is the secret weapon for achieving perfectly square and smooth end grain. By guiding your plane at a guaranteed 90-degree angle (or other set angles), it removes human error and allows for repeatable, flawless results.
Specialized Saws: A Japanese-style pull saw (like a dozuki) or a fine-toothed backsaw produces a much cleaner initial cut than a standard crosscut saw, leaving less work for your chisels and planes.
Core Techniques for Mastering End Grain
With the right tools in hand, technique takes center stage. Here are the foundational methods for conquering end work.
Paring with a Chisel: For fine adjustments, hold the workpiece securely. Use a mallet for heavy removal, but for final paring, use hand pressure only. Guide the chisel with your fingers close to the edge, keeping the bevel facing the waste side. Take thin, controlled slices, working from the edges toward the center to prevent tear-out.
Shooting for Perfection: Clamp your workpiece securely against the stop of your shooting board. With firm, even pressure, push the plane along the track, taking a shallow pass. The jig ensures the edge remains perfectly square to the face and adjacent side. This is the gold standard for preparing end grain for joinery like edge-to-edge glue-ups.
Managing Tear-Out: When planing or chiseling, exiting the cut often causes the wood fibers on the back side to splinter. The solution is to support the exit point. Use a sacrificial piece of wood clamped behind your workpiece, or simply work from both directions toward the middle when possible.

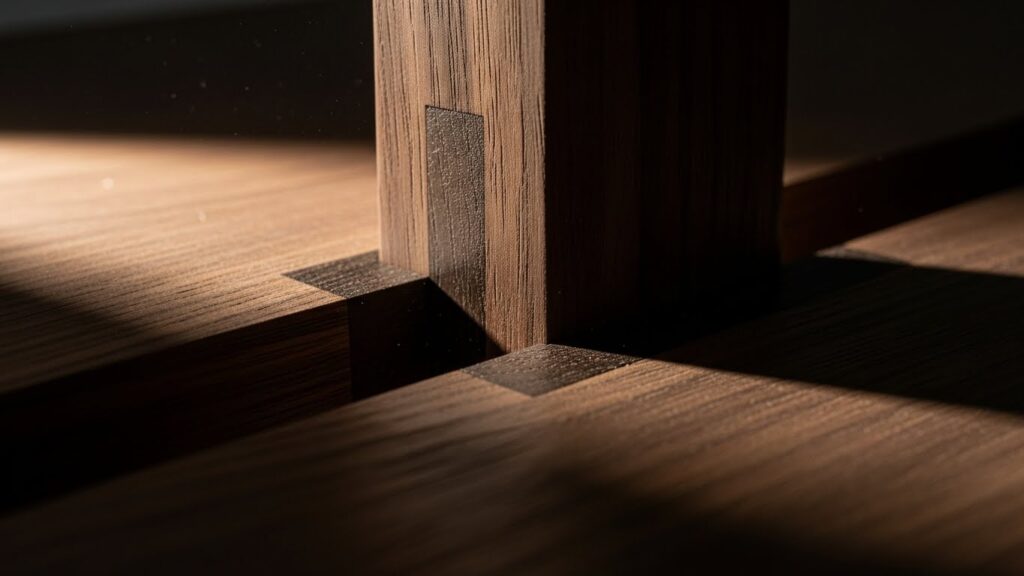
Advanced Applications: End Work in Joinery
Precision end work shines brightest in complex joinery, where thousandths of an inch matter.
Mortise and Tenon Ends: The end of a tenon must be clean and square for a proper fit. After sawing, refine the cheeks and end with a sharp chisel, using the mortise itself as a guide for final paring. A slightly chamfered edge on the tenon end makes it easier to start into the mortise without catching.
Dovetail Pins and Tails: The exposed end grain of dovetails is a badge of honor. Clean, crisp baselines are achieved by careful sawing followed by meticulous paring with a chisel guided by a marking knife line. Any fuzziness here will be glaringly obvious.
Mitered Corners: Achieving a tight, invisible miter joint is the pinnacle of end work precision. Cutting slightly long and then trimming the miter on a shooting board angled to 45 degrees is the classic method. For picture frames, a dedicated miter shooting board is an invaluable tool.
Finishing End Grain: The Final Seal
Because end grain absorbs more finish, it can appear darker and feel rougher than the rest of your project if not treated properly. The key is to seal the pores before your main finish application.
A common technique is to apply a thin coat of your finish (like diluted shellac or sanding sealer) specifically to the end grain areas first. Let it dry, then sand it lightly with fine-grit sandpaper. This seals the porous surface, creating a more uniform base. Then, proceed with your overall finishing schedule. This extra step ensures a consistent color and sheen across the entire piece.

Cultivating the Mindset for Precision
Ultimately, carved tips are about more than tools and techniques; they’re about patience and perspective. It means slowing down when you most want to rush—when the assembly is almost done. It means inspecting your work from multiple angles, feeling for imperfections with your fingers, and having the discipline to make one more light pass with the plane instead of calling it “good enough.”
Embrace end work not as a final hurdle, but as a meditative and rewarding part of the process. This is where you leave your signature, not with a brand, but with the quiet evidence of care. The satisfaction of fitting a joint that closes with a whisper, or running your hand over a seamlessly finished edge, is the true reward for mastering precision end work.
So, the next time you approach the end of a cut or the final fit of a joint, remember: this is your moment to carve your tip. Sharpen your tools, steady your hands, and give those final details the focused attention they deserve. Your work will speak volumes.


