Hair Crimping: The 90s Trend That’s Back and Better
If you lived through the 90s, you likely have a photo buried somewhere featuring a quintessential fashion trifecta: a butterfly clip, chunky platform sneakers, and a head full of perfectly zig-zagged hair. That’s right, we’re talking about hair crimping. For a while, this textured style was relegated to the annals of “what were we thinking?” fashion history. But like all great trends, it has cycled back into the spotlight, and this time, it’s evolved. The 2020s version of hair crimping is more sophisticated, versatile, and intentionally cool than its predecessor. It’s no longer about achieving a full-head, frizzy triangle; it’s about adding strategic texture, unbelievable volume, and a dose of nostalgic edge to modern hairstyles.
So, why is this throwback trend resonating so strongly with a new generation? In an era of sleek blowouts and beach waves, crimping offers something different: unabashed texture and a playful, rebellious spirit. It’s a celebration of pattern and volume, a way to stand out from the crowd without saying a word. This blog post will be your ultimate guide to embracing the crimped hair revival. We’ll dive into its nostalgic roots, explore the modern techniques that make it better than ever, and provide a step-by-step guide to getting the perfect, fashion-forward crimp.

A Blast from the Past: The Original Crimping Era
To truly appreciate the comeback, we have to take a quick trip back to the decade of grunge, boy bands, and Tamagotchis. Hair crimping in the 90s was unapologetically bold. It was a style born from a desire to break away from the big, soft curls of the 80s and embrace something more geometric and edgy. The tool of choice was a classic, often plastic, crimping iron with two plates that created a uniform, zig-zag pattern from root to tip.
The execution was straightforward: you’d take small sections of hair, clamp down the iron, and move methodically until your entire head was a landscape of peaks and valleys. The result was maximum volume and a texture that could withstand wind, rain, and a long day at the mall. It was a look championed by pop icons like the Spice Girls, Destiny’s Child, and Christina Aguilera, making it a must-have for every teen and tween. However, the style often came with downsides—namely, a tendency towards frizz, a distinct lack of movement, and a shape that could sometimes veer into the dreaded “pyramid” silhouette if not styled with care.

Why Crimping is Back and Better Than Ever
Fast forward to today, and the crimping trend has been resurrected with a heavy dose of modern sensibility. The key difference lies in the application and intention. Instead of a full-head, uniform crimp, today’s stylists and fashion influencers are using the technique to add strategic texture and support to a variety of looks.
What’s driving this revival? Firstly, the Y2K aesthetic has taken the fashion world by storm, and crimped hair is a fundamental part of that package. Secondly, there’s a growing appreciation for hairstyles that offer incredible volume and hold, especially for those with fine or flat hair. A light crimp at the roots can provide a lift that lasts all day. Finally, modern tools are far superior. Today’s crimping irons often feature ceramic or tourmaline plates, adjustable temperature settings, and varied plate patterns that create a softer, more wearable wave instead of a harsh zig-zag.
The modern approach is all about nuance. It’s crimping as a means to an end, not the final destination. The goal is texture, not a time-machine trip to 1997.

Your Toolkit for Modern Crimping Success
To achieve the contemporary crimped look, you need the right arsenal. Ditching the cheap, single-temperature irons of the past is your first step toward a better result.
The Crimping Iron: Invest in a quality tool. Look for one with ceramic or tourmaline plates to minimize frizz and protect your hair from heat damage. An adjustable temperature dial is crucial; finer hair requires lower heat (around 300°F), while thicker, coarser hair can handle higher settings (up to 380°F). Some modern irons even offer wavy or zig-zag patterns of different sizes, allowing for more customization.
Heat Protectant Spray: This is non-negotiable. Always, always spray a heat protectant evenly throughout your dry or towel-dried hair before you even plug in your iron. It creates a barrier that shields your hair from the direct heat, preventing damage and frizz.
Texturizing Spray or Sea Salt Spray: These products are your best friends for this style. Applied before crimping, they enhance the texture and grit, helping the crimp hold better and look more intentional. Applied after, they can break up any uniformity and add a piece-y, effortless finish.
Light-Hold Hairspray or Finishing Spray: You’ll want a flexible hairspray to lock in the texture without making your hair feel stiff or crunchy. A light mist is all you need.

How to Crimp Your Hair: A Step-by-Step Guide for the Modern Age
Ready to create your own updated crimped style? Follow these steps for a look that’s full of texture and volume, without the dated feel.
Step 1: Prep and Protect. Start with completely dry hair. If your hair is naturally very smooth, it can help to add a light texturizing spray at this stage. Then, thoroughly spritz with your heat protectant from roots to ends.
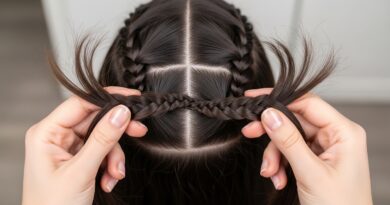
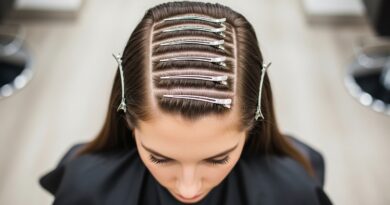
Step 2: Section Your Hair. This is the most important step for a clean result. Clip the top half of your hair up and out of the way. You will be working from the nape of your neck upwards. Further divide your hair into manageable horizontal sections, about 1-2 inches thick. The smaller the section, the more defined the crimp.
Step 3: The Crimping Technique. Set your iron to the appropriate temperature for your hair type. Take one of your bottom sections and gently clamp the iron as close to the roots as you safely can (without touching your scalp). Hold for 5-8 seconds, then release. Move the iron down the hair shaft, aligning the next “peak” of the iron with the previous “valley” in your hair, and clamp again. Continue this process all the way to the ends. The key is consistency in placement for a uniform pattern.
Step 4: Build Upwards. Continue working your way up your head, section by section, unclipping hair from the top as you go. For a truly modern look, consider leaving the very top layer of hair (the “crown” section) smooth or only lightly crimping it at the root for lift.
Step 5: Break It Up and Style. Once your entire head is crimped, it’s time to destroy any hint of the 90s pyramid. Run your fingers through your hair vigorously to break up the uniform pattern. You can also use a wide-tooth comb for this. Flip your head upside down and massage your roots for extra volume. Then, use a texturizing spray on your hands to scrunch and define pieces, creating a more effortless, lived-in texture.
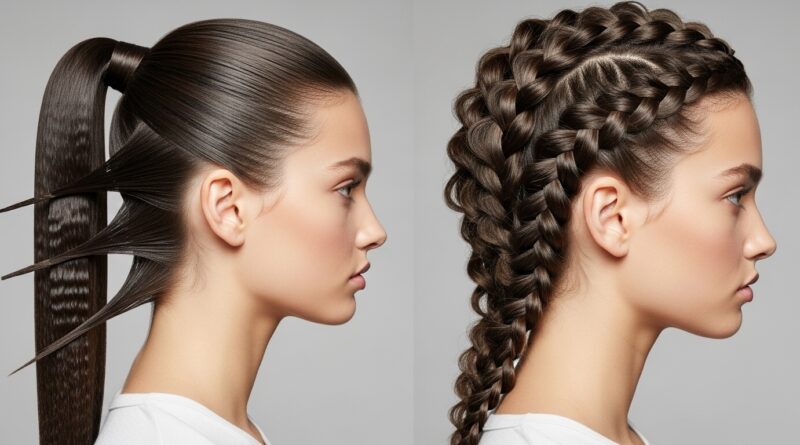
Step 6: The Final Look. Style as desired. You can leave it down in a voluminous mane, pull it into a half-up, half-down style to show off the texture, or create a messy bun or braid that has incredible hold and body thanks to the crimped base.

Beyond the Basics: Creative Ways to Wear Crimped Hair
The beauty of modern crimping is its versatility. You don’t have to commit to a full head of zig-zags. Here are some creative, subtle ways to incorporate the trend.
The Underlayer Crimp: This is perhaps the most popular modern method. Crimp only the bottom layers of your hair. When you wear it down, the top smooth layers cover most of the crimp, but it provides incredible volume and a surprising, cool-girl texture when your hair moves.
Crimped Roots for Volume: If you struggle with flat roots, this is a game-changer. Simply crimp the first 2-3 inches of your hair at the root area only. Then, brush it out or cover it with the top layer of hair. You’ll get lasting lift without the need for backcombing or excessive product.
Crimped Accent Braids or Buns: Crimp a small section of hair before braiding it or incorporating it into a style. The texture makes the braid look fuller and more detailed. A crimped messy bun has a cool, grungy feel and stays put all day thanks to the added grip.
The Half-Up Crimp: Crimp only the section of hair you plan to use for a half-up, top-knot, or pouf. This gives the style more body and makes it look thicker and more intentional.

Embracing the Texture: The Final Verdict on the Crimp Comeback
The return of hair crimping is more than just a nostalgia trip; it’s a testament to the cyclical nature of fashion and our endless desire to experiment with personal style. The 90s trend has been refined, recontextualized, and reborn as a tool for creating dimension and volume in a way that feels fresh and exciting. It’s a democratic trend, too—it works on short hair, long hair, fine hair, and thick hair, offering something unique for everyone.
So, should you try it? Absolutely. Whether you go for a full-headed, proudly retro statement or a subtle, hidden layer of texture, crimping offers a fun and effective way to change up your hair game. It reminds us that hair doesn’t always have to be sleek and perfect; sometimes, the most compelling looks are the ones that are a little bit textured, a little bit messy, and a whole lot of fun. Dig out that old crimping iron (or treat yourself to a new one) and get ready to embrace the peaks and valleys of this iconic trend. The 90s are calling, and this time, they’ve learned a few new tricks.