How to Get textured lob Hair That Looks Effortless (But Isn’t)
You’ve seen it everywhere: on your favorite celebrities, influencers, and that impossibly cool woman you passed on the street. It’s the textured lob—a long bob that falls somewhere between the chin and the collarbone, and it looks as if it was styled by a sea breeze and a good night’s sleep. The secret? It never actually happens that way. The most effortless-looking hair is almost always the product of careful planning and strategic styling.
But achieving that “I woke up like this” texture without it looking like you actually just woke up is an art form. It’s about creating movement, volume, and a touch of controlled chaos. This guide is your backstage pass. We’re diving deep into the cut, the styling techniques, the products, and the maintenance required to get a textured lob that turns heads for all the right reasons.
What Exactly is a Textured Lob?
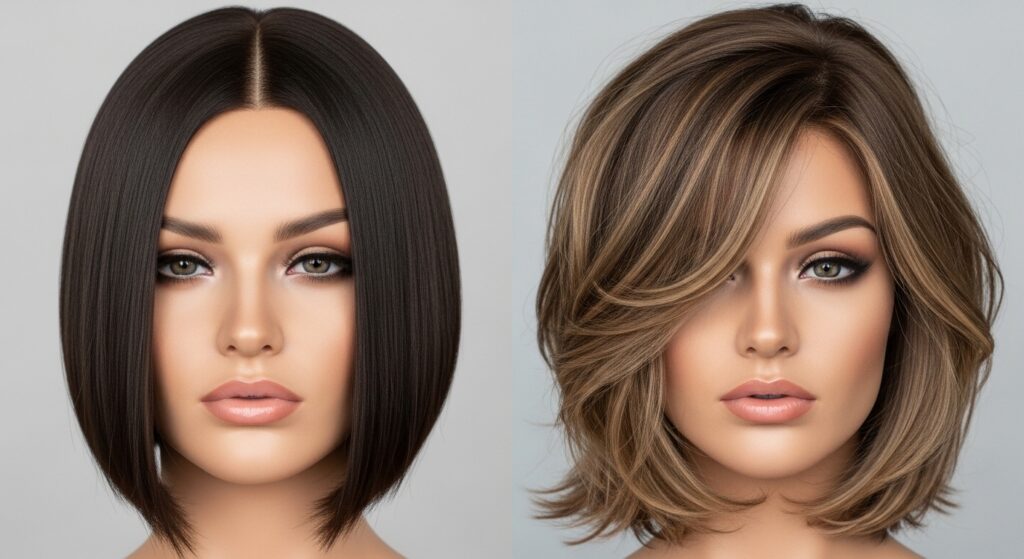
Let’s break it down. A lob, or long bob, is a timeless cut. But the textured lob is its cooler, more modern cousin. It’s not just about the length; it’s about the internal architecture of the cut. This style is built on layers, subtle graduation, and shattered ends that remove weight and encourage the hair to bend, wave, and piece out naturally.
Unlike a blunt, one-length bob, a textured lob is dynamic. It’s full of movement and has a lived-in, slightly undone feel. The goal is to create a shape that looks great even as it grows out, making it surprisingly low-maintenance in the long run. It’s the perfect marriage of polish and rebellion.
Foundation First: The All-Important Cut
You cannot style your way into a textured lob if the foundation—the cut—isn’t there. Walking into a salon and asking for “a lob” isn’t enough. The magic words you need to use with your stylist are all about creating movement and removing bulk.
Key Elements to Request:
Layers, Layers, Layers: This is non-negotiable. But we’re not talking about the chunky, dated layers of the early 2000s. Ask for soft, internal layers that are carved into the interior of the hair to create volume without altering the exterior shape. Face-framing layers are also crucial for softening the overall look.
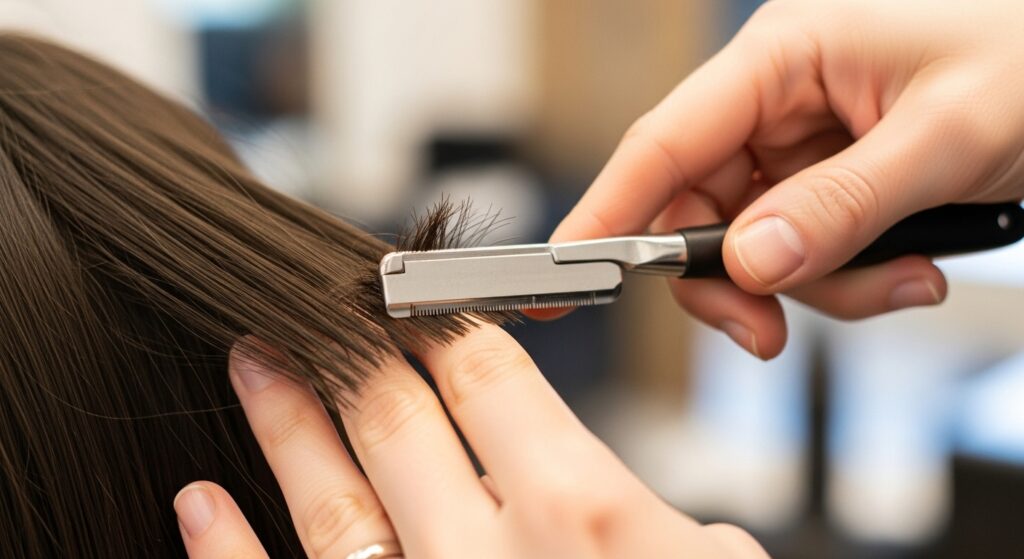
Razoring or Point Cutting: This technique is a game-changer. Instead of cutting straight across, your stylist will use a razor or scissors to cut into the ends of the hair vertically. This “shatters” the ends, making them softer, more piecey, and less bulky, which instantly encourages texture.
Disconnected Undercutting: For those with thicker hair, a subtle undercut—where the hair underneath is cut shorter than the top layers—can remove immense weight and allow the top layers to move more freely and collapse into a perfect shape.
Your Texturizing Product Arsenal
Once the cut is perfected, products are your best friends. They are the unsung heroes that hold the “effortless” look together all day. Ditch the heavy, slicking serums and embrace products that add grit, grip, and separation.
Sea Salt Spray: The holy grail for beachy texture. It mimics the effect of salt water, creating subtle waves, volume, and a tousled, matte finish. Spritz it onto damp hair and scrunch for a natural wave, or use it on dry hair to revive second-day strands.
Texturizing Spray: Think of this as sea salt spray’s stronger, more sophisticated cousin. It often contains polymers that add buildable texture, volume, and a light hold without crunch. It’s perfect for creating that piecey, “lived-in” effect.
Dry Shampoo: This isn’t just for soaking up oil. Dry shampoo at the roots adds incredible volume and grit, giving your style a lift and helping it hold better. It’s the secret to that second-day hair that often looks even better than the first.
A Lightweight Mousse: Apply a golf-ball-sized amount to damp hair before blow-drying. It provides memory, volume, and a foundation of hold that makes subsequent styling much easier, without the stiff feel of a hairspray.

The Styling Ritual: Tools and Techniques for Perfect Texture
This is where the “effort” comes in to create the “effortless” finish. Your tools and technique are everything.
1. Start with a Rough Dry: Never aim for a sleek, perfect blowout. After applying your mousse or volumizing spray, rough dry your hair until it’s about 80% dry. Use your fingers to tousle the roots and scrunch the lengths. The goal is to eradicate soaking wetness, not to create a style.
2. Embrace the 1-Inch Curling Iron (or Wand): This is arguably the most important tool. A larger barrel creates loose waves, not tight curls. The technique is key: wrap 1-2 inch sections of hair around the barrel, alternating the direction of the wrap—away from your face, then towards your face. This creates a more natural, less “done” pattern. Leave the ends out for a softer finish.
3. The Flat Iron “Bend”: Don’t have a curling iron? Use a flat iron. Clamp a section of hair about midway down the shaft, then gently twist the iron as you glide it down to the end, creating a soft bend instead of a wave. It’s a subtler, more modern-looking texture.
4. The Cool Shot is Your Best Friend: Once you’ve created a wave or bend, let it cool completely on the barrel, then hit it with the cool shot button on your dryer. This sets the shape, making it last far longer.
5. The Final Touch: Break It Up! Once all your hair is waved and cooled, the final step is crucial. Run your fingers through your hair vigorously to break up the uniform curls. Then, take a texturizing spray and lightly mist it, focusing on the mid-lengths and ends. Finally, pinch and pull a few random pieces apart to create that coveted piecey effect.

Maintaining the Magic: How to Make Your Textured Lob Last
A great textured lob looks even better on day two or three. The natural oils and the settled product create the ultimate lived-in texture.
Embrace Second-Day Hair: Don’t feel the need to wash and style every day. Refresh your style by focusing on the roots with dry shampoo to absorb oil and add volume. Then, lightly mist a texturizing spray on the ends and scrunch to reactivate the waves and texture.
Protect While You Sleep: Sleeping on a cotton pillowcase can create friction and frizz. Switch to a silk or satin pillowcase, or loosely tie your hair up in a loose, high ponytail (a “pineapple”) to preserve your waves.
Regular Trims are Non-Negotiable: To maintain the shape and prevent the layers from growing out and becoming bulky, get a trim every 6-8 weeks. This keeps the texture precise and the style looking intentional.

Is the Textured Lob Right For You?
The beautiful thing about the textured lob is its versatility. It can be adapted to suit most hair types and face shapes.
For Fine Hair: This cut is a godsend. The layers and texturizing techniques create the illusion of thickness and volume that fine hair often lacks.
For Thick Hair: It’s perfect for removing weight and taming bulk, transforming unmanageable hair into a chic, lightweight style.
For Wavy or Curly Hair: The cut enhances your natural pattern, defining your waves and reducing frizz by removing excess mass.
For Straight Hair: You might need to put in a bit more work with hot tools, but the cut provides a perfect canvas for holding styled-in texture and waves.