How to Make classic bun Hair Look Expensive on a Budget
There’s a reason the classic bun is a timeless hairstyle. It’s elegant, practical, and universally flattering. But let’s be honest: sometimes a simple bun can look more “I just rolled out of bed” than “I just stepped off a Parisian runway.” The difference between a basic bun and an expensive-looking one isn’t about the cost of your hair products, but the technique and a few clever tricks.
The good news? Achieving that coveted, high-end salon finish is completely within your reach, even on the tightest budget. An expensive-looking bun is all about illusion—the illusion of thicker hair, of effortless texture, and of meticulous detail. It’s about creating a silhouette that is polished yet soft, structured yet organic.
In this guide, we’re going to deconstruct the elements of a luxury bun and show you how to replicate them with items you likely already have at home. Get ready to transform your everyday updo into a statement of sophisticated style.

It All Starts at the Roots: The Foundation of Volume
An expensive bun never looks flat. It has lift, body, and a crown of volume that frames the face beautifully. This isn’t about having naturally thick hair; it’s about creating the illusion of density right from the start.
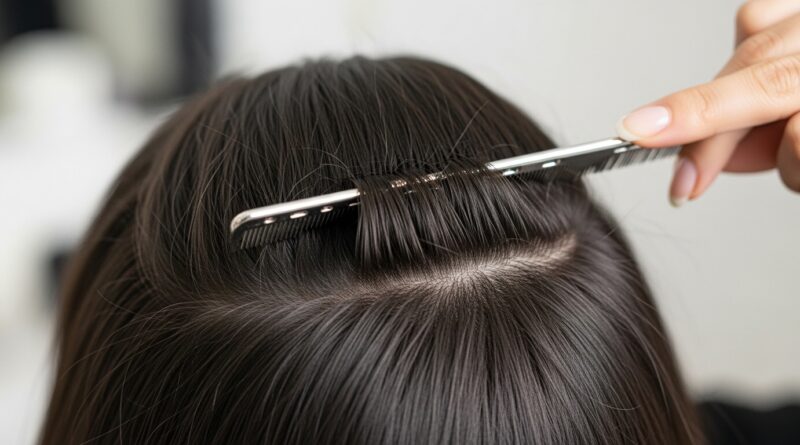
Begin with day-old hair. The natural oils and any leftover product from the previous day provide a perfect texture grip that fresh, squeaky-clean hair often lacks. If your hair is freshly washed, spritz a light texturizing spray or even a mix of water and a drop of sea salt onto the roots. Before you even think about tying your hair up, tease the crown section gently. Take a small section at the top of your head, hold it straight up, and using a fine-tooth comb, gently backcomb from the mid-lengths down to the roots. Do this sparingly—you’re building a hidden foundation, not creating 80s-era big hair. Then, smooth the top layer over the teased section to conceal your handiwork.
Another brilliant, budget-friendly trick is to change your part. Simply switching your hair part from your usual side to a deep side part or a center part can instantly add noticeable volume and a fresh, modern feel to your style.

Texture is the Secret Weapon of the Rich & Famous
Silky, smooth hair is beautiful, but when it comes to buns, a little texture is what screams effortless chic. Texture gives the bun body, helps it hold its shape, and makes it look more artfully crafted and less perfectly perfect.
If your hair is naturally straight and slippery, you need to create some grit. Before styling, work a small amount of mousse through damp hair and blow-dry, or use a dry texturizing spray on dry hair. No texturizing spray? A light-hold hairspray sprayed onto the lengths of your hair and then scrunched can work in a pinch. For those with wavy or curly hair, enhance your natural pattern with a curl-defining cream or simply scrunch your hair as it dries.
Braiding is another incredible, zero-cost technique for adding texture. Before making your bun, create a loose braid with your ponytail. Then, simply wrap the braid around the base to form your bun. When you pin it in place and gently pull apart the braided sections, you get instant, beautiful, and intricate texture that looks incredibly high-end.

The Art of the “Undone” Finish: Strategic Imperfection
Perhaps the most crucial element of an expensive-looking bun is the deliberately undone finish. A bun that is too tight, too smooth, and too perfect can look severe and dated. The modern, luxury bun is soft, with strategic pieces left out to frame the face and soften the neck.
After you’ve secured your bun, take a moment to gently pull it apart. Use your fingertips to tug lightly on the sides of the bun to increase its diameter and create a fuller, softer shape. Don’t be afraid to let a few smaller pieces escape naturally—this is part of the charm.
Next, tend to your face-framing pieces. Pull out a few soft tendrils around your forehead, temples, and nape of your neck. You can leave these straight or use a curling wand to create soft, face-framing waves. This step is non-negotiable; it breaks up the hardness of the updo, adds a touch of romance, and makes the entire style look more effortless and wearable.

Accessorize Wisely: The Power of Strategic Embellishment
You don’t need a diamond-encrusted hairpin to make your bun look expensive (though it wouldn’t hurt!). The key is to choose one, statement accessory that elevates the entire look without overwhelming it.
Scarves & Ribbons: This is the ultimate budget hack. A simple silk-like scarf (you can find affordable polyester versions that look just as chic) tied around the base of your bun adds an instant hit of color, pattern, and luxury. You can also weave a thin ribbon through your hair before wrapping it into a bun for a subtle, elegant detail.
Quality Hairpins: Ditch the shiny, plastic bobby pins. A few matte-finish, tortoiseshell, or metal hair pins can make a world of difference. Instead of just hiding them, use them as a decorative element. Criss-cross them over the base of the bun or use a single, elegant U-pin as a focal point.
Simple Clips & Combs: A minimalist, gold or pearl-adorned clip tucked into the side of the bun can look incredibly sophisticated. The goal is to choose something that looks and feels substantial, not flimsy.

The Final Touch: The Invisible Makeover
The final step to an expensive-looking bun is all about the finishing touches—the details that are barely noticeable but collectively create a polished whole.
First, tame the flyaways. A cheap toothbrush or a clean mascara wand spritzed lightly with hairspray or a bit of hair gel is perfect for slicking down those tiny, rebellious hairs around your hairline and nape without making your hair look stiff or helmet-like.
Second, check your bun from all angles in the mirror. Is it lopsided? Is there a gap showing the ponytail holder? Use a few strategically placed bobby pins to secure any loose sections and ensure the shape is cohesive from the back and sides.
Finally, a light mist of a flexible-hold hairspray will lock everything in place without creating a crispy, unnatural finish. The goal is for your hair to still have movement, not be frozen in time.

Budget Bun, Billion-Dollar Look: Your Quick Recap
Transforming your classic bun from simple to stunning doesn’t require a celebrity stylist’s budget. It requires a shift in technique and an eye for detail. Remember these key takeaways:
Volume is King: Never skip adding lift at the crown.
Embrace Texture: Grit and waves are your friends for creating a full, artful bun.
Be Deliberately Undone: Pull, tug, and release pieces to soften the style.
Accessorize with Intention: One good scarf or a set of matte pins can elevate the entire look.
Finish Like a Pro: Conquer flyaways and secure everything with a light, flexible hold.