How to Perfect choppy braid Hair Without a Trip to the Salon
You’ve seen them everywhere—from runways to red carpets to your favorite influencer’s feed. The choppy braid, with its intentionally undone, textured, and effortlessly cool vibe, has become the ultimate hairstyle for looking put-together without trying too hard. But here’s the secret they don’t tell you: achieving that perfectly imperfect look is often a carefully crafted art. If your attempts at a choppy braid often result in a mess that’s more “just woke up” than “effortlessly chic,” you’re not alone.
The good news? You don’t need a professional stylist on speed dial to get it right. With the right techniques and a little insider knowledge, you can create stunning, salon-quality choppy braids from the comfort of your own bathroom. This comprehensive guide will walk you through everything from prepping your hair to the final, crucial step of pulling it all apart to create that coveted texture. Get ready to say goodbye to braid frustration and hello to your new signature style.
Why the “Choppy” Look Works: It’s All About Texture
Before we dive into the how, it’s important to understand the why. A traditional, sleek braid is beautiful in its own right, but it can sometimes appear formal, tight, and even a little severe. The choppy braid, on the other hand, is its laid-back, modern cousin. The goal isn’t sloppiness; it’s strategic texture. By gently pulling sections of the braid loose, you create volume, dimension, and a soft, romantic feel.
This style works because it mimics the natural variation and slight disarray of hair that has been tousled by the wind or has naturally lived-in body. It frames the face softly, adds incredible volume (even if you have fine hair), and most importantly, it looks incredibly effortless and cool. It’s a style that says, “I just threw my hair up and it magically looked this amazing,” even though we all know there’s a brilliant technique behind it.
Step 1: The Foundation – Prepping Your Hair for Texture
The journey to a perfect choppy braid begins long before you start weaving sections together. The state of your hair on day one is your canvas, and a clean, smooth canvas is not what we’re after. For the best grip and texture, start with day-two or even day-three hair. The natural oils that build up will provide just enough grit and hold to prevent your braid from slipping apart and will make it easier to create that lived-in texture.
If your hair is freshly washed and too slippery, don’t despair. You can create instant texture with a few key products. A light-hold texturizing spray or a dry shampoo is your best friend here. Spritz it at the roots and through the mid-lengths to add volume and that all-important grip. For those with very fine or silky hair, a light dusting of texturizing powder can work wonders, giving your strands a slight coarseness that braids beautifully.

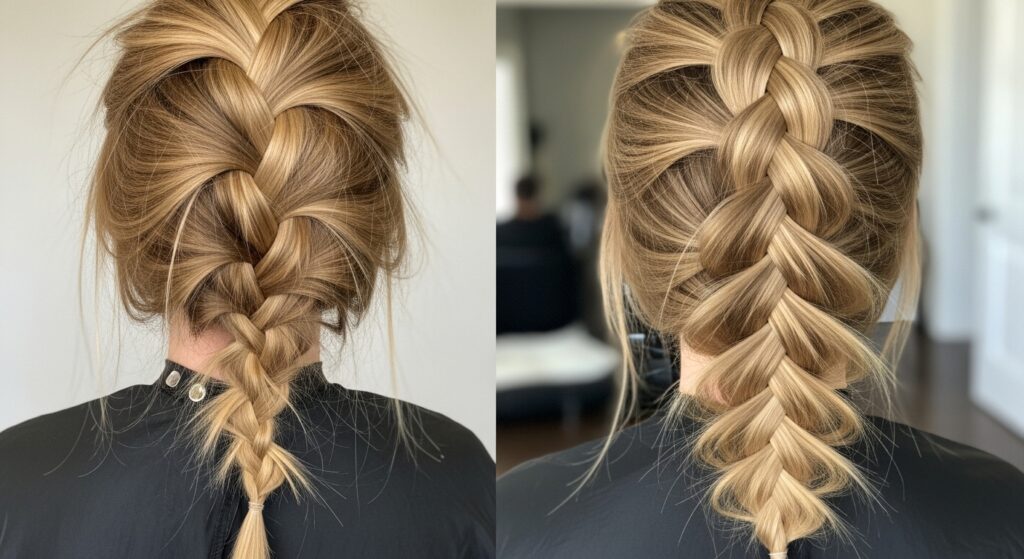
Step 2: The Braiding Technique – Loose is More
This is the most critical mindset shift for mastering the choppy braid: you must braid loosely. A common mistake is braiding too tightly, thinking you’ll just “loosen it up later.” While you can loosen a tight braid, it often leads to an uneven, frizzy result instead of a controlled, textured one. The goal is to create a braid that is cohesive but has built-in space for texture from the very beginning.
As you braid, consciously keep your grip light. Don’t pull the sections taut. Instead, let them fall with a little more slack. Think of it as gently folding the hair over itself rather than tightly pulling it. Whether you’re creating a classic three-strand braid, a fishtail, or a Dutch braid, the principle remains the same. A loose braid will feel almost too floppy in your hands, but trust the process—this is exactly what you want.

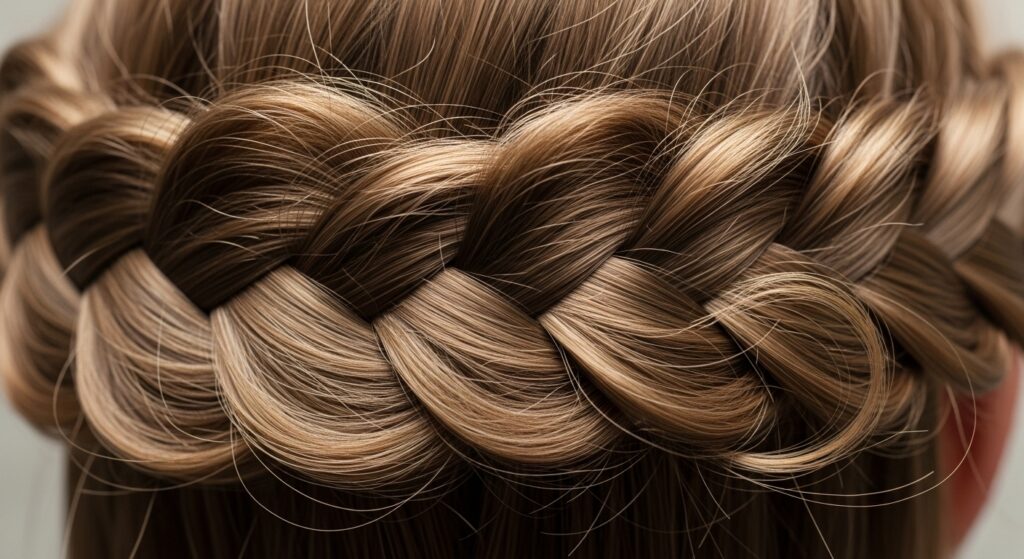
Step 3: The Magic Touch – How to “Chop” It Up Perfectly
Now for the fun part—transforming your neat, loose braid into a textured masterpiece. This is where the “choppy” magic happens, and it requires a gentle, strategic hand. Start by securing the end of your braid with a clear elastic or a small, hair-color-matched elastic. This gives you a stable foundation to work from.
Begin at the bottom of the braid and work your way up. Using your fingertips (not your nails!), gently pinch a small, random section of the braid from the outside and pull it outward. The key is to pull sections perpendicular to the braid, not straight down its length. Alternate sides as you go, pulling out different-sized pieces to create an organic, uneven look. Don’t pull every single bubble; leave some areas tighter to maintain the braid’s structure and create visual interest.
Pro Tip: For a more voluminous look, you can also gently tug on the inner sections of the braid. Carefully separate the strands from the underside to plump up the entire braid from within, making it look thicker and more substantial.

Step 4: Securing the Look and Taming Flyaways
Once you’ve achieved your desired level of chunkiness and texture, you need to lock it in. If you used a visible elastic at the bottom, you can now carefully replace it with a more discreet one or even hide it by wrapping a small section of hair around it and pinning it in place with a bobby pin.
At this stage, you’ll likely have some flyaways. This is normal and can actually contribute to the effortless vibe. However, for a more polished version of the messy look, you can tame them. Avoid heavy hairsprays that can make hair look stiff and crunchy. Instead, use a light-hold hairspray from a distance, or better yet, a drop of serum or hair oil on your fingertips to gently smooth down the most rebellious strands around your hairline and the nape of your neck.

Common Choppy Braid Mistakes (And How to Fix Them)
Even with the best instructions, things can go slightly awry. Here’s a quick troubleshooting guide:
Mistake 1: The Frizz Bomb. You pulled too hard or used a comb instead of your fingers. Fix: Always use your fingertips. If frizz persists, a light mist of texturizing spray can help redefine the separated sections and blend the frizz into intentional texture.
Mistake 2: It Fell Apart. Your braid was too loose, or your hair was too slippery. Fix: Ensure you have enough texture grip from dry shampoo or texturizing spray. When pulling sections, be gentle. You’re teasing the braid out, not ripping it apart.
Mistake 3: It Looks Too Uniform. You pulled out sections that were all the same size and evenly spaced. Fix: The beauty is in the asymmetry. Go back in and pull a few larger chunks on one side and smaller, more subtle ones on the other to break up the pattern.

Styling Variations: Beyond the Basic Choppy Braid
Once you’ve mastered the classic choppy braid, a world of styling possibilities opens up.
The Choppy Ponytail Braid: Create a high or low ponytail first, then braid the tail loosely and pull it apart. This adds incredible interest to a simple ponytail.
The Side-Swept Choppy Braid: A single braid swept over one shoulder looks romantic and bohemian. Gently pull the braid apart, focusing on the top sections that frame your face for a soft, cascading effect.
Double the Fun: Create two loose pigtail braids (either high or low) and pull them apart for a playful, youthful look. This is also a fantastic way to manage second-day hair.
The Crown Braid: A loose, pulled-apart crown braid is the epitome of ethereal beauty. Braid two sections loosely, pin them around your head, and then meticulously pull them to create a soft, halo-like effect.

Your At-Home Salon Kit for Perfect Braids
You don’t need a drawer full of expensive tools, but a few key items will make the process much easier:
Texturizing Spray or Dry Shampoo: The non-negotiable foundation for grip and volume.
Light-Hold Hairspray: For setting without stiffness.
Hair Serum or Oil: To tame flyaways and add a touch of shine.
Clear or Skinny Elastics: To secure the braid discreetly.
Bobby Pins: For securing ends and hiding elastics.
A Good Detangling Comb: For pre-braid prep, but keep it away during the “chopping” phase!

Conclusion: Embrace the Ease of Effortless Style
Mastering the choppy braid is less about technical precision and more about embracing a relaxed, creative approach to styling. It’s a forgiving, customizable hairstyle that celebrates imperfection. By starting with textured hair, braiding with a light touch, and strategically pulling your braid apart, you can achieve a look that rivals any salon creation.
The best part? This skill is now yours. No appointments, no hefty prices, just you and your newfound ability to create a hairstyle that is as unique and individual as you are. So grab your texturizing spray, throw perfectionism out the window, and start braiding. Your perfect, perfectly imperfect, choppy braid awaits.