How to Upgrade Your bouncy bun Hair in Just Minutes
Let’s be honest. The humble bun is the hero of our hair story. It’s our go-to on rushed mornings, bad hair days, and when we need to look instantly polished. But if your standard bun is starting to feel a little… well, basic, you’ve come to the right place. That simple knot of hair holds so much more potential than you might think.
Imagine transforming your everyday bun from a simple updo into a voluminous, eye-catching, and elegant hairstyle that looks like it was done by a professional. The best part? You don’t need an arsenal of tools or hours of free time. With a few simple tricks and a touch of creativity, you can learn how to upgrade your bouncy bun hair and turn it into a statement look in just minutes.
This guide is your ticket to leaving the flat, lifeless bun behind. We’re diving into the secrets of volume, texture, and style that will elevate your bun game forever. Get ready to unlock a world of chic, effortless hairstyles that are as quick as they are gorgeous.
The Foundation: Prepping for the Perfect Bouncy Bun
Before we twist and pin, the secret to a truly phenomenal bun lies in the preparation. A great bun isn’t just about the technique; it’s about the canvas you start with. The goal is to create hair that has grip, body, and a touch of texture. Slick, freshly washed hair can be slippery and difficult to work with, often resulting in a bun that unravels or lies too flat.
If possible, start with day-old hair. The natural oils and any leftover product will provide the perfect amount of texture and hold. If you must work with clean hair, spritz a texturizing or volumizing spray at the roots and through the mid-lengths. Don’t be afraid to backcomb the crown of your head gently for a few seconds. This isn’t about creating 80s-level tease; it’s about building a hidden foundation of volume that will make your bun appear fuller and more “bouncy” from every angle.

Tool Time: What You Really Need in Your Arsenal
You don’t need a professional kit, but a few key items will make the process infinitely easier and the results infinitely better. Ditch the flimsy, thin hair ties that snap and crease your hair. Instead, opt for a thick, coiled elastic or a snag-free spiral hair tie. These provide superior hold without damaging your hair or leaving a harsh dent.
Next, your pins. Standard bobby pins are good, but for a heavier or thicker bun, spin pins are a game-changer. These corkscrew-like pins twist into your bun, anchoring it securely with far fewer pieces. You’ll also want a few U-pins or hair forks for more elaborate styles. Finally, a light-hold hairspray or a shine spray is the perfect finishing touch to tame flyaways and add a professional gleam.

The Classic Volume Boost: The Secret Sock Bun (or Donut)
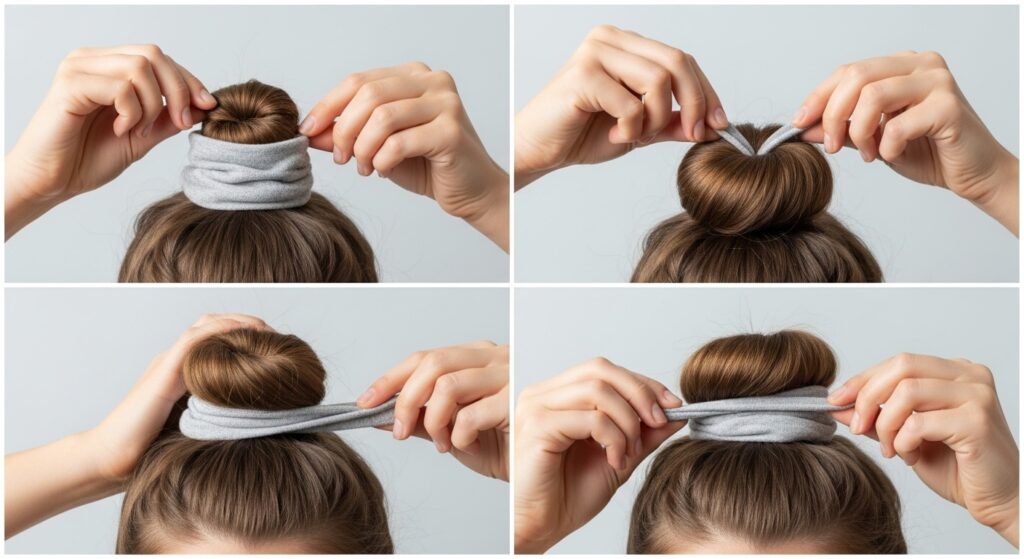
This is the ultimate cheat code for a perfect, round, and incredibly bouncy bun. While you can buy a pre-made “bun donut,” a simple sock works just as well. Take a clean sock (ankle socks work best) and cut the toe off. Then, simply roll the sock into itself until it forms a doughnut shape.
To use it, pull your hair into a high ponytail where you want the center of your bun to be. Slide the sock donut over the ponytail, letting it rest at the base. Now, evenly distribute your hair over the sock and tuck the ends under the donut. Secure the ends with a hair tie around the base of the bun, hiding it underneath. Finally, take your remaining hair and wrap it around the sock, using bobby pins to secure the hair underneath the bun. The result? An impossibly perfect, full, and symmetrical bun in under three minutes.
Effortless Texture: The Messy, Boho-Chic Bun
Perhaps the most forgiving and stylish of all, the messy bun is an art form that celebrates imperfection. This style is perfect for when you want to look put-together without looking like you tried too hard. Start by flipping your head over and gathering your hair at your desired height—the crown of the head works beautifully for this style. Twist the hair loosely once or twice.
Instead of wrapping it tightly, coil the twist loosely around the base, allowing pieces to fall out naturally. This is key! The beauty is in the escapee strands. Use your fingers to gently pull at sections of the bun to create more volume and a softer shape. Secure everything with a hair tie and U-pins, only pinning the core structure. Finish by pulling out a few face-framing pieces and using a texturizing spray to enhance the piecey, lived-in feel.

The Elegant Twist: The Braided Crown Bun
This style sounds complex but is surprisingly simple and delivers a huge payoff in elegance. It’s perfect for weddings, dates, or any event where you want to look exceptionally chic. Begin by pulling your hair into a low, loose ponytail, but leave a section of hair out near one temple. Split this section into three and create a simple braid.
Now, take the rest of your hair (including the ponytail) and form a loose bun at the nape of your neck, securing it with pins. The final step is the magic: take your braid and drape it over the top of your head, following the hairline, and wrap it around the base of your bun, pinning it securely underneath. This creates a beautiful, intricate headband effect that instantly elevates the entire look from simple to stunning.

Modern Edge: The Bubble Bun
For a truly fashion-forward take on the bun, the bubble bun is your winner. It’s fun, modern, and incredibly easy to achieve. Start with a high ponytail. Use multiple, thin hair elastics to secure the ponytail at even intervals down its length. You’ll create a look that resembles links of sausage or, as the name suggests, bubbles.
Once all the elastics are in place, the real fun begins. Gently tug on each “bubble” to puff it out and make it rounder and fuller. The goal is to create a playful, exaggerated silhouette. You can leave the tail as is for a space-age look, or you can twist the end into a small, traditional bun. This style is a guaranteed conversation starter and proves that a bun can be anything but boring.

Finishing Touches: The Details That Make the Difference
Your bun is secured, but the magic is in the final flourishes. This is where you personalize your creation. Take a moment to assess the shape. Use the tip of a comb or your fingers to gently pull out a few more tiny hairs around your hairline and nape to soften the look and frame your face.
If you want a sleeker appearance, use a soft-bristle brush and a light-hold gel or pomade to smooth down any flyaways. For extra glamour, this is the time to accessorize. Slide a delicate, decorative hair pin into the side of the bun, or wrap a silk scarf around the base before you start for a pop of color and pattern. A spritz of shine spray will add a healthy, red-carpet-worthy gleam to your masterpiece.

Your New Go-To Hairstyle Awaits
As you can see, learning how to upgrade your bouncy bun hair is less about learning complicated techniques and more about understanding a few foundational tricks. It’s about adding volume with a donut, embracing texture for a messy look, incorporating braids for elegance, or playing with form for a modern twist. Each of these styles can be mastered in mere minutes, yet they completely transform your appearance and confidence.
So the next time you reach for that hair tie, dare to do more than just twist and tuck. See your bun not as a last resort, but as a blank canvas for creativity. With these techniques in your style repertoire, you’re equipped to turn the most basic of hairstyles into your signature look. Go ahead, give your bun the bounce it deserves.