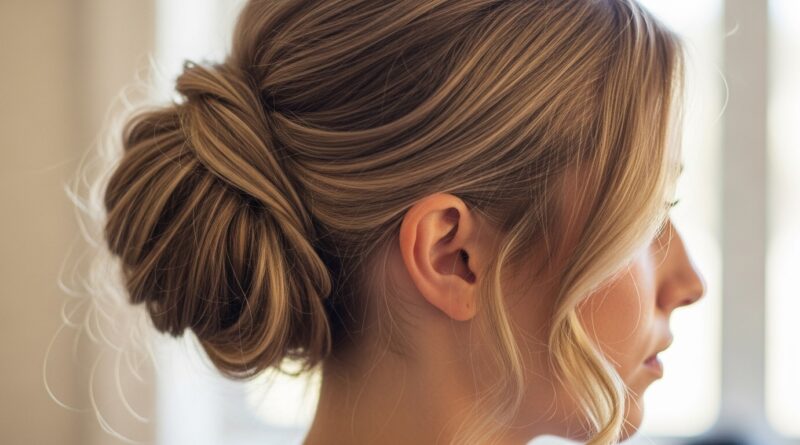
How to Upgrade Your natural updo Hair in Just Minutes
You know the feeling. You’re running late, your hair is doing its own thing, and you desperately need a style that looks like you put in effort when you really, really didn’t. The trusty bun or simple ponytail comes to the rescue, but let’s be honest—it can feel a little… basic. What if you could transform that quick updo from a last-minute resort into a deliberate, elegant hairstyle that turns heads?
The good news is, you absolutely can. Upgrading your natural updo doesn’t require a professional stylist, a suitcase full of tools, or even a lot of time. It’s all about small tweaks, clever techniques, and a few insider secrets that make a world of difference. Whether your hair is coily, curly, wavy, or straight, this guide is your ticket to achieving a sophisticated, polished updo in just minutes. Let’s dive in and unlock the potential of your everyday hairstyles.
The Foundation: Prep Your Hair for the Perfect Updo
Before you even think about twisting or pinning, the secret to an updo that lasts all day and looks incredible starts with the foundation. Think of it like building a house—you need a solid base. For natural hair, this means working with your hair’s texture, not against it.
First, consider your hair’s state. Is it freshly washed and fluffy, or is it on day two or three with a little more grip? Slightly second or third-day hair often has more natural hold, making it easier to style. If your hair is freshly washed, a light-hold mousse or a texturizing spray can provide the necessary grit and body. The goal is to create a canvas that has some texture and hold, allowing your updo to stay secure without feeling stiff or crunchy.
Another crucial step is moisture and definition. For curly and coily textures, a good leave-in conditioner and a defining cream can enhance your curls, making any tendrils or face-framing pieces you leave out look intentional and beautiful. Don’t skip the scalp care either; a quick spray of a refreshing toner or a light oil can keep your scalp feeling great while your hair looks gorgeous.
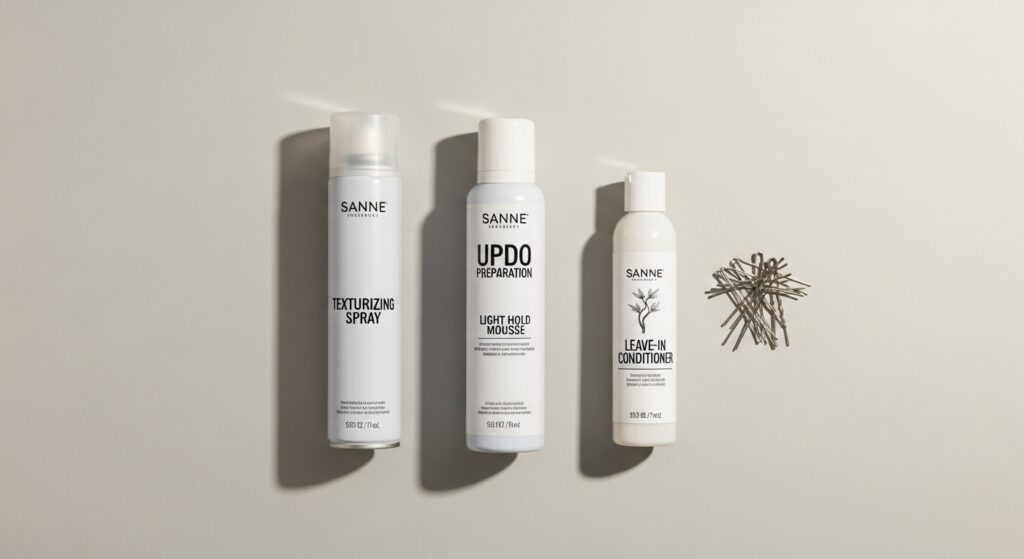
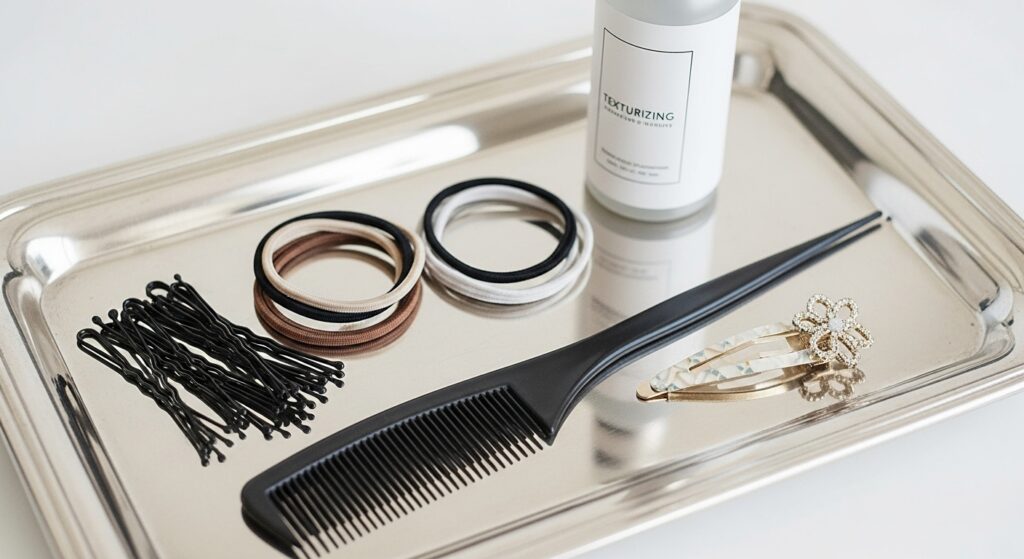
Tool Time: The 5-Minute Updo Kit
You don’t need a salon’s worth of equipment to create stunning updos. In fact, you can achieve most styles with just a few key items. Having these tools within arm’s reach will cut your styling time in half and open up a world of possibilities.
The Non-Negotiable Basics: A rat-tail comb for clean parts, strong, snag-free hair elastics that don’t break your hair, and a reliable set of bobby pins. Pro tip: choose bobby pins that match your hair color for a seamless, invisible hold.
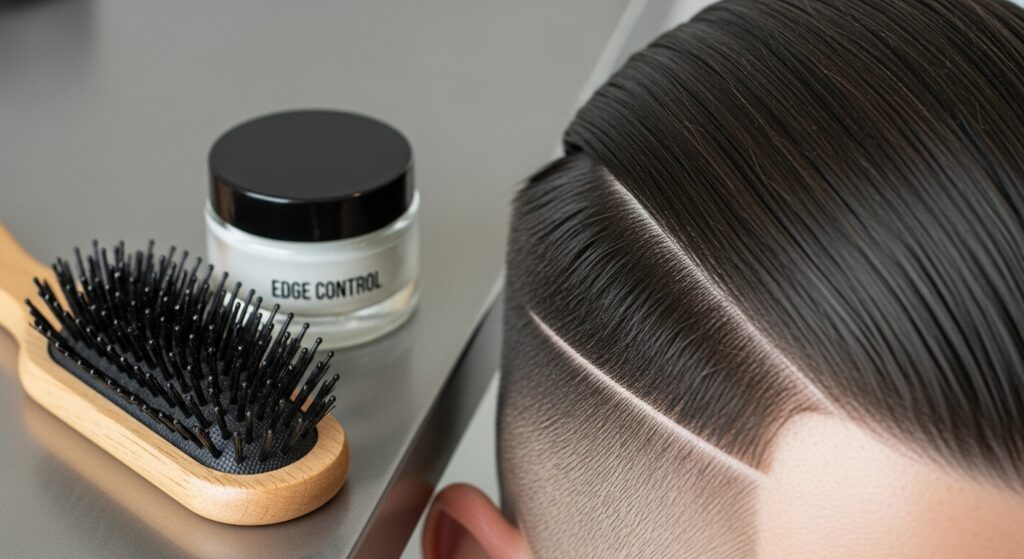
The Upgraders: This is where the magic happens. A few coil-less hair bands or “ouchless” elastics are perfect for creating internal structure without bulk. A set of hairpins (like U-pins or Amish pins) offers superior hold for thicker, heavier hair. A little bottle of edge control and a soft-bristle brush will give you those sleek, polished edges that elevate any style instantly.
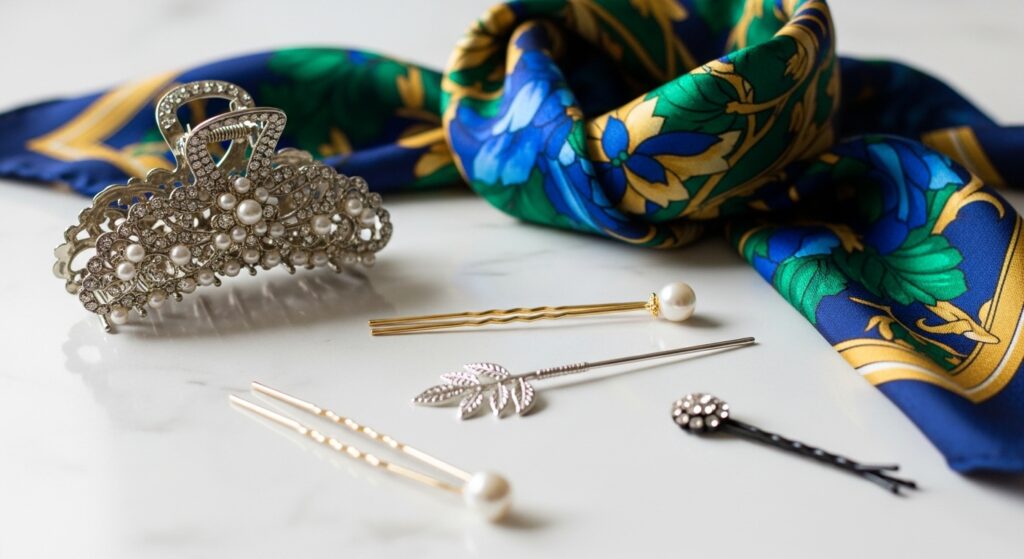
The Secret Weapons: Don’t underestimate the power of a little texturizing dry shampoo or a light-hold hairspray for flyaways. For a touch of glamour, have a decorative hair clip or a silk scarf on standby. These accessories can transform a simple bun into a statement look in seconds.
5-Minute Updo Transformations: Step-by-Step
Now for the fun part! Let’s apply these principles and transform three common, basic updos into something special. Each of these styles builds on a simple technique but uses a small upgrade to create a big impact.
1. The “Twist and Tuck” Pouf
This style takes a simple high puff and gives it a modern, elegant twist—literally.
Step 1: Gather your hair into a high ponytail, but on the last loop of the hair tie, only pull the hair halfway through, creating a loop or a “half-pony.”
Step 2: Take the remaining tail of hair and split it into two sections. Twist these two sections around each other loosely.
Step 3: Wrap the twisted section around the base of the half-pony, tucking the end underneath and securing it with bobby pins. Gently pull apart the looped hair to create a soft, full pouf.
The Upgrade: Before you start, take two small sections from the front, twist them back, and incorporate them into the ponytail. This creates an instant, built-in frame for your face.
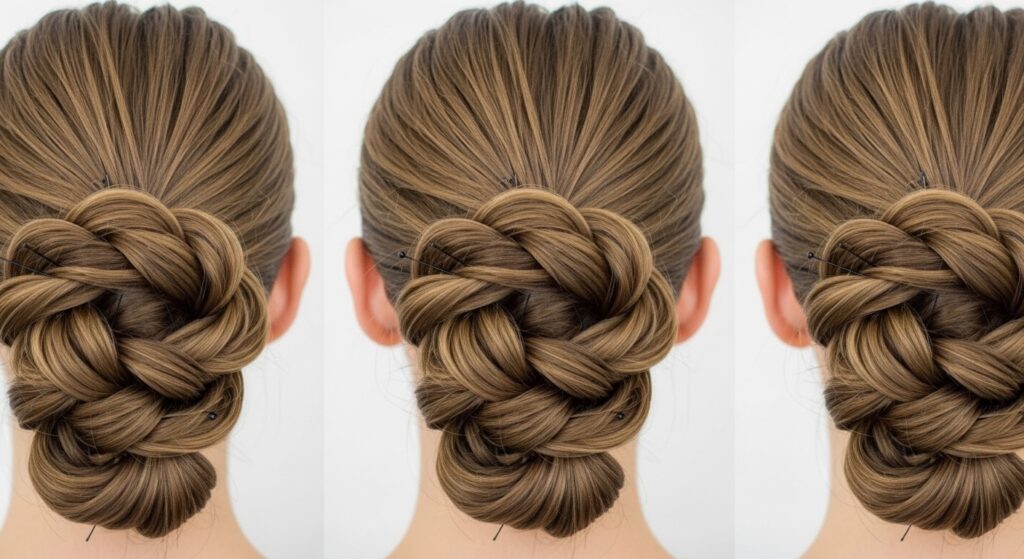
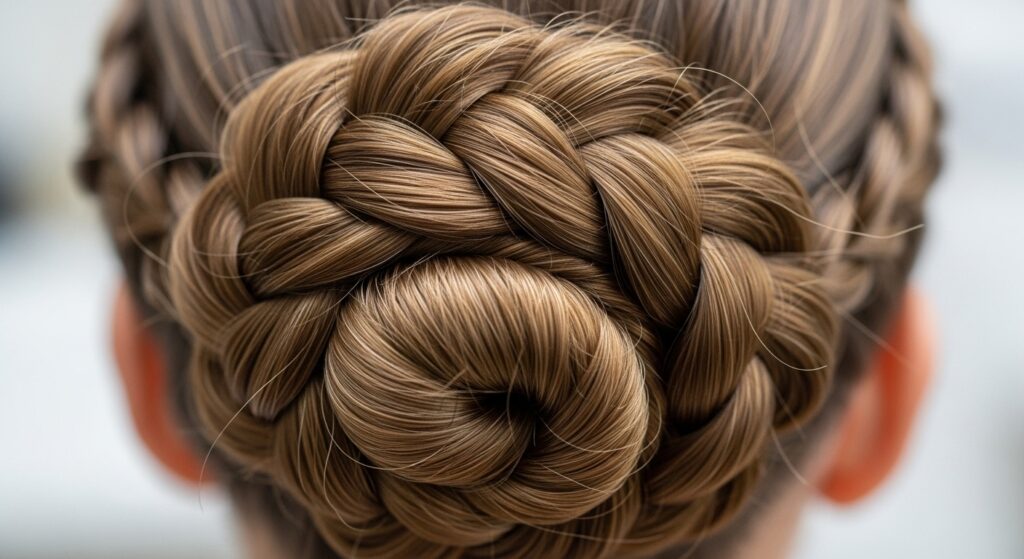
2. The Elegant Rope Braid Bun
A regular braided bun is beautiful, but a rope braid adds incredible texture and visual interest with minimal effort.
Step 1: Gather your hair into a low or high ponytail.
Step 2: Split the ponytail into two equal sections. Twist each section clockwise, then wrap the two twisted sections around each other counter-clockwise. This is the key to the rope braid—it keeps the braid tight and defined.
Step 3: Once the entire length is braided, wrap the rope braid around the base of the ponytail to form a bun. Secure it firmly with bobby pins, tucking the end under.
The Upgrade: Gently pull apart the strands of the rope braid before you wrap it into a bun. This “pancaking” technique will make the braid look fuller, thicker, and more intricate, giving you a high-fashion bun in minutes.
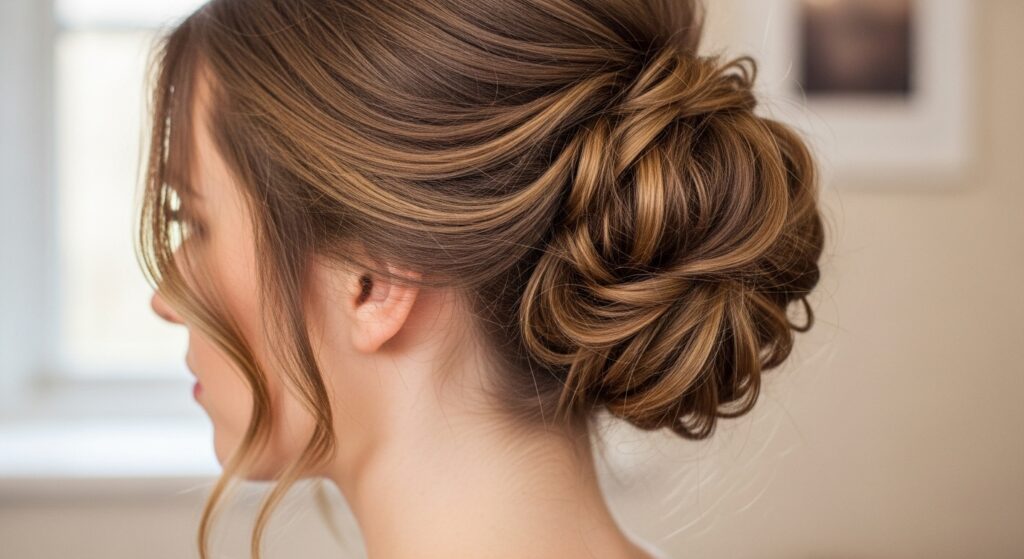
3. The “Effortlessly Messy” Twisted Bun
This style is the ultimate in chic, undone elegance. It’s perfect for when you want to look put-together without looking like you tried too hard.
Step 1: Do not brush your hair. Instead, use your fingers to gather it into a loose, high ponytail. The goal is to maintain all your beautiful natural texture.
Step 2: Twist the entire ponytail until it naturally starts to coil around itself.
Step 3: Loosely wrap the twisted ponytail around its base to form a bun. Do not pull it tight. Let some pieces fall out naturally.
Step 4: Secure the bun with just 2-3 U-pins or criss-crossed bobby pins. The hold should feel secure but not tight.
The Upgrade: Spritz a texturizing spray all over the bun once it’s in place. Then, use your fingers to gently pull out a few more tendrils around your face and nape of your neck. This creates a soft, romantic, and intentionally imperfect look.
Pro Tips for a Flawless Finish
It’s the tiny details that separate a good updo from a great one. These finishing touches are what make your style look professional and polished.
Sleek Edges Are Everything: A little edge control and a soft brush can transform your entire look. Take 30 seconds to smooth down your baby hairs and edges into a soft swoop or defined pattern. This single step adds an incredible amount of polish.
Hide Your Hair Tie: Nothing says “I did this in a rush” like a visible, bulky hair elastic. After securing your bun, take a small section of hair from underneath the bun, wrap it around the base to conceal the tie, and secure it with a discreet bobby pin.
Volume is Your Friend: If your updo is looking a little flat, don’t be afraid to gently tug at the sides of your style. For a high bun, gently pull it apart to create a fuller shape. For a low style, gently tug at the hair just above your ears to create a little lift at the crown.
Accessorize to Maximize
Accessories are the ultimate shortcut to an upgraded updo. They add personality, color, and a high-end feel without any additional styling effort.
A large, decorative claw clip can be used to pin one side of a twisted style or to hold a low bun in a truly glamorous way. Silk or satin scarves are incredibly versatile; you can wrap them around a ponytail base, tie them into a headband that flows into your bun, or even braid them into your hair for a pop of color. For a minimalist yet chic touch, a simple gold or pearl-encrusted hairpin tucked into the side of a bun catches the light and draws the eye beautifully.
The key with accessories is to choose one statement piece. Let it be the star of the show, and keep the rest of your look relatively simple.
Conclusion: Your Time for Elegance is Now
Upgrading your natural updo from simple to stunning isn’t a matter of having more time; it’s about using the time you have more strategically. With the right prep, a few key tools, and these easy, transformative techniques, you can say goodbye to boring buns and hello to hairstyles that make you feel confident and beautiful every single day.