How to Upgrade Your playful braid Hair in Just Minutes
Let’s be honest, a simple braid is a trusty friend. It’s our go-to for bad hair days, workouts, or when we just need our hair out of our face. But sometimes, that classic three-strand plait can feel a little… basic. What if you could take that foundational style and transform it into something extraordinary, something that looks like you spent an hour in front of the mirror, but in reality, only took you a few minutes?
Well, consider that wish granted. The humble braid is a canvas waiting for your creative touch. With a few simple tweaks, the right accessories, or a slight variation in technique, you can elevate your look from simple and playful to chic and sophisticated in the time it takes to brew a cup of coffee. This guide is your secret weapon to unlocking a world of quick, beautiful, and upgraded braided hairstyles that will make everyone ask, “How did you do that?”
1. The Accessory Game-Changer: Ribbons & Scarves
This is, without a doubt, the fastest way to inject instant personality and a pop of color into your braid. The technique is simple, but the impact is massive. Instead of just weaving hair, you weave a beautiful ribbon or a silk scarf right into the braid itself.
How to do it: Start by tying your ribbon or scarf to the hair elastic at the top of your ponytail, or simply incorporate it as one of the “strands” from the very beginning at your crown. As you French braid or create a standard three-strand braid, treat the fabric as one of the sections, crossing it over and under the sections of hair just like you normally would. The key is to keep the fabric flat and smooth as you go. Once you reach the end, secure everything with a clear elastic and let the ends of the ribbon flow freely with the ends of your hair.
Pro Tip: For a more bohemian vibe, use a patterned scarf. For a romantic, feminine look, a satin ribbon is perfect. This method works wonders on both fine and thick hair, adding visual interest and texture.

2. The Pull-Through Perfection: A Softer, Voluminous Look
If tight, precise braiding isn’t your forte, the pull-through braid (also known as a lace braid or fake French braid) is about to become your new best friend. It creates the intricate, elegant look of a French or Dutch braid but is significantly easier and faster to achieve. The result is a soft, romantic, and incredibly voluminous braid that looks far more complicated than it is.
How to do it: Begin by gathering a top section of hair and splitting it into two parts. Hold these two parts separately. Now, from the side of one part, pick up a new, thin section of hair from your head and add it to the opposite part, then cross that part over. Repeat on the other side: pick up a new section of hair, add it to the opposite part, and cross over. Continue this “pick, add, and cross” motion all the way down the back of your head. The magic lies in the gentle pulling of each loop to loosen it and create that gorgeous, waterfall-like volume.
Pro Tip: For a messier, more bohemian finish, gently tug on the sides of the braid once it’s secured to amplify the volume and create a piecey, textured effect.

3. The Twist & Braid Combo: Elegance Made Easy
Sometimes, the most sophisticated looks come from combining two simple elements. Enter the twist and braid combo. By starting with a few face-framing twists that then merge into a braid, you create a hairstyle that is effortlessly elegant and perfect for everything from a day at the office to a dinner date.
How to do it: Part your hair as you normally would. On one side of your part, take a front section of hair and split it into two. Twist these two sections around each other two or three times. As you continue twisting, start picking up small sections of hair from the side of your head and incorporating them into the twist, much like you would in a French braid. Once you’ve gathered all the hair you want from that side, continue the twist down a few more inches and then join it with the rest of your hair to form a low side braid or ponytail. Repeat on the other side for a symmetrical look, or leave it as a single, statement detail.
Pro Tip: Keep the twists tight near your face for a polished look, and then loosen them slightly as you go back to blend seamlessly into the braid.

4. The Braided Bun Upgrade: A Quick Chignon
Why have a regular bun when you can have a braided one? This upgrade takes a simple ponytail and turns it into a chic, ballerina-inspired chignon in a matter of minutes. It’s the perfect solution for second-day hair and looks exceptionally polished.
How to do it: Start by creating a low ponytail and secure it with an elastic. Braid the ponytail as you normally would—a standard three-strand braid works perfectly. Once you’ve reached the end, don’t secure it yet. Instead, take the braid and start wrapping it around the base of the ponytail, forming a bun. As you wrap, use bobby pins to secure the braid to your head, tucking the end under the bun. The beauty of this style is that the braid itself becomes the textural detail of the bun, making it look intricate and intentional.
Pro Tip: For a less perfect, more romantic bun, gently pull apart the sections of the braid before you wrap it to make the bun look fuller and softer.

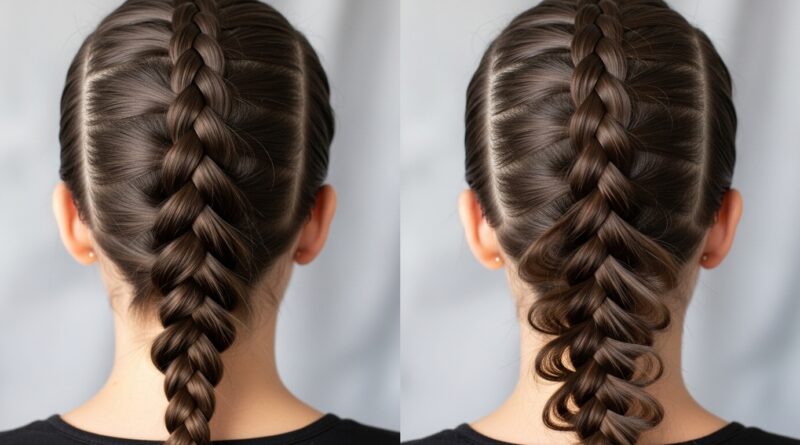
5. The “Pancake” Method: Maximizing Volume Instantly
This is the ultimate secret trick of hairstylists and braid enthusiasts everywhere. “Pancaking” a braid is the technique of gently pulling apart the sections of a completed braid to make it look wider, fuller, and more dramatic. It transforms a skinny, tight braid into a bohemian, statement piece.
How to do it: First, create any type of braid you like—a Dutch braid (which pops out) is particularly stunning for this. Secure the end firmly with a clear elastic. Now, starting from the bottom of the braid and working your way up, gently tug on the outer loops of each “bump” in the braid. Use your thumb and forefinger to pull each section horizontally, away from the center of the braid. Alternate sides as you move up, gradually loosening and expanding the entire braid. Be gentle but firm; you want to stretch the braid, not pull it apart completely.
Pro Tip: For even more hold and a piecey texture, lightly mist the braid with a texturizing spray before you start pancaking. This gives the hair more grip and helps the volume last all day.

Your Quick-Start Guide to a Flawless Braid
Before you dive into these upgrades, remember that a great braid starts with the right foundation. Here are a few universal tips for success:
Embrace Texture: Braiding perfectly clean, silky hair can be a slippery battle. If possible, braid day-old hair, or spritz dry shampoo or a texturizing spray at the roots and through the lengths. The added grit and volume will make the braiding process easier and help your style hold much longer.
Tool Up: Keep a tail comb for clean parts, clear elastics for an invisible finish, and a few bobby pins on hand. A light-hold hairspray is great for taming flyaways without making your hair look stiff.
Practice Makes Progress: Don’t get discouraged if your first attempt isn’t perfect. Braiding is a skill that improves with repetition. Try these styles when you’re at home with no pressure, so you can master them for when you really need a quick, beautiful hairstyle.