Shag Styling: How to Make Layers Look Intentionally Messy
Remember when messy hair was something you desperately tried to brush, smooth, and tame into submission? Those days are over. Today, a deliberately disheveled, textured, and effortlessly cool mane is the ultimate hair goal. And at the heart of this aesthetic revolution is the modern shag. This isn’t your grandmother’s shag from the 70s—this is a fresh, customizable, and incredibly versatile cut that celebrates movement, personality, and a beautiful, intentional mess.
But here’s the secret every stylist knows: achieving that “I just woke up like this” vibe actually requires a bit of know-how. The messy shag is a masterpiece of controlled chaos, and styling it is an art form. If you’ve ever left the salon with a perfect shag only to struggle recreating that lived-in texture at home, you’re not alone. This guide is your roadmap. We’re diving deep into the techniques, products, and tricks you need to make your layers look intentionally messy, undeniably chic, and completely you.
Understanding the Anatomy of a Modern Shag
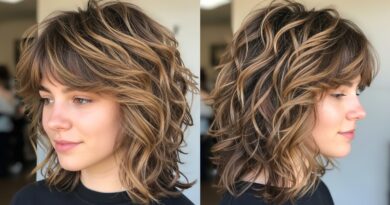
Before you can master the styling, it’s crucial to understand what you’re working with. A shag haircut is fundamentally built on layers—lots of them. But these aren’t just any layers. The modern shag is characterized by short layers around the crown and face that create volume and frame your features, seamlessly blending into longer layers throughout the rest of the hair. This structure is what gives the shag its signature shape and bounce.
The magic, however, lies in the texturizing. A skilled stylist will use techniques like point cutting, razor cutting, or notching to remove weight and create internal movement. This texturizing is the foundation for the mess. Without it, layers can fall flat or look chunky instead of piecey. So, your first step to a great messy shag is ensuring the cut itself has been properly textured to support the style. It’s the difference between hair that looks accidentally unkempt and hair that looks artistically undone.

Start in the Shower: The Foundation of Texture
Believe it or not, your styling session begins before you even step out of the shower. The products you use to wash and condition your hair set the stage for everything that follows. For a shag, you want to build a base of grip and body, not slickness and slip.
Swap your smoothing shampoo for a volumizing or texturizing formula. These are designed to gently cleanse without weighing hair down. When it comes to conditioner, this is non-negotiable: only condition the ends. Apply conditioner from your mid-lengths down to the tips, carefully avoiding your roots. This prevents the scalp from getting too slick, ensuring your roots have the lift and grit needed for maximum volume. For an even bigger boost, consider a texturizing spray or sea salt spray applied to damp roots before you even start drying.

The “Upside-Down” Blow-Dry: Your Volume Secret Weapon
This is perhaps the most critical step for creating the shag’s iconic volume and lived-in texture. The goal here isn’t a sleek, polished blowout; it’s to rough-dry your hair while encouraging natural movement and root lift.
Start by towel-drying your hair until it’s just damp, not dripping. Then, flip your head upside down. Using a blow dryer with a concentrator nozzle on a medium heat and high speed setting, direct the airflow at your roots. Use your fingers to tousle and scrub at the roots as you dry. This creates instant lift and breaks up the hair, preventing it from falling flat. Don’t aim for perfection—you’re going for a general, all-over dryness with plenty of body. Once your roots are about 90% dry, you can flip back up and quickly blast the lengths of your hair until they are completely dry. You should be left with a wild, voluminous base that’s ready for strategic styling.

Tool Time: Irons and Wavers for Creating Controlled Chaos
Now that you have a foundation of volume, it’s time to define those layers with heat tools. The key is to avoid uniform, perfect curls or waves. You’re aiming for a mix of textures that look like they happened naturally.
The 1-Inch Curling Iron or Wand: This is your best friend for creating piecey, defined ends. Take small, random sections of hair, focusing on the shorter layers around your face and throughout the crown. Wrap the hair around the barrel, but only curl the mid-lengths to the ends, leaving the roots straight. Alternate the direction of the curls—some towards your face, some away. This inconsistency is what creates the messy, effortless effect. When you release the curl, don’t pull it out; just let it fall.
The Texturizing Iron or Wave Wand: For a more overall tousled look, a tool with a triangular or zig-zag barrel is perfect. It creates imperfect, crumpled waves instead of defined curls. Run this through larger sections of your hair, again, avoiding the roots. The result is an all-over texture that looks like you’ve had braids in for a day.
Remember: The goal is not to curl your entire head of hair. Be selective. Curl a few face-framing pieces, a few layers in the back, and leave some sections relatively straight. This variation is the soul of the messy shag.

The Magic of Mess: Texturizing Sprays and Pastes
This is where the magic truly happens. If heat tools define the shape, texturizing products are what give it that “messy” soul. They are the final, essential step that transforms styled hair into a lived-in masterpiece.
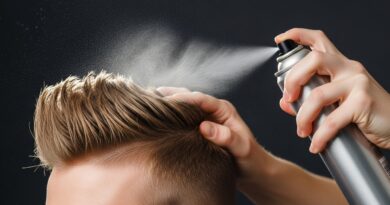
Texturizing Spray: This is your go-to for adding grit, volume, and a touch of hold without crunch. Hold the can about 10 inches away from your head and spritz it focusing on the mid-lengths and roots. Then, flip your head over and scrunch your hair with your hands. You can also spray it directly onto your fingertips and then pinch and pull at individual layers to make them more defined. The salt and polymers in these sprays break up the hair, creating separation and that coveted piecey look.
Pomade or Paste: For the ultimate piecey-ness, a pomade or paste is your secret weapon. Take a tiny amount (less is more!), rub it between your palms to warm it up, and then get to work. Pinch the ends of your shorter layers, twirl small pieces around your fingers, and define the face-framing bits. This product is perfect for creating those artistic, “lived-in” strands that seem to fall perfectly out of place.

The Final Touch: Breaking It All Up
You’ve dried, curled, and product-ed. Now, it’s time for the most satisfying part: breaking the set. Running your fingers through your hair is your final styling tool.
Flip your head over once more and gently run your fingers through your roots to loosen any sections that may have gotten too defined or stuck together. Shake your head from side to side. Stand up straight, turn your head to the side, and give your hair a gentle shake. The goal is to disrupt the uniformity created by the heat styling. You want the curls and waves to blend and soften into one another. Avoid using a brush at this stage, as it will smooth out all the beautiful texture you just worked so hard to create. Your fingers are the only tool you need.

Maintaining the Mess: How to Make Your Shag Last
A great shag style shouldn’t just last for one day. The beauty of its texture means it often looks even better on day two or three. To extend the life of your style, embrace dry shampoo. It’s not just for soaking up oil; it’s a texturizing hero in its own right. A light spray at the roots on non-wash days will refresh volume and add more grip and grit.
At night, try a loose, high ponytail or a pineapple (a very high, loose bun on top of your head) to preserve volume and prevent your hair from getting flattened while you sleep. In the morning, simply take it down, shake it out, and refresh with a light mist of texturizing spray or a dab of paste on any pieces that have fallen flat.
The modern shag is more than just a haircut; it’s a statement of effortless cool and confident individuality. It’s a celebration of natural texture and movement. By understanding the cut and mastering these styling techniques—the rough-dry, the strategic curling, and the artful application of texture products—you can unlock a world of easy, everyday style. So, put down the round brush, embrace the mess, and let your layers do the talking.