Weave 14 Basket Ponytails for Unique Everyday Elegance
Okay, let’s be real. We all have those days where we want to look put-together without spending an hour in front of the mirror. You want something that feels special, a little unique, but still totally doable for your morning routine. I get it. That’s why I’m obsessed with the basket weave ponytail right now.
It sounds fancy, but I promise it’s just a clever braiding technique. It creates this beautiful, textured look that’s way easier than it appears. Think of it as your secret weapon for looking polished in minutes.
Whether you’re running errands or heading to a dinner, this style adds that touch of everyday elegance we all crave. It works with so many different hair vibes, from old money hair to something more romantic. Let me show you how simple it can be.
What Exactly Is a Basket Weave Ponytail?
At its heart, it’s a type of braid that wraps around your base ponytail. Instead of a simple hair tie, you use sections of hair from the tail itself to create a “basket” or sleeve that covers the elastic. The result is a seamless, intricate-looking detail that elevates a basic ponytail instantly.
It’s perfect for when you want a style that looks thoughtfully crafted. The best part? Once you get the basic move down, you can adapt it in so many ways. It’s a foundational technique that opens up a world of pretty hairstyles.

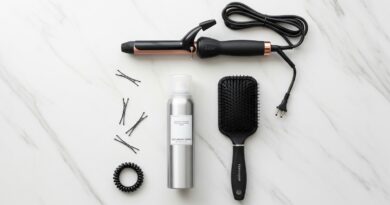
Gather Your Simple Tools
You don’t need much! A good hair elastic is key—I like the thin, no-slip kind. You’ll also need a fine-tooth comb for clean sections and some bobby pins that match your hair color to secure the ends neatly.
A little texturizing spray or mousse on damp hair before you start can give fine hair more grip. For flyaways, a tiny bit of hairspray or a light-hold gel on a toothbrush works wonders at the end. Keep it simple.

Step 1: The Perfect Base Ponytail
Start with brushed hair. Decide where you want your ponytail—low for elegance, high for energy. Smooth the hair back and secure it tightly with your elastic. The tighter the base, the easier it is to weave.
If your hair is very slippery, a light mist of texturizing spray at the crown can help. Don’t worry about perfection; a little volume is good. We’re going to cover the elastic completely, so just focus on a secure hold.

Step 2: Section Your Hair for the Weave
Divide your ponytail into three even vertical sections. Think of it like splitting a pie into three long slices from the top of the elastic down to the ends. Use your comb for clean parts.
Hold the right and left sections out to the side, and let the middle section hang down. This middle part is what we’ll be weaving around. Clip the side sections temporarily if it helps you keep things organized.

Step 3: The Basic Weaving Motion
- Take the right section and cross it over the middle section.
- Now, take the left section and cross it over the new middle (which was the right section).
- Pull gently to tighten the weave against the base of the ponytail.
That’s the core pattern! Right over, left over, pull snug. Repeat this all the way down the length of your hair. It’s just like a simple overhand braid, but you’re wrapping it around the center core.

Step 4: Securing the End Neatly
When you run out of hair to weave, secure the end with a small, clear elastic. Now, you have the woven braid and a little tail. Tuck that tail underneath the woven section at the back of your ponytail.
Use a bobby pin or two to pin it flat and hidden against the base. This creates a seamless, finished look like the weave just magically appears. Give the whole weave a gentle tug to loosen it slightly for a softer effect.

Elevate It: The Low Basket Weave
For a touch of quiet luxury bob energy, try this on a low ponytail. It’s incredibly chic and works even on shorter hair like an asymmetrical lob. The low placement feels elegant and intentional.
Keep the weave tight and sleek. This style pairs perfectly with a silk scarf or classic earrings. It’s that effortless look that says you know exactly what you’re doing, even if you just learned five minutes ago.

Make It Playful: The High Basket Weave
A high basket weave ponytail is all about fun and volume. It gives major cheerleader-ponytail energy but way more refined. Tease the hair at the crown slightly before you make your base ponytail for extra lift.
This version is perfect for active days or when you want your hairstyle to feel like a statement. It lifts your face and shows off your neckline. It’s confident and cool.

Add Romance with Face-Framing Pieces
Before you make your base ponytail, pull out a few soft pieces around your face. Think wispy bangs or tendrils at the cheekbones. After you finish the weave, curl these pieces loosely with a curling iron.
This instantly softens the look and adds a romantic goth hairstyles vibe—soft but defined. It keeps the style from feeling too severe and adds a beautiful, feminine touch.

Incorporate a Ribbon for Vintage Flair
Take a long, silk ribbon. Tie it around the base of your ponytail with your elastic. As you weave, incorporate the ribbon strands as if they are part of your hair sections.
At the end, you can tie the ribbon into a bow. This detail feels straight out of a fairy tale and is a beautiful way to add a pop of color or texture. It’s a small touch with a big impact.

Create a Half-Up Basket Weave
Only gather the top half of your hair into a ponytail at the crown. Perform the basket weave on this section. Let the rest of your hair flow down loose.
This is a gorgeous way to wear the trend if you have long hair and want to keep it down but out of your face. It adds interest and keeps you cool. Perfect for a day-to-night look.

Try a Double Basket Weave Ponytail
For a truly head-turning look, create two basket weave ponytails, one above the other. Make a high ponytail and weave it about halfway down. Then, gather the woven braid and remaining hair into a second elastic and weave again.
This double texture is intricate and modern, fitting right in with edgy 2026 hairstyles forecasts. It’s a commitment, but the payoff is amazing.

Pair It with a Hime Cut
If you have a hime cut with its signature straight-across front pieces and shorter layers, this ponytail is a dream. It neatly contains the shorter back layers while letting the dramatic front pieces shine.
Make your ponytail, weave it, and let the blunt front sections frame your face perfectly. It’s a beautiful blend of structured and striking.

Get Edgy with a Vampire Vibe
Channel the vampire haircut aesthetic with a deep side part and a severely sleek low basket weave. Use a strong-hold gel to slick down any flyaways for a wet-look effect.
Keep the weave tight and precise. Add a dark lip color and you’ve got a modern, undead elegance that’s perfect for a night out. It’s darkly romantic and super cool.

Embrace the Glitchy Glam Aesthetic
Glitchy glam hair is all about intentional imperfection. After weaving, gently pull apart a few strands of the weave to make them wispy and irregular. Add a few colored hair clips or tinsel in a strategic, “off” way.
The idea is to look artfully disheveled, like the digital glitch of a perfect hairstyle. It’s playful, trendy, and lets you be creative.

Use It to Tame Curly Hair
This technique is fantastic for defining curly hair textures. Apply curl cream to damp hair, then gather into a ponytail. As you weave, the pattern will help separate and showcase your curls in a structured way.
You’ll get a gorgeous, textured look that feels controlled but still lets your natural pattern pop. It’s a great protective style, too.

Accessorize with Gold Cuffs
After weaving, slide a few small, gold hair cuffs onto the braided section. Space them out evenly or cluster them near the base. This metallic detail instantly screams luxury and is so easy.
It’s a modern take on hair jewelry that feels fresh and expensive. This little trick can make any simple outfit look meticulously styled.

Practice on Second-Day Hair
This style actually works better on day-old hair! The natural oils and any leftover product give your hair more grip and texture, making the weaving process easier and helping the style hold its shape longer.
It’s the perfect solution for a bad hair day or when you need a quick refresh. A little dry shampoo at the roots can add even more volume and texture if you need it.

Fix the Top for Maximum Volume
If the top of your ponytail looks flat, here’s a fix. Once the weave is done, gently insert the tip of a comb under the hair at the crown, near the elastic. Gently lift upward to create a little height, then spray.
Be careful not to pull too hard. This small lift makes the whole style look more expensive and balanced. It’s a pro stylist trick.

Combine with a Hair Scarf
Fold a square scarf into a long band. Tie it around your neck and let the ends hang. Make your basket weave ponytail, then incorporate the scarf ends into the final tuck, or let them hang loose with the tail.
This adds a fantastic 70s-inspired boho touch. It’s playful, covers the elastic beautifully, and lets you play with prints and colors.

Make It a Messy, Textured Weave
For a beachy, lived-in look, don’t make your initial ponytail too sleek. Use your fingers, not a comb. After weaving, pull on the edges of the weave aggressively to loosen it and create a chunkier, softer texture.
Finish with a texturizing spray. This version is less “perfect” and more “I woke up like this,” in the best possible way. It’s relaxed and cool.

Master the One-Minute Speed Weave
Once you’ve practiced, you can do a simplified version in under a minute. Instead of three sections, use two. Simply cross them over each other around the central core, alternating sides and pulling tight.
It creates a similar wrapped effect but is even faster. This is my go-go-go morning hack when I still want to look like I tried.

Your Final Checklist Before You Start
- Hair elastic (strong hold)
- Fine-tooth comb for sections
- Bobby pins (color-matched)
- Texturizing spray (optional, for grip)
- Mirror you can see the back of your head in
- 5-10 minutes of patience for your first try!
Gather these, take a deep breath, and just start. The first attempt is always the hardest. By the third, you’ll be a pro.
And there you have it! A whole world of style unlocked from one clever braiding trick. The basket weave is that perfect bridge between “I need my hair up” and “I want to feel pretty today.” It’s practical magic.
What I love most is how it adapts to your personal vibe. Whether you’re feeling romantic, edgy, or just need a quick fix, this technique has your back. It’s one of those skills that, once learned, you’ll use forever.
I’d love to see your creations! Which version are you trying first? Did you come up with a new twist? Tell me everything in the comments below. And if you found this helpful, save this post to Pinterest so you can always find it when you need a little hair inspiration. Happy weaving!