Shave It, Hide It, Flaunt It: 31 Undercut Hairstyles for Women Who Want an Edge on Their Own Terms
An undercut is the only haircut that lets you have it both ways. Shave the hair underneath — at the nape, along the sides, or both — and the top layers fall over it like a curtain. Wear your hair down and nobody knows it is there; sweep it up and the shave is suddenly the whole look. That double life is exactly why undercuts have moved from punk salons into everyday life: they are a secret you control, an edge you can switch on and off in seconds, and a genuinely practical fix for hair that is too hot, too heavy, or too flat underneath.
This guide gathers 31 undercut hairstyles for women, from the classic nape undercut and the hidden undercut to undercut pixies, bobs and long hair, shaved designs and fades, coloured undercuts and workplace-friendly versions. Eight guides explain what an undercut really is, how hidden and visible versions differ, where to place the shave, how designs and fades work, how to grow one out without the awkward stage, how to style long hair over it, and what the upkeep honestly costs. One honest note first: an undercut is easy to get and easy to regret for about three months — so choose the placement carefully, because a nape undercut you can hide is a very different commitment from a shaved side you see in every mirror.
What Is an Undercut — And How It Is Different From a Shave
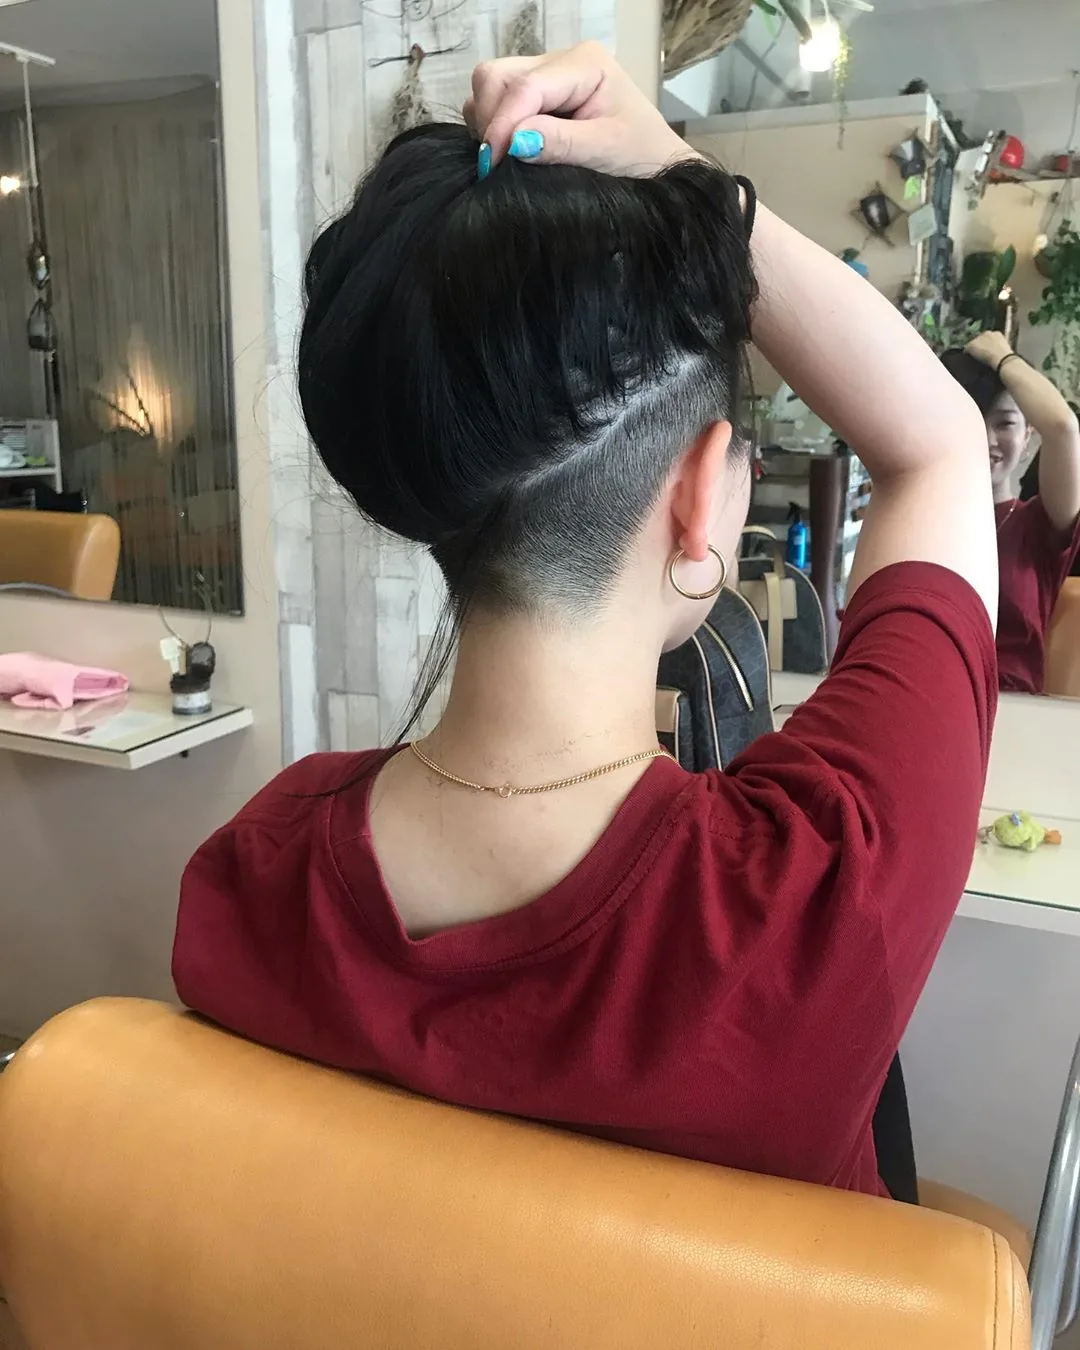
An undercut is a haircut in which the hair underneath a section of the head is cut very short — usually with clippers — while the hair above it is left long enough to fall over it. The contrast is the point: long on top, short underneath, with a clear disconnect between the two lengths rather than a gradual blend. The shave can sit at the nape of the neck, along one or both sides, or around the whole lower half of the head, and the top can be anything from a pixie to waist-length hair. What makes it an undercut, rather than simply short hair, is that the longer top layer is meant to cover the shaved section when you want it to.
How is that different from a side shave or a buzz cut? A side shave usually exposes one whole side of the head and is designed to be seen, while a buzz cut takes the whole head short. An undercut is more strategic: the shave is a layer underneath, and the top hair is the star of the show. Quick verdict: if you want a bold change that you can hide on a Monday morning, an undercut is the only cut that offers both — a shave is a statement, an undercut is a secret with a reveal.
Hidden vs Visible Undercut: How Much Edge Do You Actually Want?
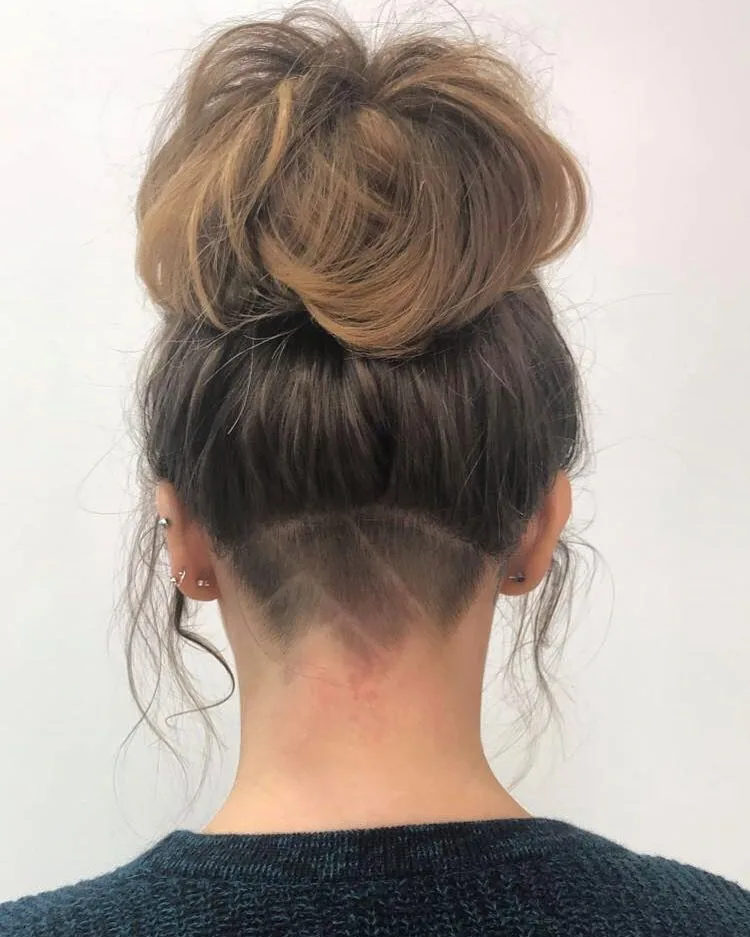
The first decision is not where to shave, but how often you want anyone to see it. A hidden undercut sits low at the nape or behind the ears, covered by the top layers whenever your hair is down — it only appears when you tie your hair up, tuck it behind an ear, or catch a breeze. A visible undercut, by contrast, is part of the style all the time: a shaved side, a disconnected pixie, or a design that shows even with the hair down. Most women start hidden and go more visible later, once they know how the shave feels and how their workplace, family and mirror react to it.
Think about your week, not just your weekend. If you work in a conservative office, meet clients, or simply prefer to choose when you look edgy, a hidden nape undercut gives you the cooling effect and the secret thrill with zero daily consequences. If you want the undercut to be your look — the thing people notice first — a side or temple undercut delivers it. Pros and cons: hidden undercuts are the lowest-risk way in, but you will barely see them yourself; visible undercuts are a real style statement, but they ask for confidence every single day. Start hidden; you can always shave more.
Where to Shave: Nape, Sides or Both — Choosing Your Placement
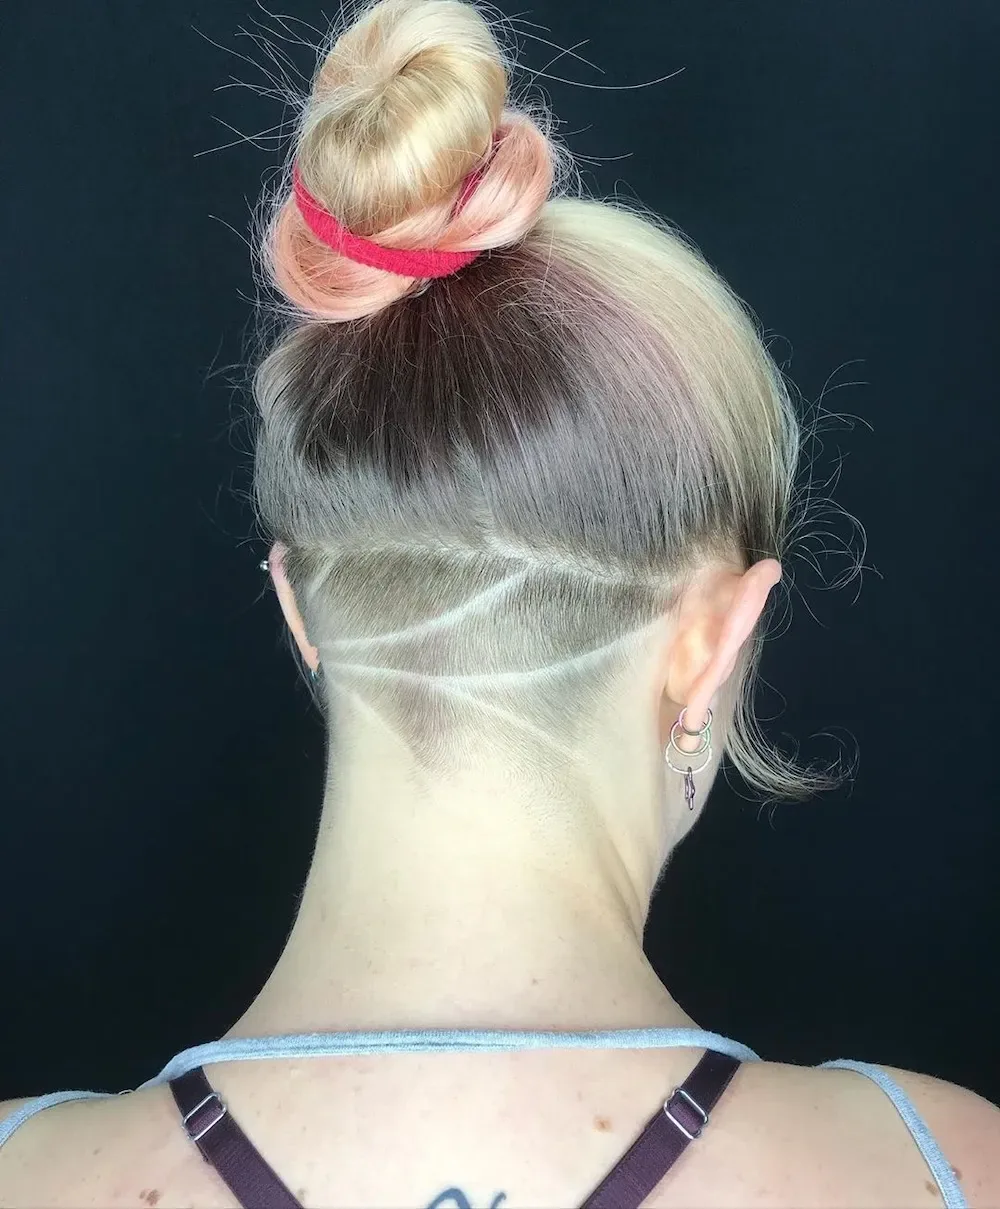
Placement changes everything about how an undercut looks, feels and grows out. The nape undercut — a shaved strip at the back of the neck — is the most popular placement for a reason: it is hidden by hair worn down, it cools the neck in summer, and it removes the heavy bulk that makes long hair feel like a blanket. The side undercut shaves one temple area, which shows whenever the hair is swept to one side and reads as bold and modern. A double undercut shaves both sides, leaving a longer strip on top, which is dramatic and closest to a mohawk silhouette. And the full undercut rings the whole lower head, so the top hair sits like a cap over a shaved base.
How to choose: run your fingers through your hair and notice where the bulk bothers you — if the weight sits at the back of your neck, a nape undercut solves it; if your hair is thick at the temples and puffs out sideways, a side undercut tames it. Face shape matters too: a nape undercut suits everyone, while a side undercut draws the eye to the cheekbones and jaw. What to ask your stylist: how high will the shave go, and where exactly will the line sit when your hair is down? Common mistake: shaving too high on the first visit — a low, narrow nape undercut can always be widened later, but a high shave cannot be un-shaved. Start low, go higher only when you are sure.
Designs, Fades and Lines: Turning the Shave Into Art
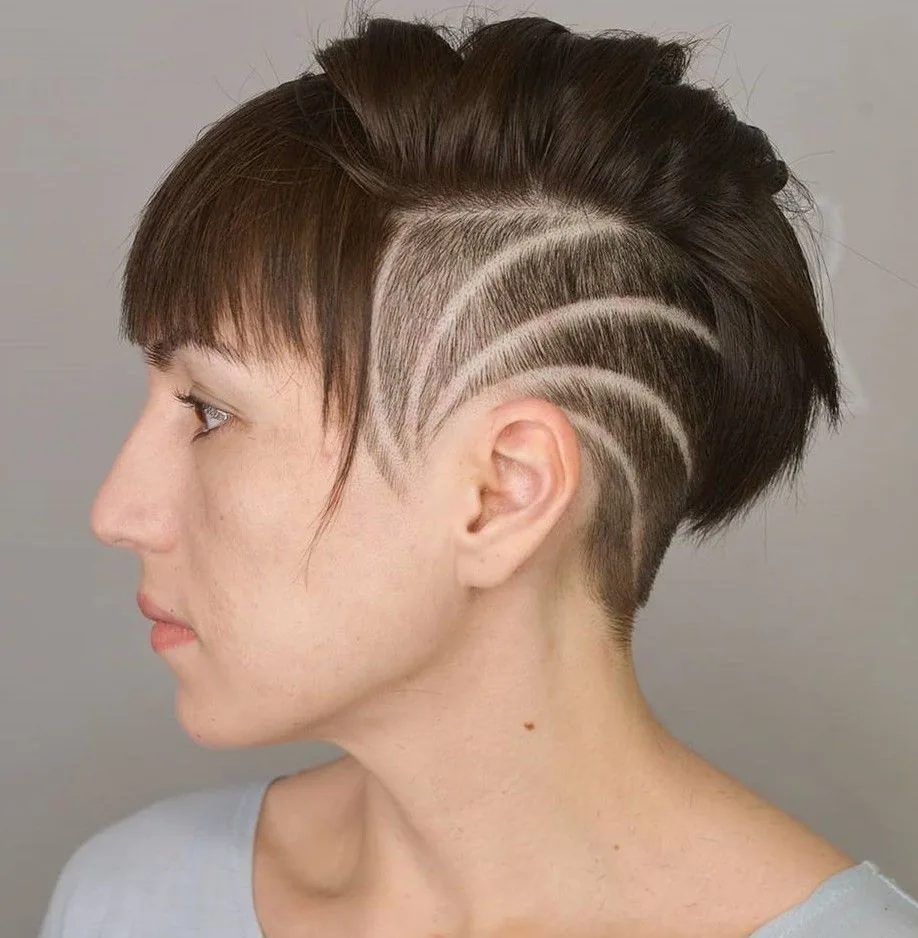
Once the shave is there, it becomes a canvas. A fade blends the shaved section from skin to a short stubble to the longer hair above, so the edge is soft and the grow-out is graceful. A hard line — a clean, sharp boundary between the shaved and unshaved hair — looks graphic and precise, but it needs touching up every week or two. Shaved designs take it further: lines, triangles, zigzags, stars, flowers or geometric patterns cut into the short hair with a trimmer, sometimes with a touch of temporary colour. The design lasts about a week before the stubble softens its edges, so it is the most temporary part of the whole cut.
Cost and time: a plain nape undercut adds ten to fifteen minutes to a haircut; a detailed design can add thirty minutes and cost extra. What to ask: bring a photo of the exact design, and ask how long it will stay sharp on your hair’s growth rate. Pros and cons: designs are the most fun part of an undercut and completely reversible — they grow out in days — but they also need the most frequent upkeep, and a design on a hidden nape undercut is only for you and whoever sees your hair up. Quick verdict: try a simple line or triangle first; if you love it, the whole pattern book is open to you.
Growing Out an Undercut Without the Awkward Stage
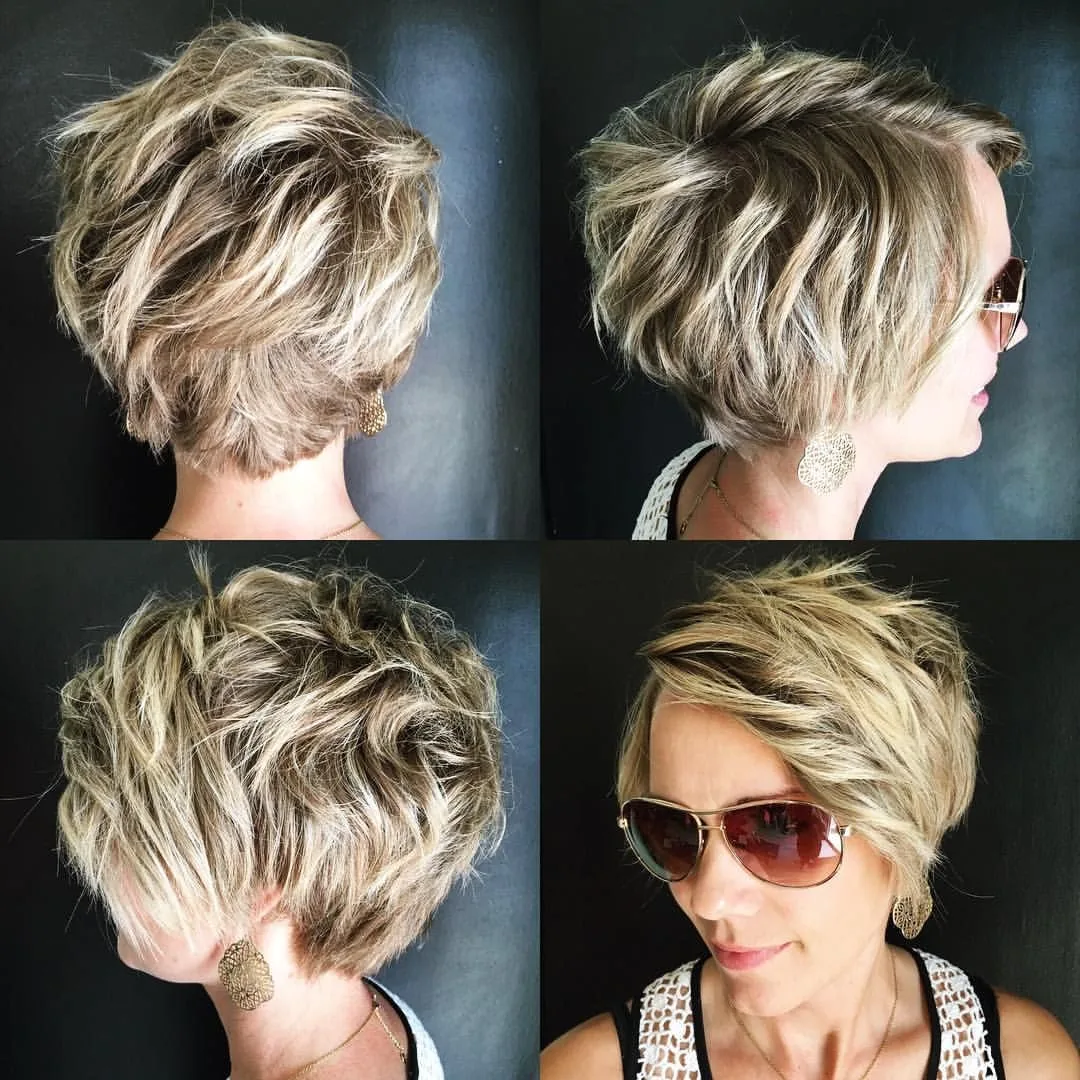
Every undercut eventually grows out, and the awkward stage is real — but it is also manageable. The shaved section grows at roughly half an inch a month, so a clipper-short nape takes about three to four months to reach a length you can blend, and a side undercut can take six months or more to catch up with the top layers. The trick is to stop thinking of it as a mistake to hide and start treating it as a transition: the shaved hair is simply the shortest layer of a growing cut, and it can be blended, textured or covered while it catches up.
The practical plan: get the rest of your hair trimmed regularly so the lengths stay tidy while the undercut grows, and ask your stylist to blend the line between the short and long sections with thinning shears or a soft taper. Styling helps too — texture spray, a little wax on the short pieces, or pinning the regrowth flat with a bobby pin keeps it looking intentional. Common mistake: shaving it again out of impatience and restarting the clock. If you truly hate the grow-out, a pixie or a bob is the fastest escape route — cut the top to meet the undercut, and the awkward stage disappears overnight. Quick verdict: growing out an undercut takes patience, not suffering — blend it, style it, and give it four months.
Styling Long Hair Over an Undercut: The Curtain Effect
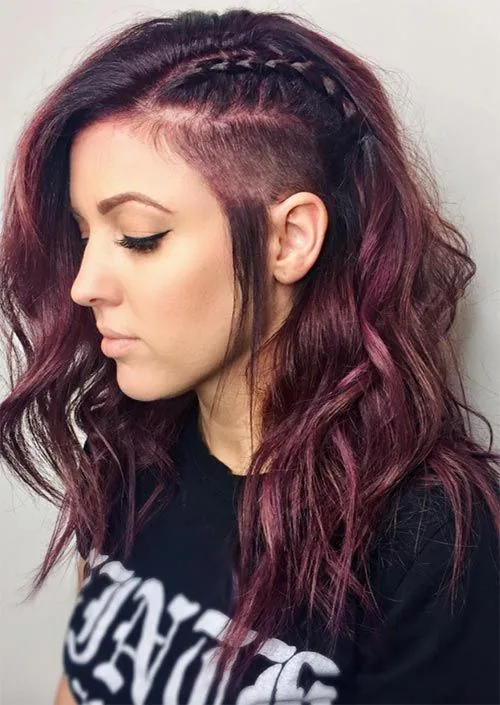
Long hair over an undercut is where the magic happens, because the top layers act as a curtain: down, the undercut vanishes; up, it is revealed. The trick is to make sure the top layers are long enough and thick enough to cover the shave completely when you want them to — if the top is too thin, the shaved section can peek through at the sides, which looks accidental rather than intentional. Ask your stylist to check the coverage with your hair down, dry and moving, not just when it is wet and combed flat.
Day-to-day styling is simple: wear it down for the hidden look, and use a ponytail, bun or half-up style for the reveal. A high ponytail shows a nape undercut beautifully; a side sweep or a tuck behind the ear shows a side undercut. What to avoid: heavy oils or serums on the shaved section, which can make it look greasy, and flat-ironing the top layers so flat that they cling to the shave line. Pros and cons: long hair gives you the most control over when the undercut shows, but it also hides the shave so well that you may forget it is there — which is either the point or a waste of a good cut, depending on your mood. Quick verdict: if you love long hair but want an edge, this combination is the best of both worlds.
Maintenance and Upkeep: Keeping the Shave Sharp
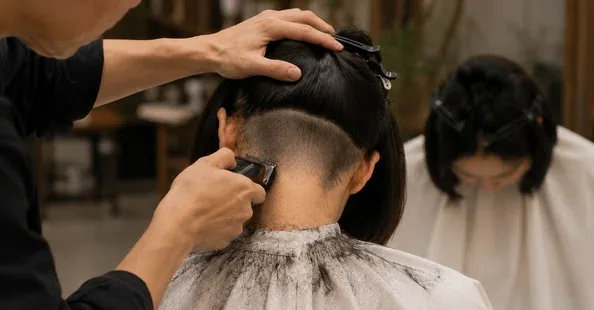
An undercut is a low-effort haircut with one high-maintenance catch: the shaved section grows fast, and stubble shows quickly. A nape undercut kept sharp needs a touch-up every two to three weeks; a side undercut, every one to two weeks, because the line is on show. You can do it yourself with clippers and a hand mirror — a number 1 or 2 guard for the shave, a steady hand and good light — or book a quick trim at the salon, which many stylists will do for a small fee between full appointments. Either way, plan for it: an undercut that is never touched up grows into a fuzzy, uneven patch that looks like a mistake.
The rest of the upkeep is easy. Wash the shaved section like the rest of your hair, but skip heavy conditioner on it — it can make short hair look limp and oily. Exfoliate the scalp gently once a week to prevent ingrown hairs, and use sunscreen on a visible undercut in summer, because shaved skin burns fast. Cost: a clipper at home costs about the same as two salon touch-ups and pays for itself in a month. Common mistake: letting the shave grow to an inch and then re-shaving it yourself in a hurry — the line ends up uneven and twice as hard to fix. Quick verdict: budget fifteen minutes every two weeks, and the undercut will always look deliberate.
Who Should Think Twice Before Getting an Undercut
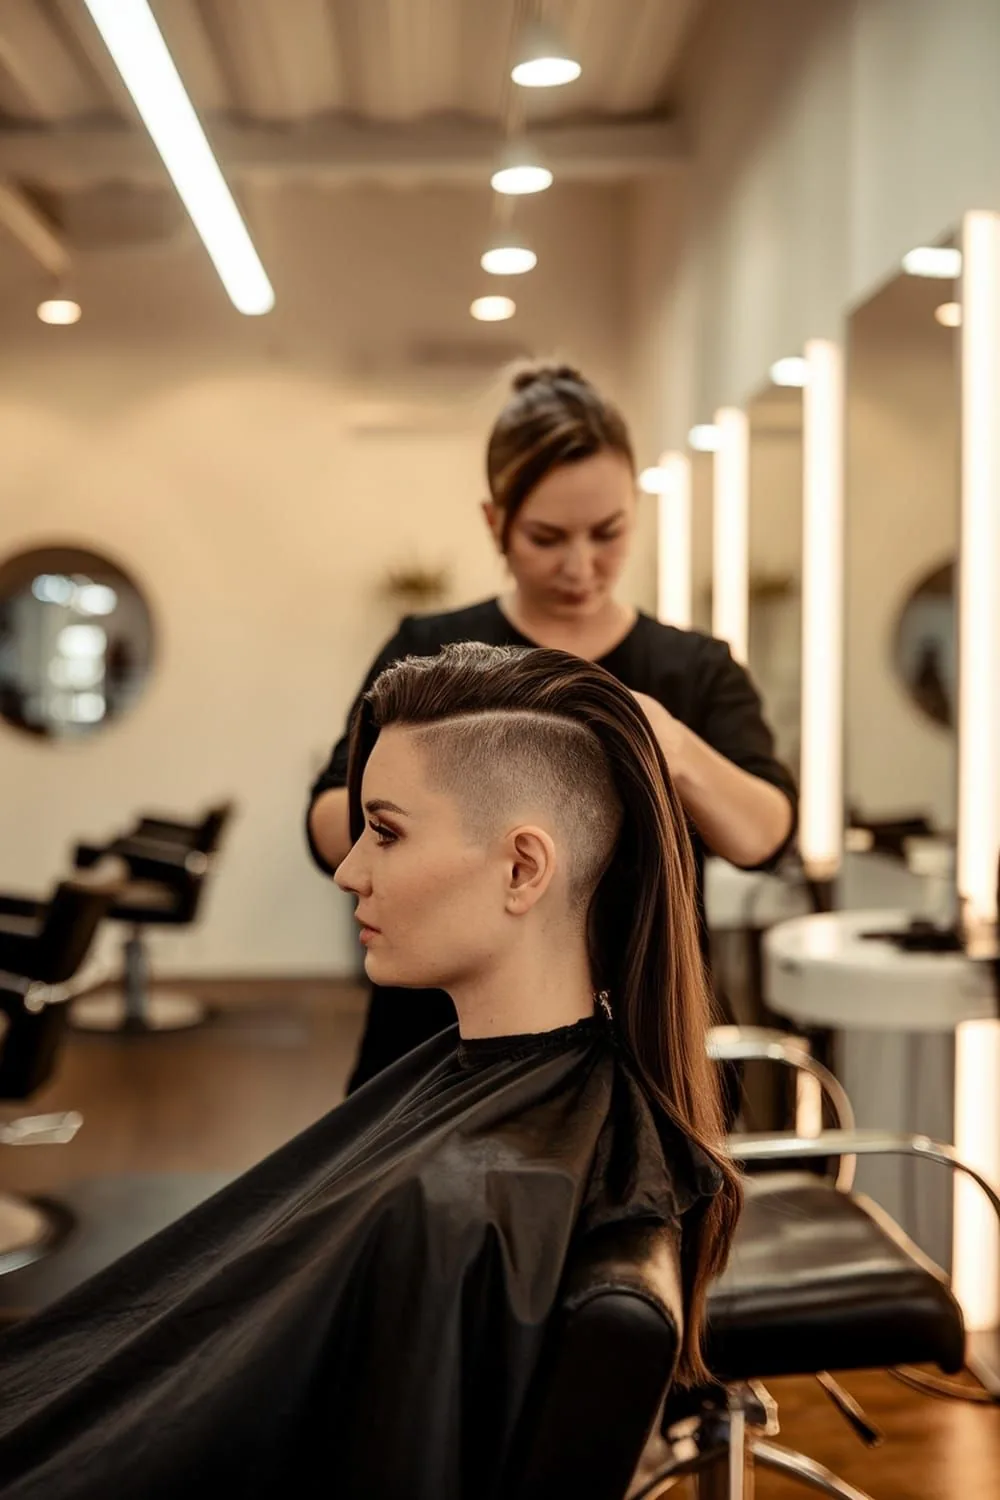
An undercut suits far more women than you might think, but it is not for everyone, and honesty now saves regret later. Think twice if your hair is very fine and thin at the nape — shaving the underneath can make the top layers look thinner, not thicker, because you have removed the bulk that was supporting them. Think twice if you have a very visible scar, birthmark or patch of uneven skin on the area you plan to shave, because an undercut will put it on display. And think twice if you change your mind easily about haircuts, because an undercut is a three-to-six-month commitment to grow out.
Your lifestyle matters too. If your job has a strict appearance policy, check it before you book — a hidden nape undercut is usually safe, but a visible side undercut may not be. If you have a cowlick at the nape or temples, tell your stylist: the shave can expose a swirl that was invisible under longer hair. And if you are getting an undercut purely because someone else loves it, pause — the best undercuts are the ones the wearer wanted for herself. Quick verdict: an undercut is a brilliant cut for the right woman at the right time, and the right time is when you want it for you, not for anyone else’s reaction.
1. The Classic Nape Undercut
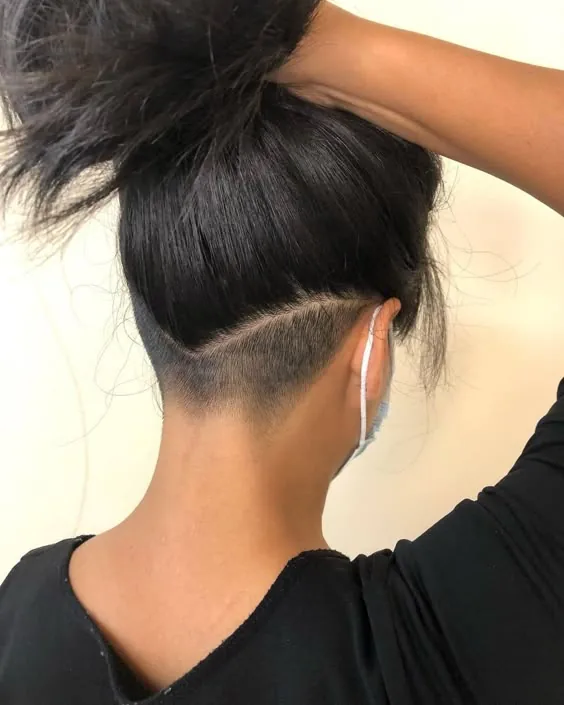
The classic nape undercut is the original — and still the most popular — undercut for women: a shaved strip at the back of the neck, hidden by the top layers whenever the hair is down. It is the undercut for women who want the cooling effect, the lighter feeling and the secret thrill, without changing how they look from the front at all. From behind, with the hair up, it is a clean, bold line; from the front, it is simply great hair.
Best for: long and medium hair, hot climates, and first-time undercut wearers. How to style it: wear it down to hide it, or pull it into a high ponytail or bun to show it off. Maintenance: a touch-up every two to three weeks keeps the line crisp. Quick verdict: the safest, most versatile undercut there is — if you only try one, start here.
2. The Hidden Undercut
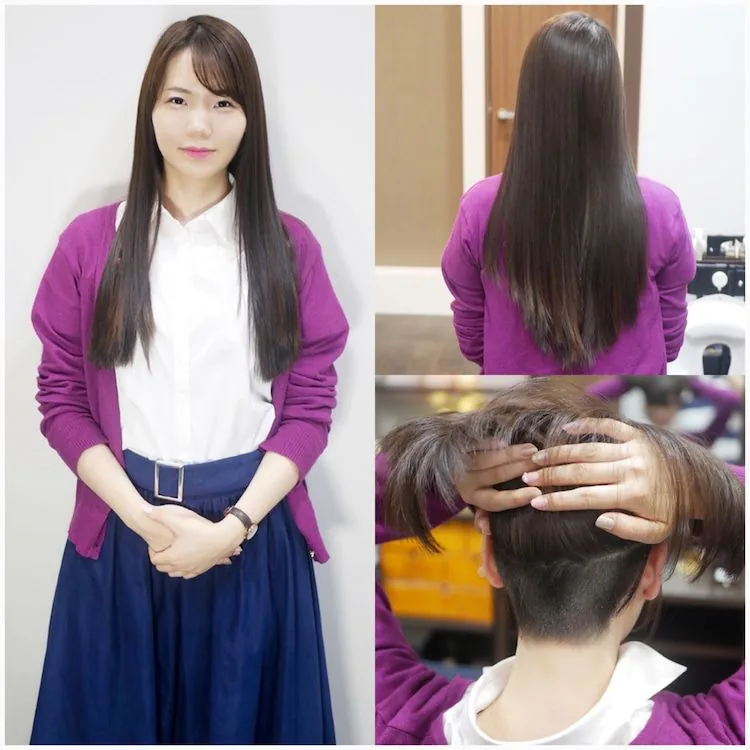
The hidden undercut is the nape undercut’s quieter cousin: the shave sits low and narrow, tucked behind the ears and at the very bottom of the nape, so even a ponytail barely reveals it. It is the undercut for women who want the practical benefits — less bulk, less heat, faster drying — with almost no visible change. Only you know it is there, and that is exactly the appeal: it is a private decision, not a public statement.
Best for: thick hair that feels heavy, and women who want the benefits without the look. How to style it: nothing changes — your normal styles all work the same, just lighter and cooler. Pros and cons: it is the lowest-risk undercut of all, but it is also the least visible, so if you want people to notice, this is not the one. Common mistake: asking for it too narrow — a strip under an inch wide barely removes any bulk. Quick verdict: the undercut for women who want the feeling, not the attention.
3. The Undercut Pixie
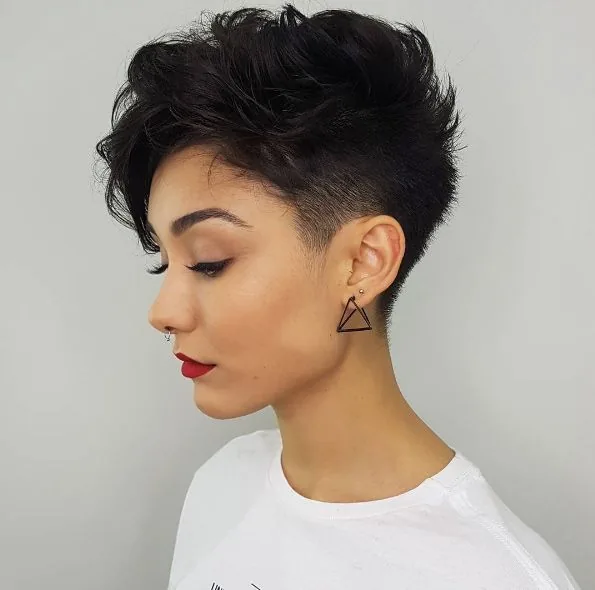
An undercut pixie takes the shortest haircut and gives it an edge: the sides and back are clipped short, the top is left longer and textured, and the contrast between the two is the whole style. It is bold, modern and wonderfully low-maintenance — wash it, add a dab of texture paste, and you are done in two minutes. The longer top can be swept forward, to the side, or spiked up, so one cut gives you several looks.
Best for: oval and heart-shaped faces, and women who want a short cut with personality. How to style it: texture paste or pomade on damp hair, pushed in the direction you want, and left to air-dry. Maintenance: a trim every three to four weeks keeps the contrast sharp — let it grow and it becomes a regular pixie. Who should avoid it: anyone who is not ready for a genuinely short cut, because the top is the only length you have. Quick verdict: the coolest short haircut in this guide — a pixie with a point of view.
4. The Undercut Bob
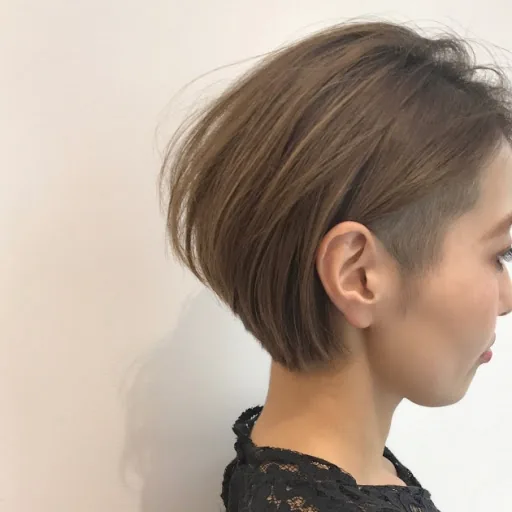
The undercut bob is a chin-length bob with the nape shaved underneath, so the bob sits lighter, swings more freely, and never puffs out at the back. It is the bob for women who love the shape but hate the weight — the undercut removes the bulk at the neck, so the bob falls cleanly instead of flipping out. From the front it is a classic, polished bob; from behind, with the hair tucked or lifted, there is a surprise.
Best for: thick hair that makes bobs look triangular, and anyone who wants a bob that behaves. How to style it: blow-dry with a round brush for a smooth finish, or air-dry with a little cream for a softer wave. Pros and cons: the bob is lighter, cooler and easier to style, but the nape needs a touch-up every two to three weeks. What to ask: ask for the shave to stop just below where the bob ends, so the line stays hidden. Quick verdict: the bob that finally works for thick hair.
5. The Long-Hair Undercut
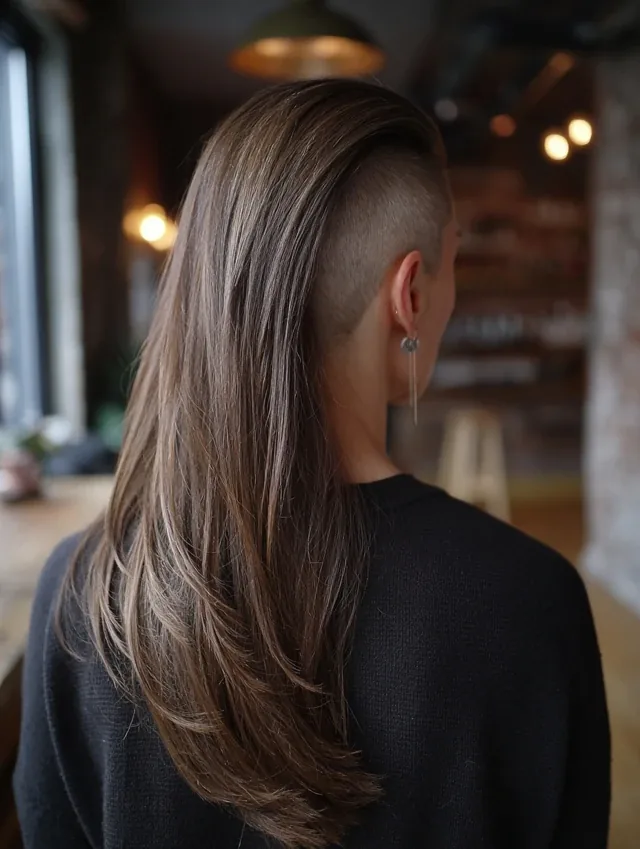
The long-hair undercut is the ultimate have-it-both-ways cut: waist-length or mid-back hair on top, a shaved section underneath that nobody sees until you choose to show it. It solves the two biggest complaints about long hair — the weight and the heat — without losing a single inch of length. The top layers fall over the shave like a curtain, and the moment you tie your hair up, the undercut is revealed.
Best for: very long, thick hair, and women who refuse to cut their length. How to style it: wear it down for the hidden look, or sweep it into a high ponytail, a braid or a bun for the reveal. Maintenance: the shave needs touching up every two to three weeks, and the long top needs regular trims to keep the ends healthy. Cost and time: a quick addition to a normal trim — ten to fifteen minutes, often free with a cut. Quick verdict: the undercut that changes how long hair feels without changing how it looks.
6. The Side Undercut
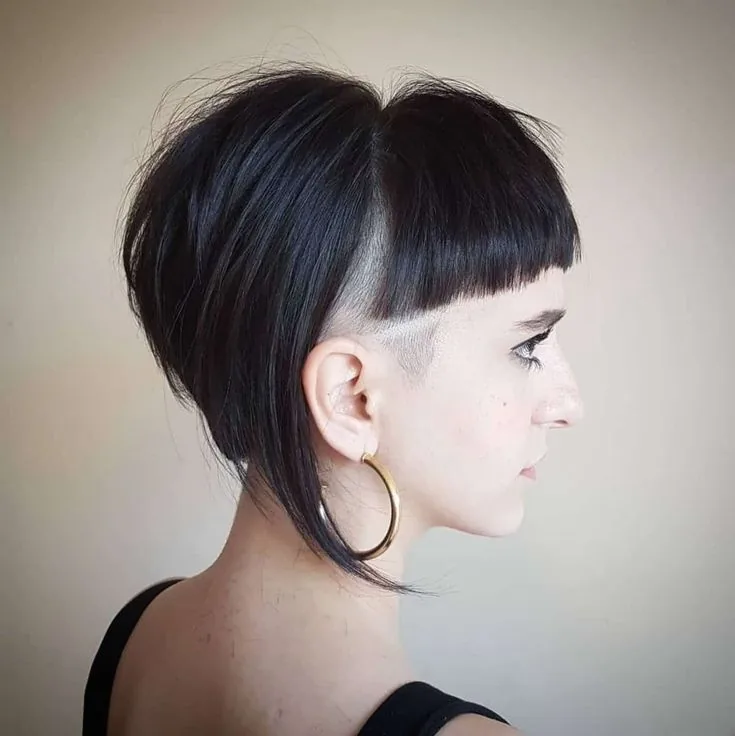
The side undercut is the one undercut in this guide that is meant to be seen: one temple is shaved close, the rest of the hair sweeps over to the other side, and the contrast is visible from the moment you walk into a room. It is bold, modern and unapologetic — the undercut for women who want the edge to be the look, not a secret. It works best with a deep side part, which makes the sweep dramatic and the shave unmistakable.
Best for: confident wearers, strong jawlines, and women who want a statement cut. How to style it: part deeply, sweep the long hair across, and keep the shaved side clean with a weekly touch-up — stubble shows fast on the temple. Pros and cons: it is the most striking undercut here, but also the most committed — a side undercut takes months to grow out and cannot be hidden with the hair down. Who should avoid it: anyone who needs to look conservative at work, or who is trying an undercut for the first time. Quick verdict: the undercut as a statement — wear it if you mean it.
7. The Undercut With Shaved Designs
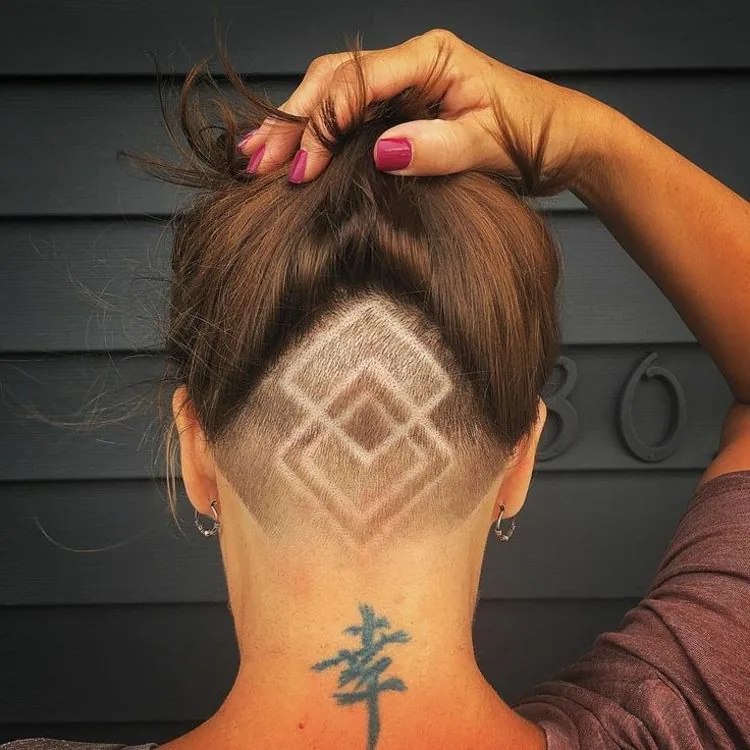
Shaved designs turn the undercut into wearable art: geometric lines, triangles, stars, flowers or mandala patterns cut into the short hair with a trimmer, so the nape or side becomes a canvas. The design is sharpest for about a week, then softens as the stubble grows — which is part of the charm, because it means you can change the design every few weeks. It is the most creative, most playful version of the undercut, and the one most likely to get compliments from strangers.
Best for: creative spirits, festivals, and anyone who treats hair as self-expression. How to style it: show it off — a high ponytail, a bun or a half-up style frames the design. Cost and time: a simple design adds ten to fifteen minutes to a haircut; a detailed one can add half an hour. Common mistake: choosing a design that is too detailed for your hair’s growth rate — fine, fast-growing hair blurs intricate patterns in days. Quick verdict: the undercut as art — temporary, joyful, and entirely yours.
8. The Faded Undercut
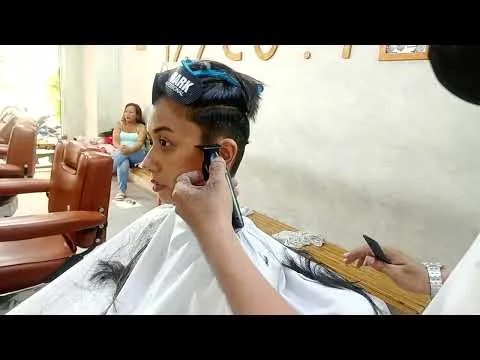
The faded undercut softens the whole idea: instead of a hard line between shaved and long, the hair graduates from skin to stubble to short to long, so the edge is a smooth gradient rather than a sharp boundary. It looks more polished than a hard-line undercut, it grows out far more gracefully, and it flatters the head shape beautifully. It takes a skilled barber or stylist to fade well, because the blend has to be seamless — but when it is done right, it is the most refined undercut in this guide.
Best for: anyone who wants an undercut that looks expensive, and women who hate the hard regrowth line. How to style it: the fade does the work — wear the top however you like, and the undercut looks intentional from every angle. Maintenance: a fade needs refreshing every two weeks to stay sharp, but it looks better than a hard line at every stage of growing out. Pros and cons: the most elegant undercut, but the most dependent on your stylist’s skill — ask to see their fade work first. Quick verdict: the undercut for women who want edge with polish.
9. The Undercut Lob
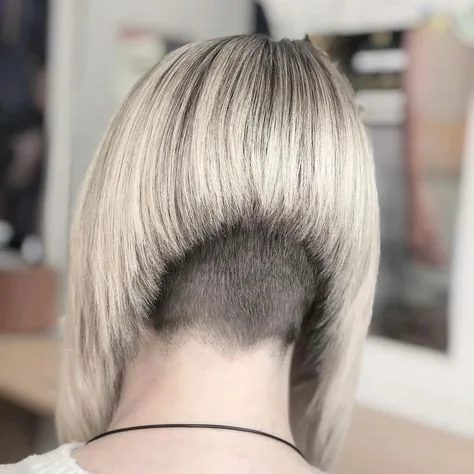
The undercut lob — a long bob with a shaved nape — is the shoulder-length answer to the undercut bob: the length sits at the collarbone, the nape is clipped underneath, and the result is a lob that moves, swings and never feels heavy. It is the lob for women whose hair is too thick for a normal lob, because the undercut removes the weight that makes lobs puff out at the ends. From the front, it is a sleek, modern lob; from behind, it is a secret.
Best for: shoulder-length hair, thick hair, and women who want a lob that stays sleek. How to style it: blow-dry straight for a polished finish, or add a loose wave with a flat iron for movement. What to ask: ask for the shave to end where the lob ends, so the line stays completely hidden when the hair is down. Maintenance: a touch-up every three weeks, and a trim every eight weeks to keep the lob’s shape. Quick verdict: the lob that finally behaves — lighter, cooler, and easier to live with.
10. The Undercut With Curls
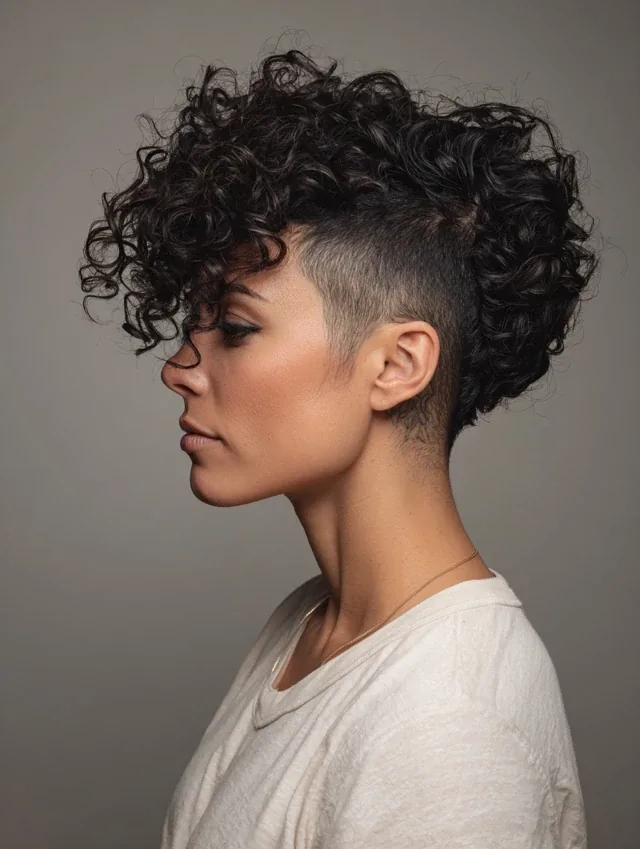
Curls and an undercut are a natural pair: the shaved section removes the bulk underneath, so the curls on top fall more freely, spring up more, and take up less room. A curly undercut — shaved sides or nape with a cloud of curls on top — gives definition to the curls and structure to the whole style. It is also practical: less hair underneath means less drying time, and anyone with curly hair knows what that is worth.
Best for: thick, curly or coily hair that feels heavy underneath. How to style it: curl cream on damp hair, scrunched and diffused, with the shaved section left product-free. Common mistake: shaving too high into the curls — the transition should sit low, so the curls have room to fall. Pros and cons: the curls look lighter and more defined, but the undercut needs regular touch-ups or the curls start to swallow it. Quick verdict: the undercut that makes curly hair easier, not just edgier.
11. The Undercut for Thick Hair
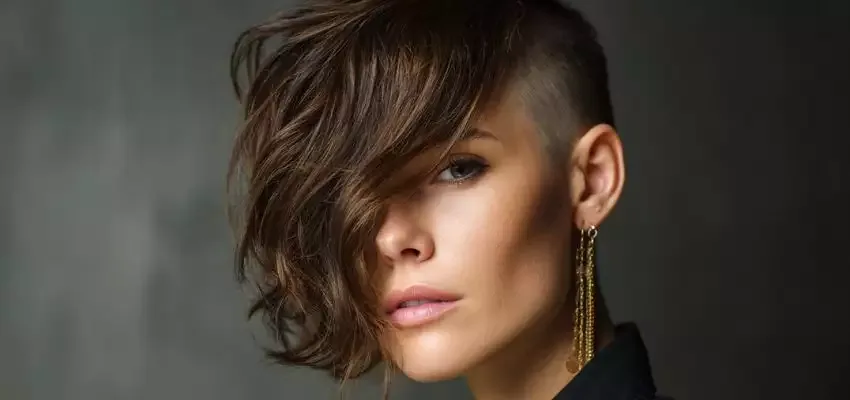
If your hair is thick, an undercut is not just a style — it is a solution. Shaving the underneath removes a surprising amount of bulk, so the top layers lie flatter, dry faster, and stop feeling like a helmet. Many women with thick hair get an undercut for comfort alone and never show it to anyone: the difference in weight and heat is that noticeable. It is the most practical reason in this guide to get an undercut, and the one most women wish they had discovered sooner.
Best for: very thick, heavy hair, and hot climates. How to style it: exactly as before — the top layers behave better, not differently, once the bulk is gone. Maintenance: a touch-up every two to three weeks, because thick hair grows fast and the stubble shows. Cost and time: a ten-minute addition to a normal haircut, and it can cut your drying time in half. Quick verdict: the undercut as a practical fix — try it for the comfort, stay for the look.
12. The Undercut for Fine Hair
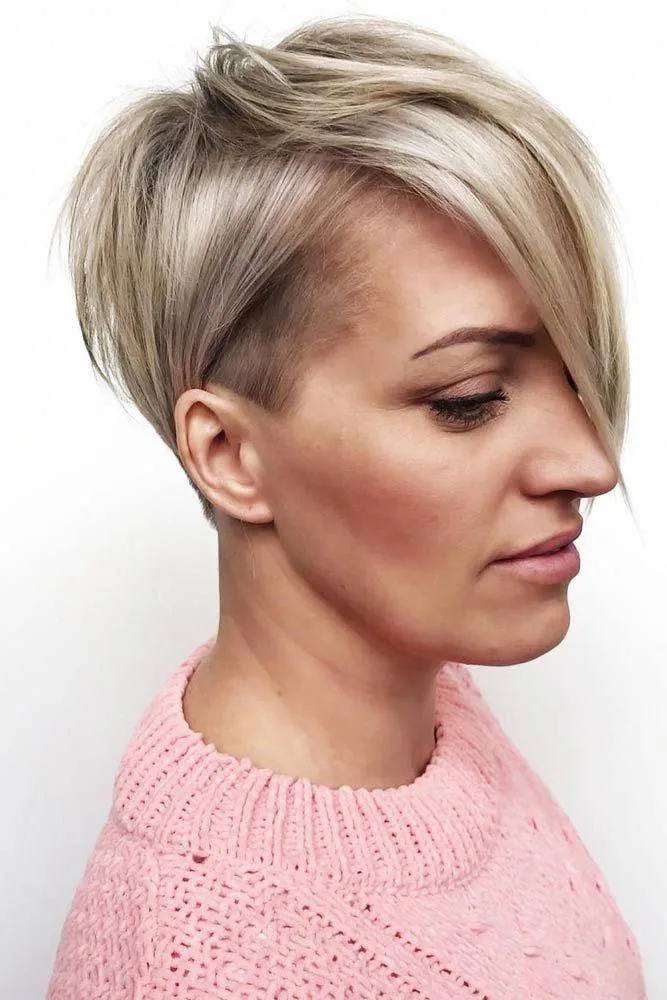
An undercut on fine hair is a careful balancing act, and it only works when it is done sparingly. A narrow nape undercut can actually help fine hair: it removes the wispy, flyaway hairs at the neck that never sit properly, and it lets the top layers fall cleanly. But a wide or high undercut on fine hair can backfire, because the top layers lose the support underneath and can look thinner than before. The rule for fine hair is simple: shave less than you think you need.
Best for: fine hair with a messy nape, and women who want a clean neckline. How to style it: keep the top layers smooth and the shave narrow, so the hair still looks full. Who should avoid it: anyone whose fine hair is already thin at the crown — an undercut will not add volume, and it can make the top look sparse. What to ask: ask your stylist to shave the smallest possible strip first, and widen it only if the hair still looks full. Quick verdict: the undercut can work for fine hair — but only in a small dose, and only at the nape.
13. The Undercut With Braids
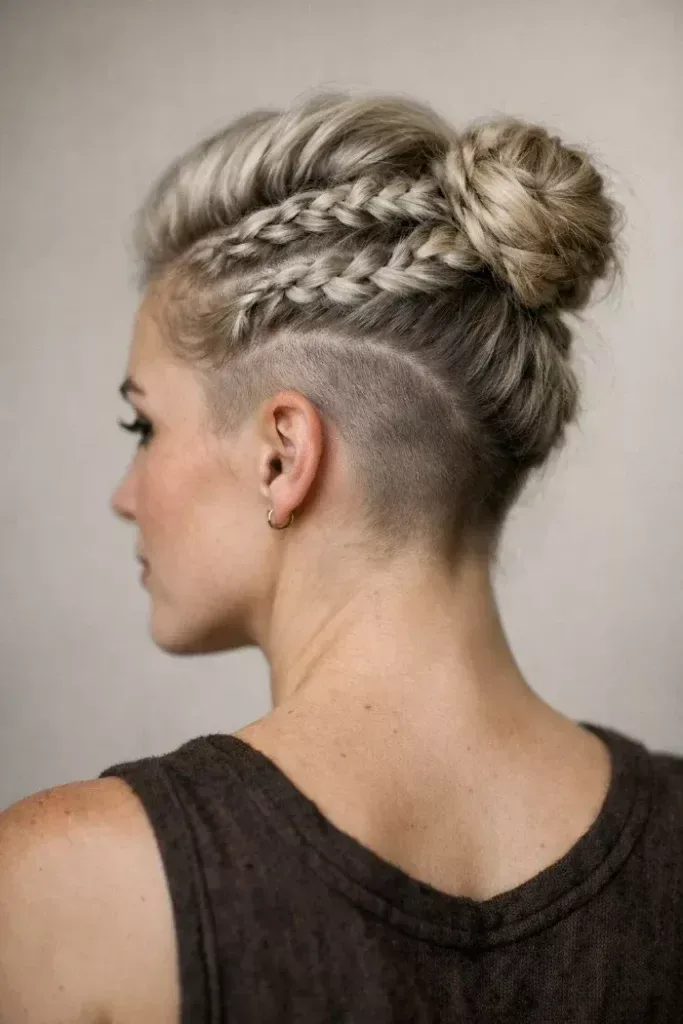
Braids and an undercut are made for each other: the braids pull the long hair back and up, which frames the shaved section perfectly, and the contrast between the neat braids and the clean shave is striking. A French braid that ends in a ponytail shows a nape undercut; cornrows or a side braid show a side undercut. It is the undercut for festivals, holidays and weekends — a style that looks intricate and deliberate, and takes less time than it looks.
Best for: long hair, festivals, and anyone who loves braided styles. How to style it: braid the top section back, secure it, and let the undercut do the talking. Pros and cons: braids show the undercut off better than almost any other style, but tight braids over a fresh shave can irritate the skin — wait a day after shaving before braiding tightly. Common mistake: braiding so tightly that the shaved line pulls — keep it comfortable. Quick verdict: the undercut’s best friend — braids frame the shave like a picture frame.
14. The Undercut for a Round Face
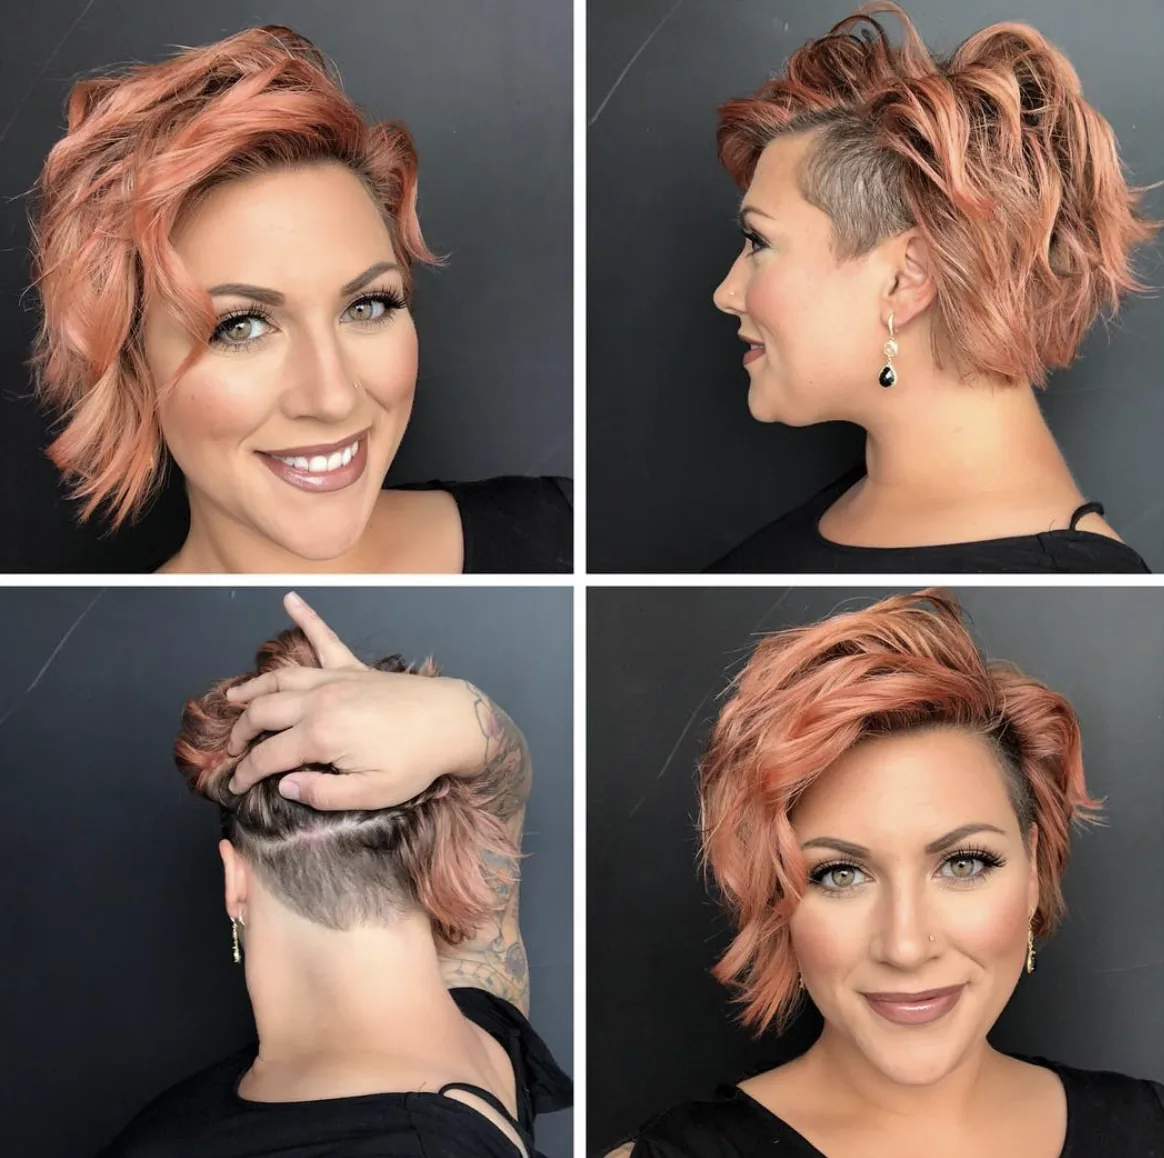
For a round face, an undercut works best when it adds height and length rather than width: a nape undercut with volume on top, or a side undercut with the long hair swept across the forehead. The shaved section removes width at the sides, which is exactly what a round face wants, and the longer top can be styled upward for height. The result is a face that looks longer and more defined, with the undercut doing the slimming work invisibly.
Best for: round faces that want definition and height. How to style it: lift the roots with a little volume powder, and sweep the top to one side. What to ask: ask for the shave to stay low and narrow, so the top keeps its volume. Who should avoid it: a wide, high double undercut, which can add width at the temples — the opposite of what a round face needs. Quick verdict: the undercut is not the problem for a round face; the placement is — keep it low, and it flatters beautifully.
15. The Undercut for an Oval Face
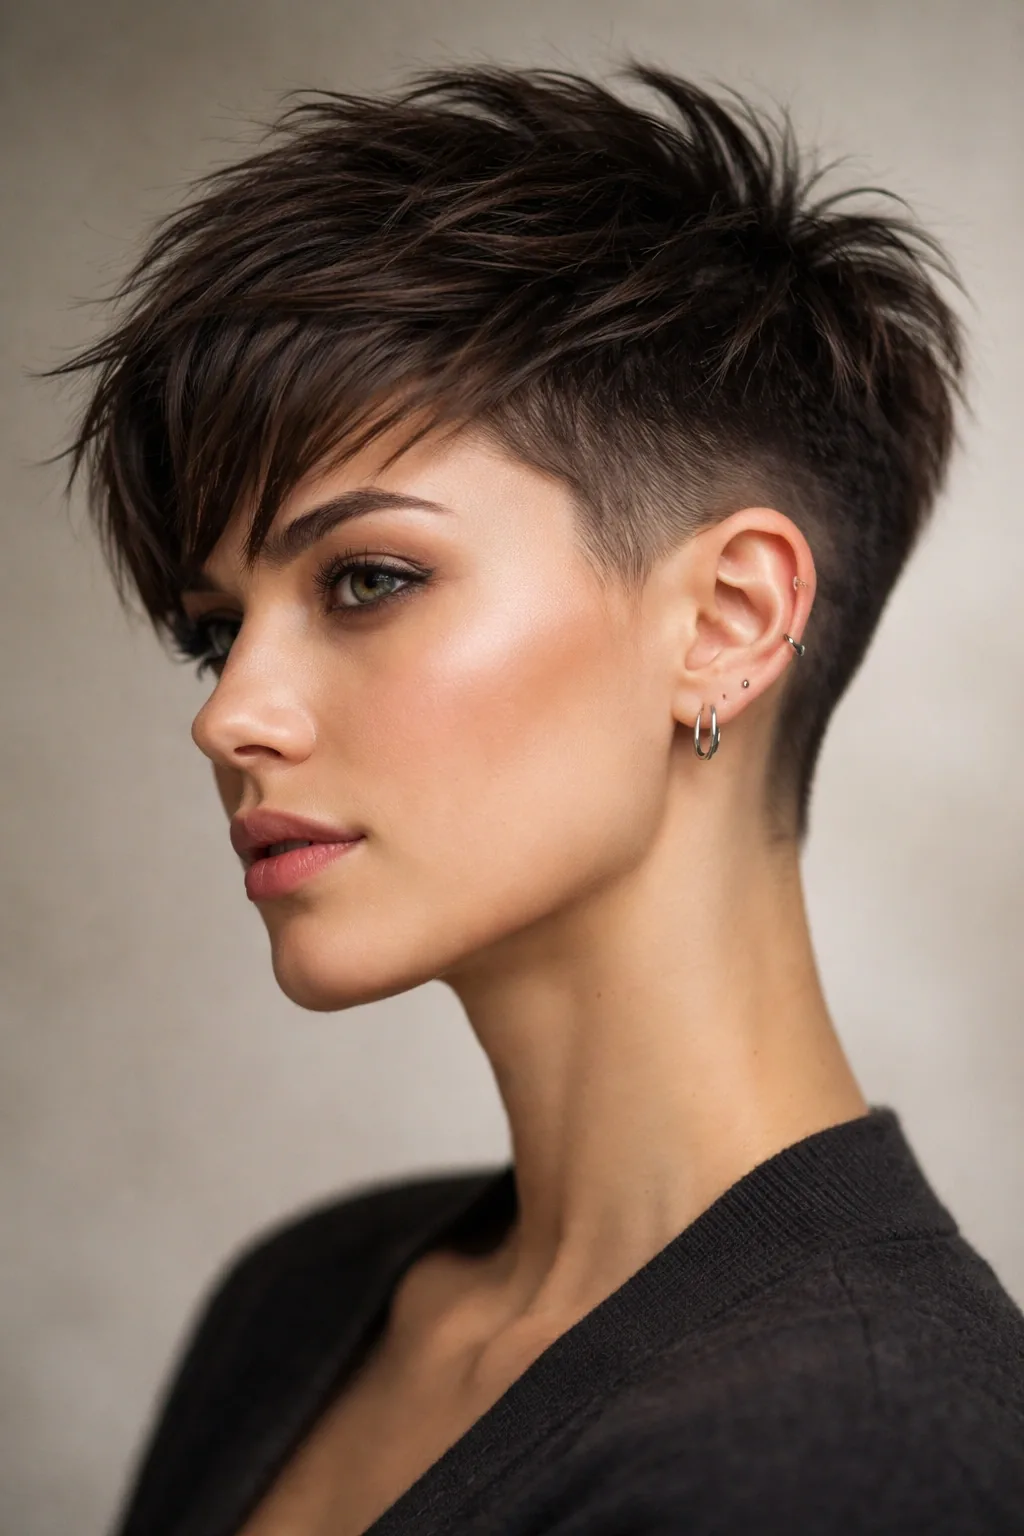
An oval face is the easiest face shape for an undercut, because its balanced proportions can take almost any placement — nape, side, double or full — without looking out of proportion. That freedom means the choice comes down to personality rather than rules: a hidden nape undercut for a quiet edge, a side undercut for drama, or a pixie undercut for a bold, modern look. The only real guidance is to choose the one you love, not the one you think you should have.
Best for: oval faces, which suit every undercut in this guide. How to style it: any way you like — try a centre part for balance, or a deep side part for drama. Pros and cons: the freedom is wonderful, but it can make the choice harder — bring two or three photos you love and ask the stylist which placement suits your hair’s thickness best. Quick verdict: if you have an oval face, the undercut is yours to choose — enjoy having every option open.
16. The Undercut With Bangs
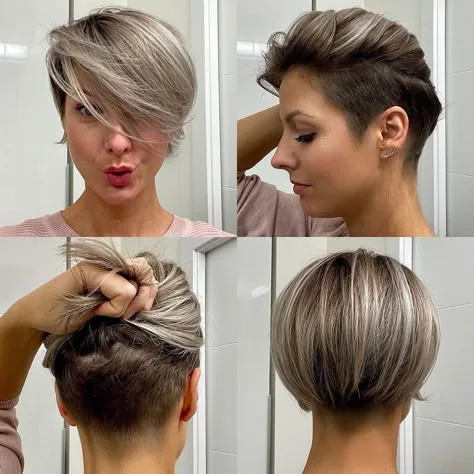
Bangs and an undercut are a surprisingly good pair: the bangs frame the face and soften the front, while the undercut adds edge at the back, so the whole style is balanced — soft in front, bold behind. Curtain bangs work beautifully with a nape undercut, because they fall softly while the shave stays hidden; a blunt fringe works with an undercut pixie, because the contrast between the straight fringe and the shaved sides is graphic and modern. Either way, the bangs make the undercut look deliberate rather than accidental.
Best for: anyone who wants bangs with an edge, and undercut pixies that need softening. How to style it: blow-dry the bangs forward with a round brush, and let the rest of the hair fall naturally. Common mistake: cutting the bangs too short before the undercut — the shave already adds drama, so the bangs can stay longer and softer. Maintenance: bangs need a trim every four to six weeks, and the undercut every two to three. Quick verdict: the undercut with a soft front — the most balanced bold cut in this guide.
17. The Undercut Ponytail
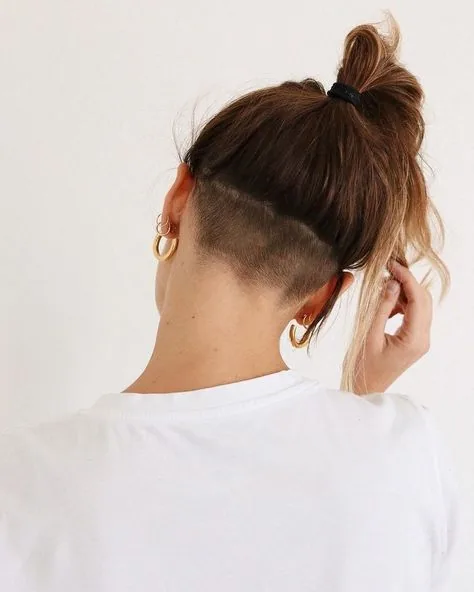
The undercut ponytail is the reveal moment: a high ponytail pulls all the long hair up and back, and the nape undercut is suddenly the star of the show. It is the reason many women get a nape undercut in the first place — the everyday ponytail becomes a style statement, and the shave turns a gym hairstyle into a look. A high, sleek ponytail shows the undercut best; a low, loose one shows it more subtly.
Best for: long hair, workouts, and anyone who lives in a ponytail. How to style it: brush the hair up smoothly, secure it high, and wrap a strand around the elastic for a polished finish. Pros and cons: it is the easiest way to show off a nape undercut, but a tight ponytail every day can stress the hairline — vary the height. Maintenance: keep the shave fresh, because a ponytail puts it on full display. Quick verdict: the undercut’s party trick — one elastic, and the whole look changes.
18. The Undercut Messy Bun
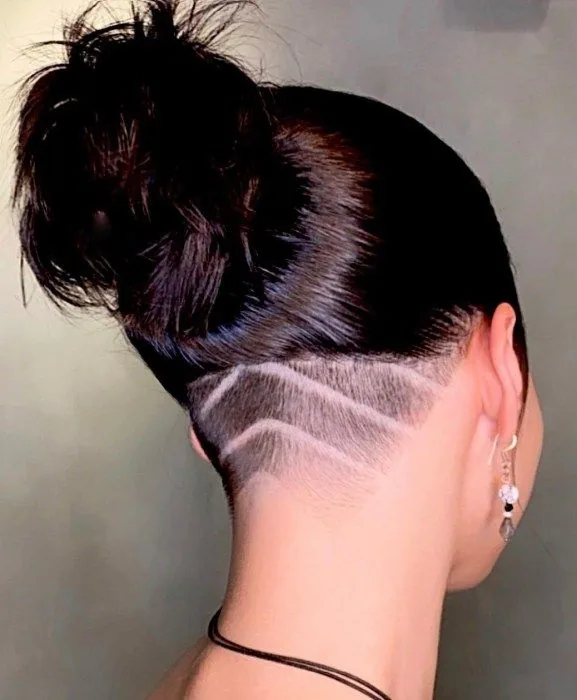
The messy bun is the undercut’s most relaxed reveal: the hair is gathered loosely on top of the head, a few pieces fall free, and the nape undercut peeks out underneath. It is the weekend version of the undercut — casual, effortless, and a little bit undone. It works especially well with a faded or designed undercut, because the loose bun frames the shave without hiding it, and the whole look takes about thirty seconds.
Best for: casual days, weekends, and second-day hair. How to style it: gather the hair loosely, twist it into a bun, secure it with pins, and pull out a few face-framing pieces. Common mistake: making the bun too tight and neat — the charm of this style is that it looks undone. Pros and cons: the fastest way to show an undercut, but the bun needs enough length to hold — very short hair will not make it. Quick verdict: the undercut for lazy days — thirty seconds, and you look like you tried.
19. The Undercut With Bold Colour
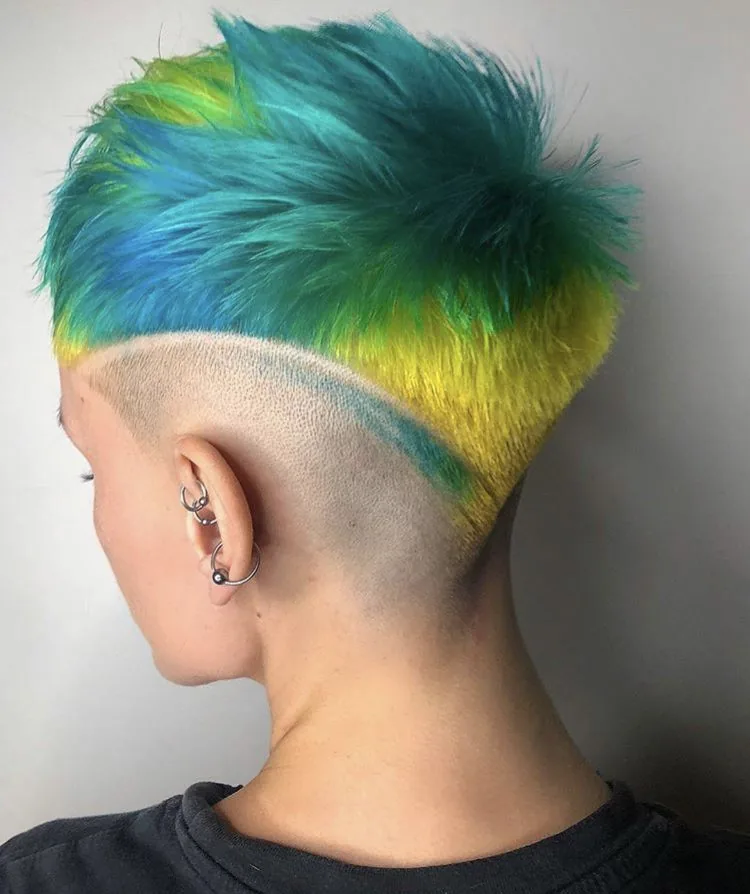
Colour takes an undercut to another level: the shaved section can be dyed a bold colour — pink, blue, purple, or a bright red — while the top stays natural, so the colour is a secret that only appears when the hair goes up. Or the whole look can be coloured, with the undercut in a contrasting shade that makes the shave pop. It is the most eye-catching undercut in this guide, and the most fun: the colour is temporary if you want it to be, and it grows out with the shave.
Best for: creative spirits, and anyone who wants colour without committing the whole head. How to style it: show it off — a ponytail, a bun or a half-up style reveals the colour. Cost and time: colouring a small shaved section is quick and cheap, and it fades faster on short hair, so it needs refreshing every few weeks. What to ask: ask for a semi-permanent colour on the shave, so it fades gently instead of growing out with a hard line. Quick verdict: the undercut as a canvas — colour it, change it, and start again next month.
20. The Blonde Undercut
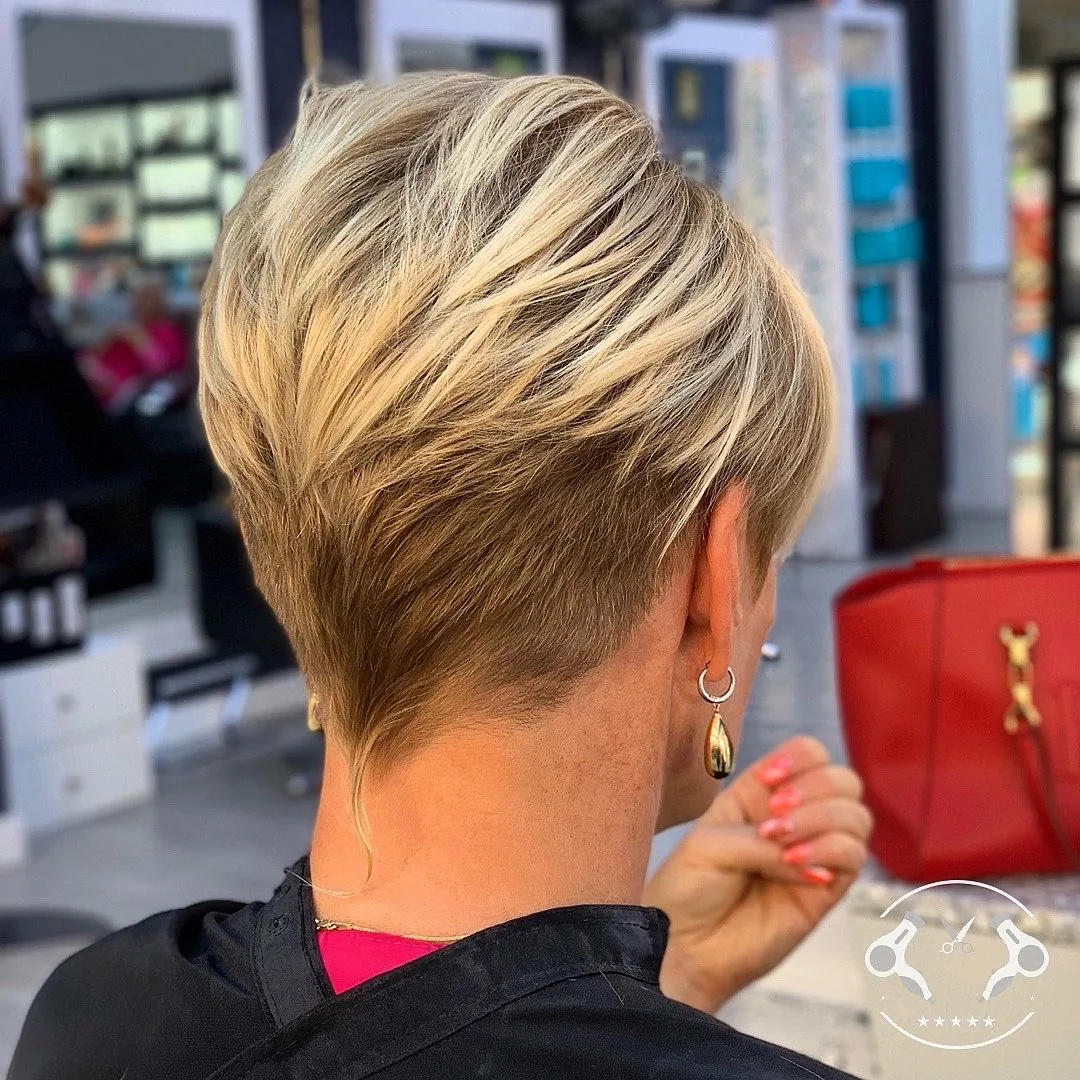
A blonde undercut is striking because the contrast is so visible: pale blonde hair on top, a closely shaved section underneath, and the line between them is crisp and graphic. On platinum or light blonde hair, the shave can look almost white, which makes the design or fade stand out beautifully. It is the undercut for blondes who want their hair to look modern and intentional, rather than simply long and blonde.
Best for: blonde hair, especially platinum and light blonde. How to style it: keep the top smooth and shiny, and the shave clean — a purple shampoo keeps the blonde from turning brassy. Maintenance: blonde hair needs more care, so a weekly mask and a regular toner keep both the colour and the undercut looking fresh. Who should avoid it: anyone whose blonde hair is already very damaged — the shave is fine, but the top needs to be healthy to carry the look. Quick verdict: the brightest undercut in this guide — blonde makes the shave shine.
21. The Undercut for Women Over 50
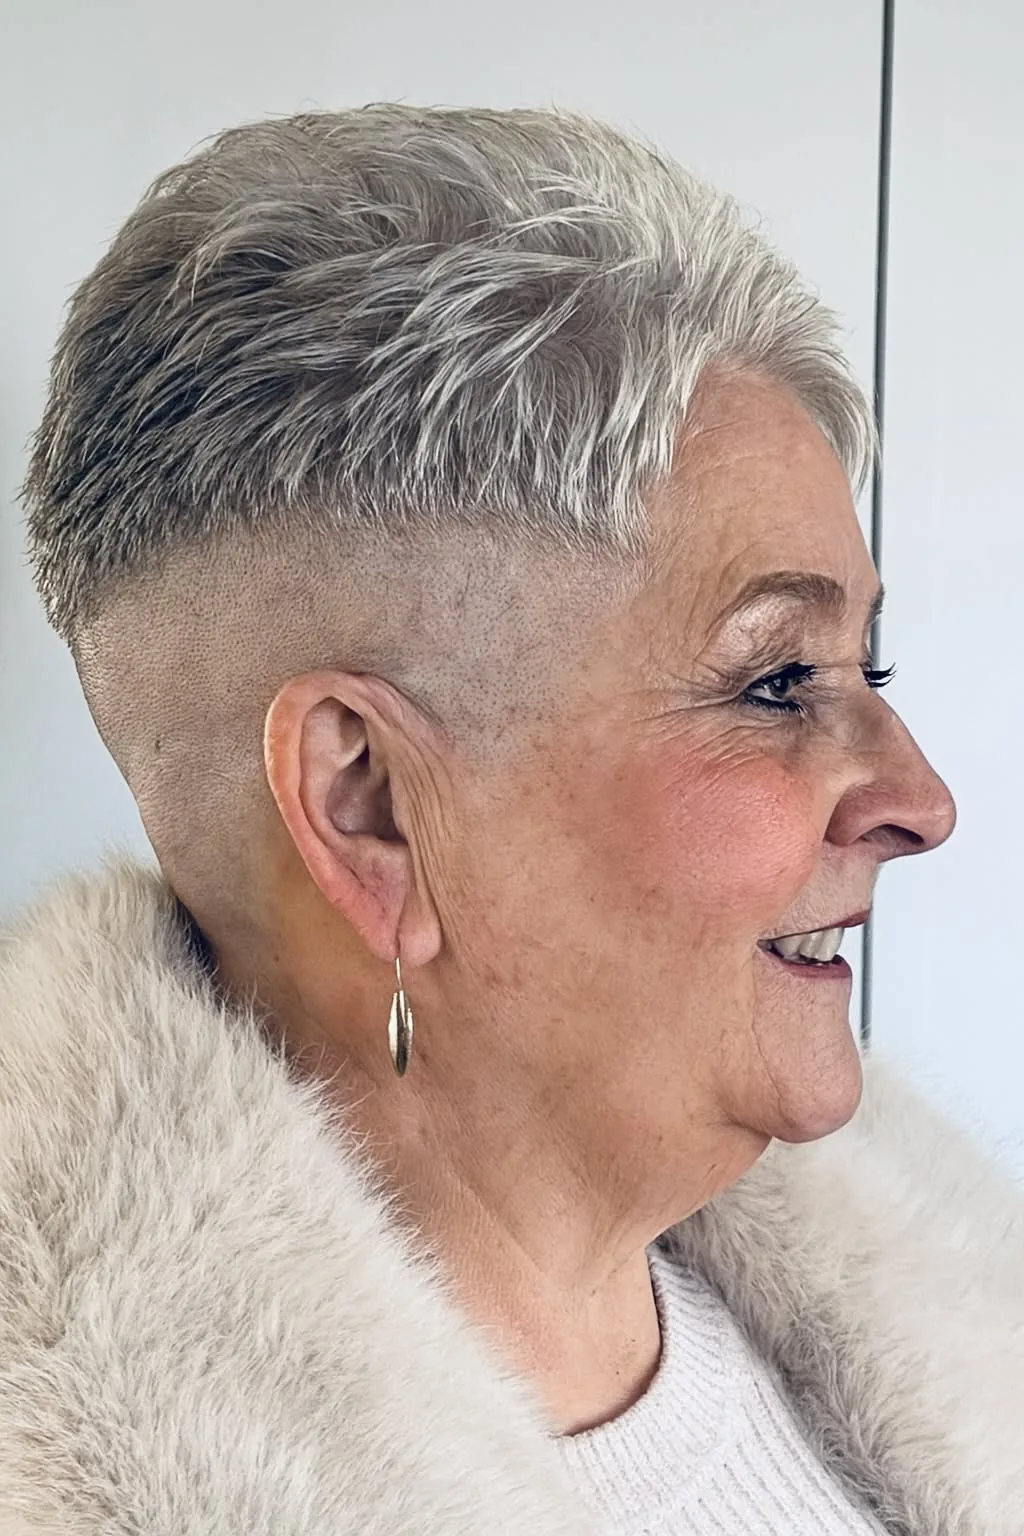
An undercut is not just for twenty-somethings — and women over 50 are discovering it for the most practical reason of all: it makes thick, heavy hair lighter and easier to manage. A hidden nape undercut under a shoulder-length cut or a bob removes the bulk that makes mature hair feel heavy, cools the neck, and cuts the drying time in half. It is subtle, it is hidden when you want it to be, and it is nobody’s business but yours.
Best for: mature hair that has become thick or heavy, and women who want comfort without a short cut. How to style it: exactly as before — the undercut changes how the hair feels, not how it looks from the front. What to ask: ask for a low, narrow nape undercut, and bring a photo of the length you want to keep. Pros and cons: the comfort difference is immediate, but the shave still needs a touch-up every few weeks. Quick verdict: the undercut has no age limit — and for many women over 50, it is the most practical haircut they have ever had.
22. The Workplace-Friendly Undercut

The workplace-friendly undercut is designed around one rule: nobody at work should be able to tell. It is a low, narrow nape undercut, hidden completely by hair worn down, and it only appears when you tie your hair up — which you simply do not do at the office. It gives you the cooling effect, the lighter feeling and the private thrill, with zero professional risk. It is the undercut for women in conservative offices, client-facing roles, and anyone whose workplace has opinions about hair.
Best for: professional settings, conservative workplaces, and first-time undercut wearers who need to be cautious. How to style it: wear it down at work, and save the ponytail reveal for the weekend. Common mistake: asking for it too high — a workplace undercut should sit as low as possible, so even a low ponytail barely shows it. Maintenance: a touch-up every three weeks is enough, because nobody is inspecting it. Quick verdict: the undercut that respects your office — and still belongs entirely to you.
23. The Undercut With Shaved Lines
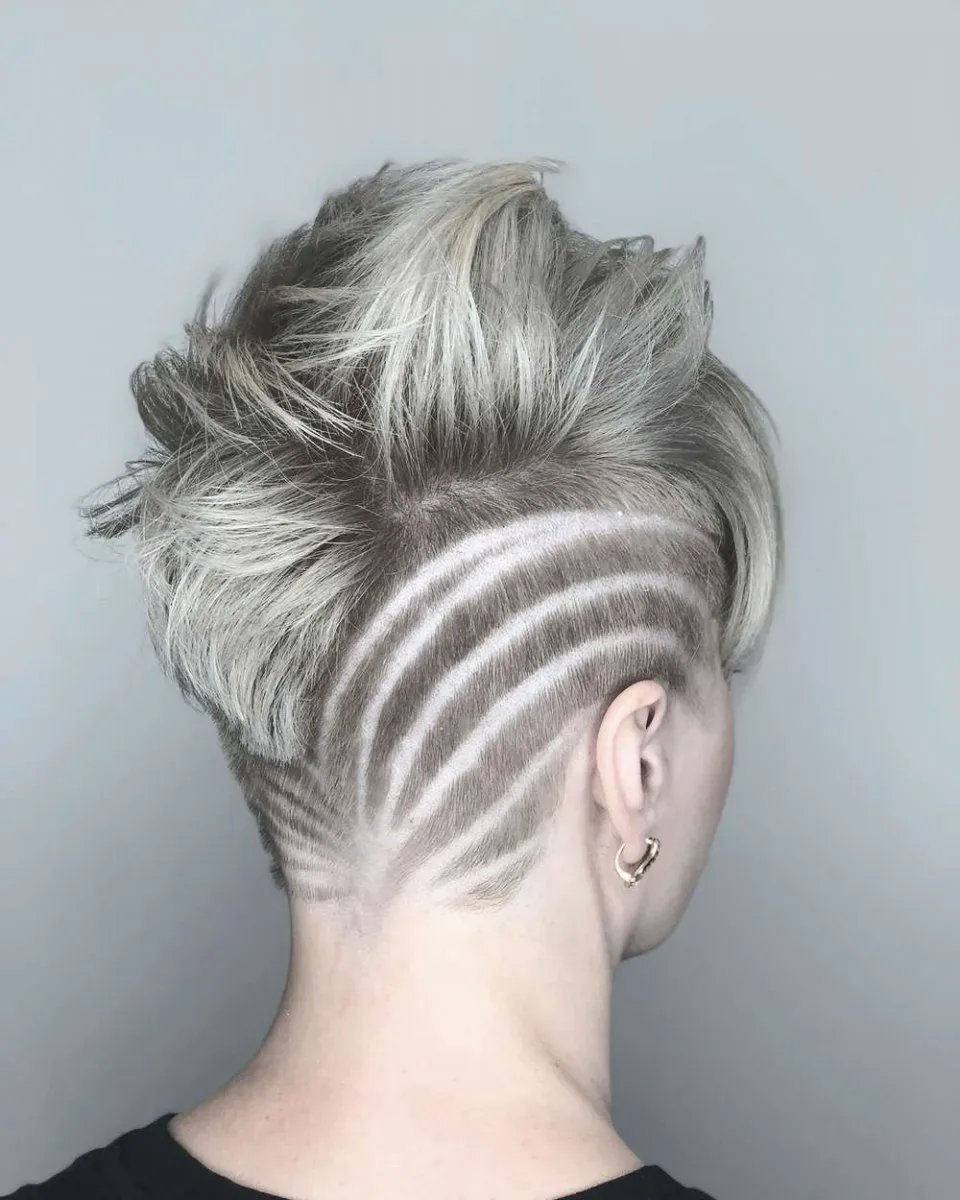
Shaved lines are the simplest undercut design and the easiest to love: one or two clean, parallel lines cut into the nape or side, so the shave has a graphic detail that catches the eye. They are quick to do, they suit every hair type, and they grow out in a week or two — which means they are the lowest-commitment design there is. A single line is subtle and chic; two or three lines are bolder and more graphic. Either way, they turn a plain undercut into a designed one.
Best for: first-time designs, and anyone who wants a detail without a full pattern. How to style it: show it — a high ponytail or a bun frames the lines perfectly. Cost and time: a few minutes added to a normal undercut touch-up. Pros and cons: the lines are the easiest design to maintain and the easiest to change, but they also blur fastest as the stubble grows — expect them to stay sharp for about a week. Quick verdict: the undercut design for minimalists — one line, and the whole cut looks intentional.
24. The Undercut With Loose Waves
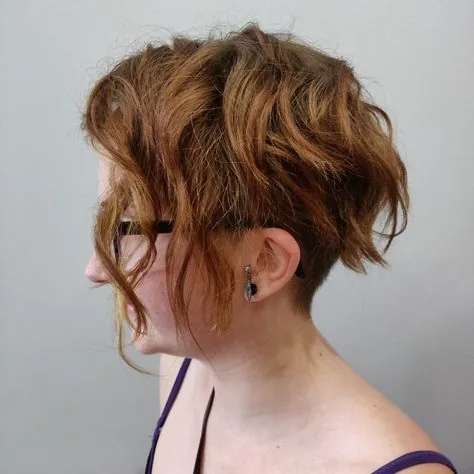
Loose waves over an undercut are the softest version of the look: the top layers fall in gentle, touchable waves, the shaved section sits quietly underneath, and the contrast between soft and sharp is what makes it interesting. It is the undercut for women who want edge without hardness — the waves keep it romantic and feminine, while the shave keeps it modern. It works beautifully on medium to long hair, where the waves have room to form.
Best for: wavy hair, romantic styles, and anyone who wants a soft edge. How to style it: a large-barrel curling iron or a braid left overnight gives loose waves, finished with a little texture spray. Maintenance: the waves need a little styling, but the undercut itself is hidden, so a touch-up every three weeks is enough. What to ask: ask for the shave to stay low, so the waves fall over it cleanly. Quick verdict: the softest undercut in this guide — proof that edge and romance are not opposites.
25. The Half-Up Undercut
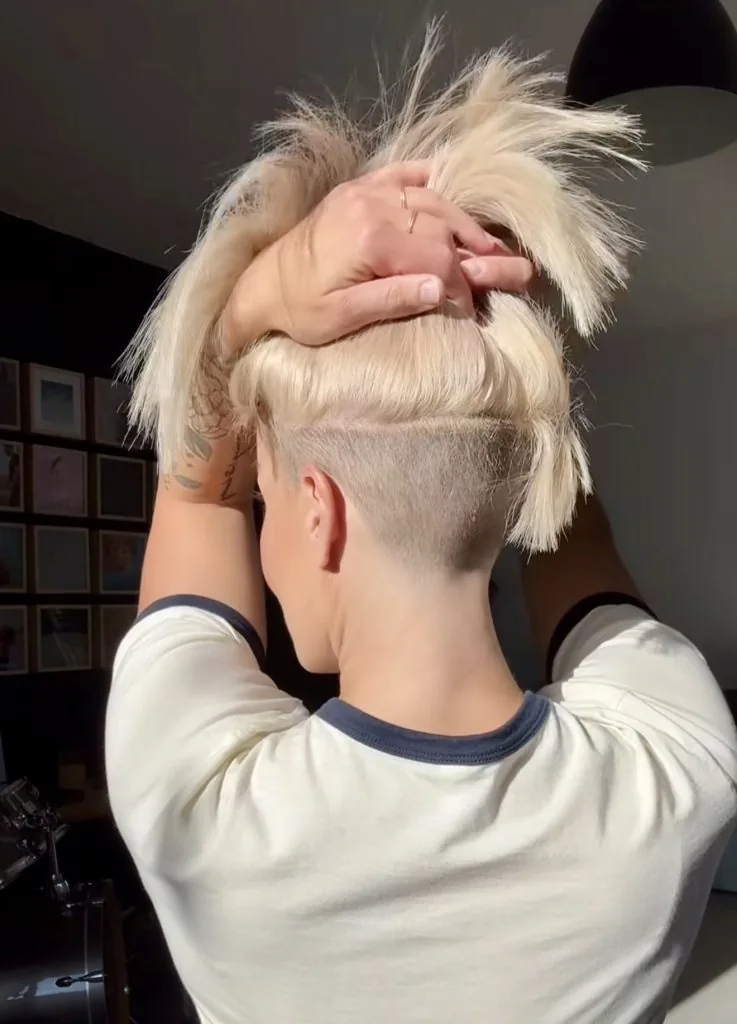
The half-up undercut is the reveal with the most control: the top half of the hair is tied up, the bottom half falls free, and the nape undercut shows just enough to be noticed. It is more subtle than a full ponytail and more deliberate than wearing the hair down — a middle ground that works for a night out, a wedding, or a day when you want the undercut to peek rather than shout. It is also the easiest reveal to do on yourself, because you only need to gather the top section.
Best for: medium to long hair, evenings out, and anyone who wants a partial reveal. How to style it: gather the top half, secure it with a clip or elastic, and let the rest fall. Pros and cons: it shows the undercut without committing to a full updo, but it needs enough length on top to tie up — very short hair will not make it. Common mistake: tying it too tightly, which pulls the face and hides the shave — keep it loose. Quick verdict: the undercut reveal for when you want a hint, not a headline.
26. The Undercut With a Side Part
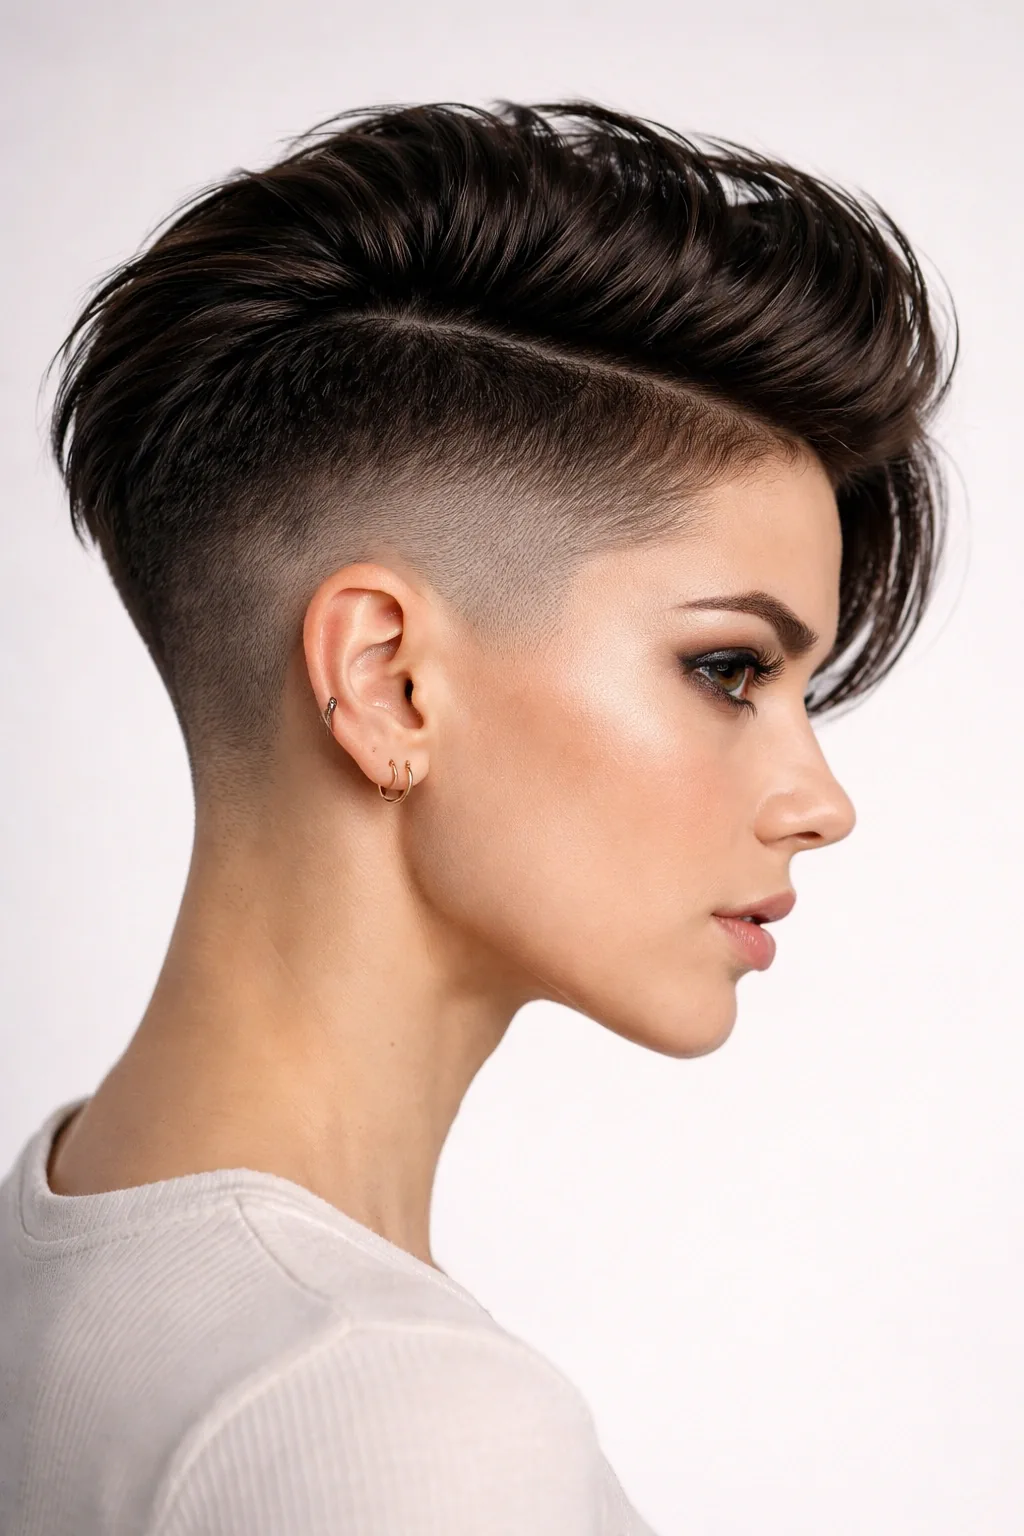
A deep side part changes an undercut completely: the hair sweeps across the forehead in a dramatic wave, the volume piles up on one side, and the shaved section — whether it is a nape or a side undercut — is framed by the sweep. It is the undercut for evenings out and for photos, and it makes the whole style look glamorous and intentional. The side part also adds lift at the roots, because the hair is being pushed against its natural fall.
Best for: evenings, events, and anyone who wants a glamorous undercut. How to style it: part deeply while the hair is damp, blow-dry the roots in the direction of the part, and let the lengths fall. Common mistake: switching the part daily — the undercut and the top layers settle into a part, so pick a side and stick to it. Maintenance: a little root-lifting spray keeps the volume up. Quick verdict: the most glamorous way to wear an undercut, and the easiest way to make it look expensive.
27. The Sleek Straight Undercut
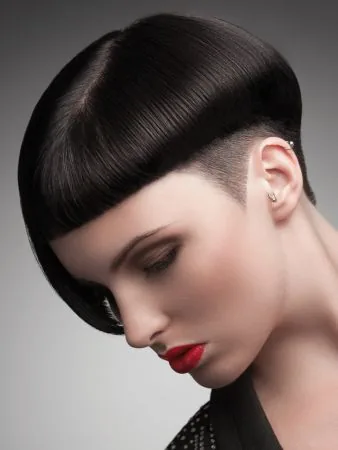
The sleek straight undercut is the most polished version of the look: the top layers are blow-dried smooth and shiny, the shaved section is crisp and clean, and the contrast between the glossy top and the matte shave is graphic and modern. It is the undercut for women who love a sleek, put-together finish — the kind of hair that looks like it was done in a salon, every day. It works best on straight or straightened hair, where the smoothness shows off the line of the undercut.
Best for: straight hair, polished styles, and professional settings where the undercut stays hidden. How to style it: blow-dry with a paddle brush, finish with a flat iron on the top layers, and add a drop of shine serum. Pros and cons: the sleekest undercut of all, and the one that photographs best — but it needs daily styling, and the shave shows every flaw if it is not kept fresh. Who should avoid it: anyone who does not enjoy blow-drying — this look earns its polish. Quick verdict: the undercut at its most refined — sharp, shiny, and deliberate.
28. The Undercut Top Knot
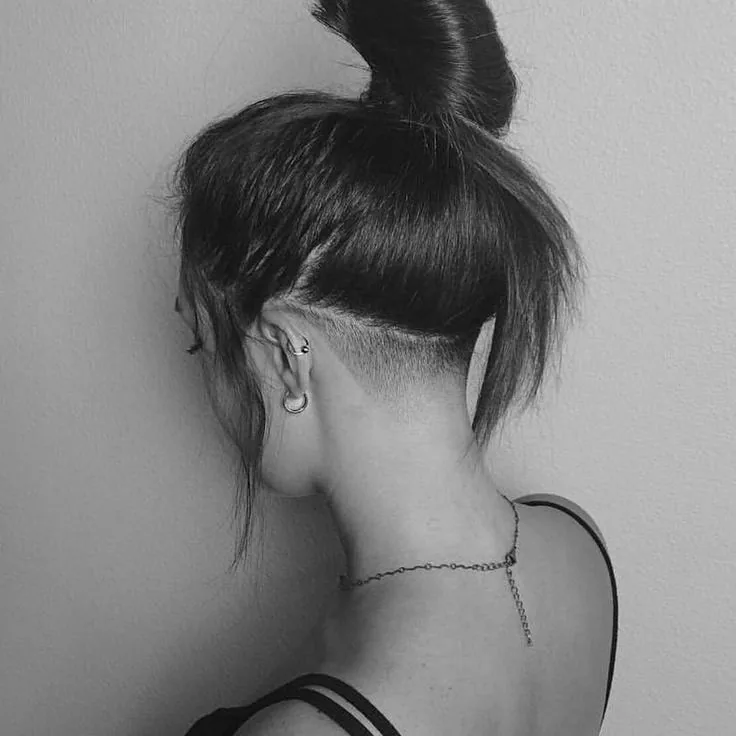
The top knot is the undercut’s boldest everyday reveal: all the hair is gathered high on the crown, twisted into a knot, and the nape and side undercuts are fully on display. It is the style for hot days, workouts, and anyone who wants the undercut to be the look rather than the secret. A sleek top knot shows the shave crisply; a messy one softens it. Either way, the top knot and the undercut were made for each other — one pulls the hair up, the other rewards it.
Best for: long and medium hair, hot weather, and days when you want the undercut front and centre. How to style it: gather the hair high, twist it into a knot, secure it with pins, and smooth the edges. Maintenance: a top knot shows the shave completely, so keep the touch-ups regular. Common mistake: pulling the knot too tight — it can cause breakage at the hairline. Keep it firm, not painful. Quick verdict: the undercut’s loudest reveal — one knot, and there is no hiding it.
29. The Low-Maintenance Undercut
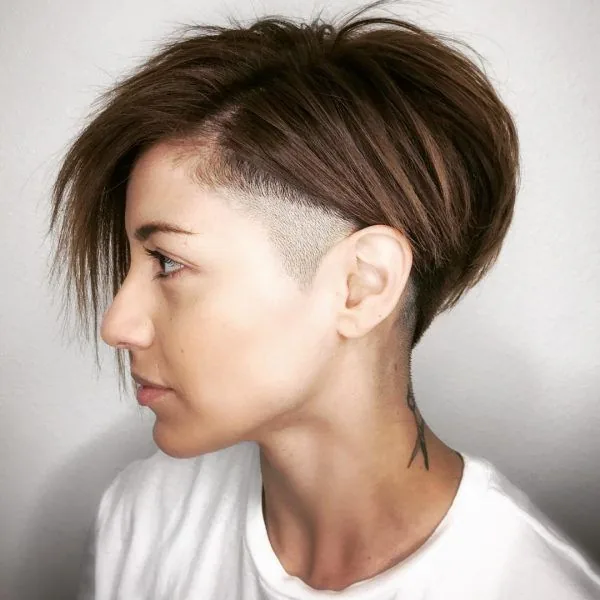
The low-maintenance undercut is not a specific cut — it is an undercut chosen with maintenance in mind. That means a low nape placement, a narrow strip, no design, and a top length that covers it completely when worn down. The result is hair that needs almost nothing extra: wash it, let it dry, and go. The only upkeep is a touch-up every three weeks, which takes ten minutes at home with clippers or a quick salon visit. It is the undercut for busy women, new mothers, and anyone who wants good hair without a routine.
Best for: busy schedules, and women who do not enjoy styling their hair. How to style it: nothing special — your normal routine, just lighter and cooler. What to ask: tell the stylist you want the lowest-maintenance undercut they can give you, and ask for the smallest strip that still removes the bulk. Pros and cons: the easiest undercut to live with, and the most forgiving grow-out — but also the least visible, so if you want a statement, this is not the one. Quick verdict: the undercut for women who want to forget they have one — until someone compliments their hair.
30. The Undercut With a Faux Hawk
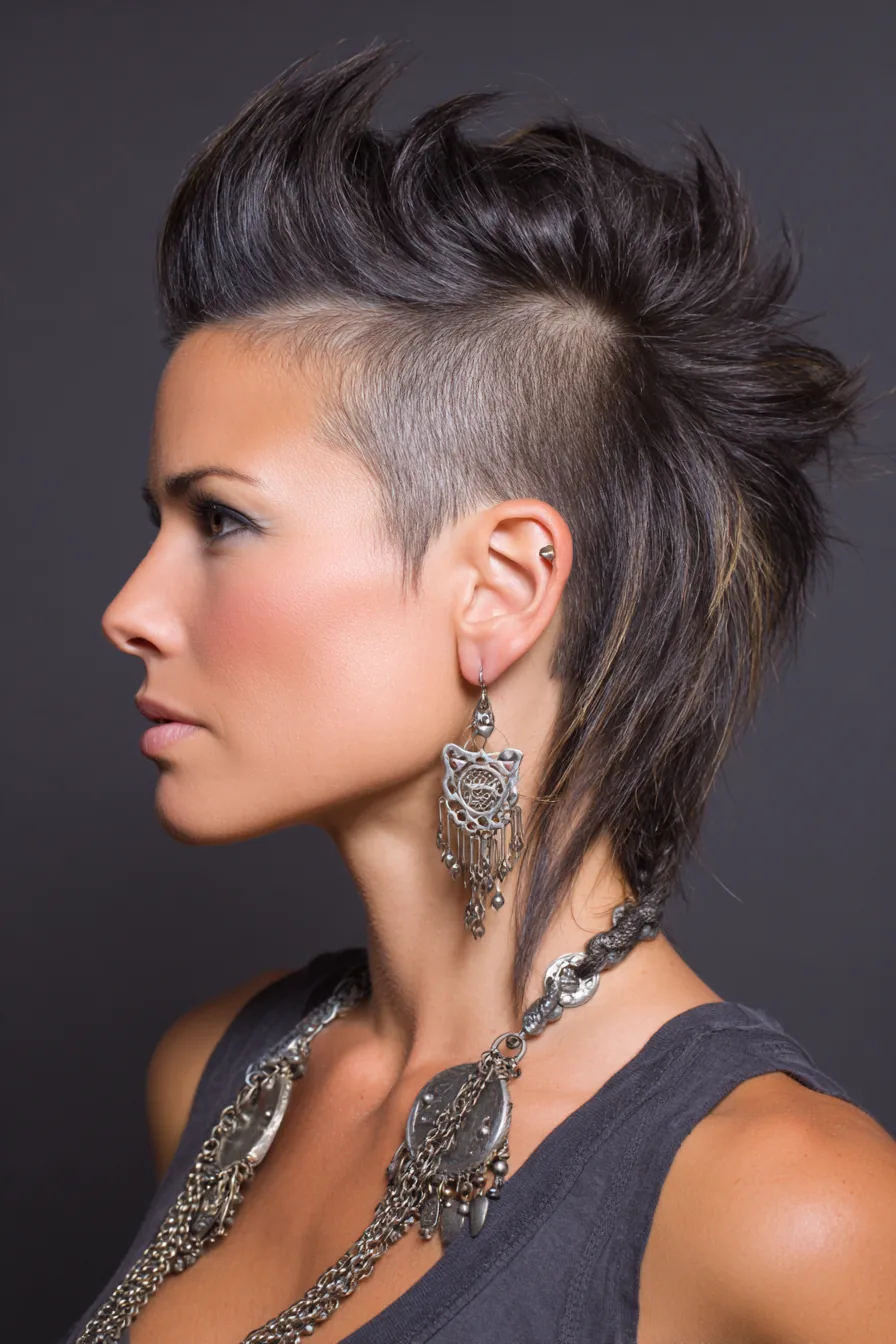
The faux hawk undercut is the boldest look in this guide: the sides are shaved, the top is left long and styled upward into a mohawk-like strip, and the result is punk energy without a full mohawk commitment. It is dramatic, it is fun, and it is unmistakably a statement — the undercut for concerts, festivals, and women who want their hair to have attitude. The top can be worn spiked up for maximum drama, or swept to one side for a softer, more wearable version.
Best for: bold personalities, festivals, and anyone who wants the most dramatic undercut. How to style it: strong-hold gel or pomade on the top section, pushed upward and left to set. Maintenance: the sides need a touch-up every one to two weeks, because the contrast is the whole point. Who should avoid it: anyone who needs to look conservative — this undercut cannot be hidden. Quick verdict: the undercut at full volume — wear it if you want to be noticed, because you will be.
31. The Undercut With Long Layers
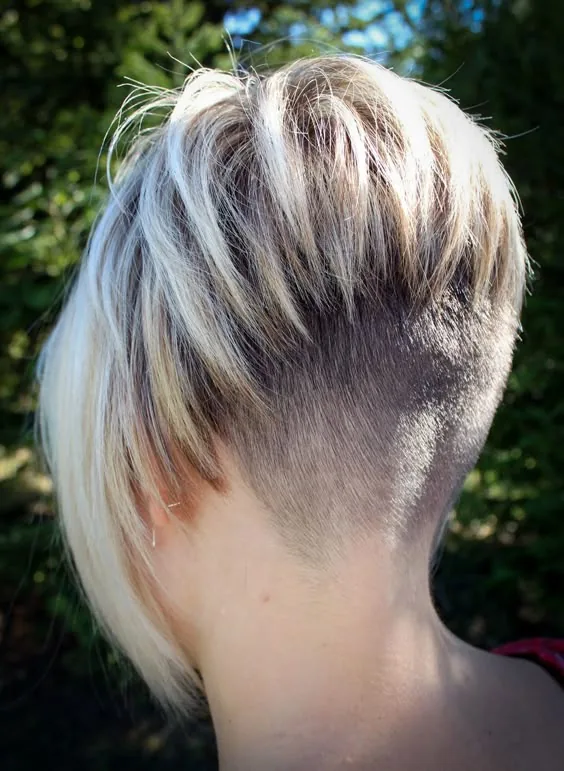
Long layers and an undercut are a perfect match: the layers give the top hair movement and shape, so it falls in tiers over the shaved section instead of one heavy curtain, and the undercut removes the bulk underneath so the layers can actually move. The result is hair that looks lighter, bouncier and more modern than either the layers or the undercut alone. It is the undercut for women who love layered hair and want it to behave better.
Best for: medium to long layered hair that feels heavy or shapeless. How to style it: blow-dry with a round brush for bounce, or air-dry with a little cream for soft movement. What to ask: ask the stylist to cut the layers before the undercut, so the shave can be matched to the shortest layer. Pros and cons: the layers make the undercut look expensive and intentional, but they need a trim every eight weeks to keep their shape. Quick verdict: the undercut that makes layered hair work — lighter on top, lighter underneath, and better from every angle.
What is an undercut hairstyle for women?
An undercut is a haircut where the hair underneath a section of the head — usually the nape, the sides, or both — is clipped very short, while the hair on top is left long enough to fall over it. The contrast between the long top and the short underneath is the defining feature, and the top can be anything from a pixie to waist-length hair.
Is an undercut the same as a side shave?
No — a side shave exposes one whole side of the head and is designed to be seen, while an undercut shaves a section underneath longer hair, so it can be hidden when the hair is worn down. A side undercut is one type of undercut, but most undercuts sit at the nape, where they are invisible with the hair down.
Can you hide an undercut at work?
Yes — a low nape undercut is completely hidden whenever your hair is worn down, which makes it one of the most workplace-friendly bold haircuts. Keep the shave low and narrow, wear your hair down at work, and save the ponytail or bun reveal for outside the office.
How often does an undercut need trimming?
A nape undercut needs a touch-up every two to three weeks to stay sharp, and a side undercut every one to two weeks, because the line is more visible. You can do it yourself with clippers at home, or book a quick trim at the salon between full appointments.
Does an undercut work for thick hair?
Yes — thick hair is the best candidate for an undercut, because shaving the underneath removes bulk, weight and heat, so the top layers lie flatter, dry faster and feel much lighter. Many women with thick hair get an undercut for comfort alone and never show it to anyone.
Does an undercut work for fine hair?
It can, but only in a small dose: a narrow nape undercut can clean up the wispy hairs at the neck, but a wide or high undercut on fine hair can make the top layers look thinner, because it removes the bulk supporting them. Start with the smallest possible strip and widen it only if the hair still looks full.
How long does it take to grow out an undercut?
A nape undercut takes about three to four months to reach a length you can blend, and a side undercut can take six months or more to catch up with the top layers. Regular trims, blending with thinning shears, and styling the regrowth flat all help — or cut the top into a pixie or bob and the awkward stage disappears overnight.
Will an undercut damage my hair?
No — an undercut is just a haircut, with no chemicals involved, so it cannot damage the hair the way colouring or perming can. The only risk is to the skin: a fresh shave can be irritated by tight braids or heavy products, and shaved skin burns easily in the sun, so use sunscreen on a visible undercut.
What is a hidden undercut?
A hidden undercut is a shave placed low at the nape or behind the ears, narrow enough that the top layers cover it completely when the hair is worn down. It only appears when you tie your hair up or tuck it behind an ear — it is the most discreet version of the undercut, and the best starting point for first-timers.
Can I get an undercut with long hair?
Yes — long hair is ideal for an undercut, because the top layers act as a curtain that hides the shave when worn down and reveals it when tied up. A long-hair undercut removes weight and heat without losing any length, and it is the most versatile version of the cut.
Conclusion
An undercut is the rare haircut that asks nothing of you and gives you everything: less weight, less heat, faster drying, and a secret you can reveal whenever you choose. Whether it is a hidden nape undercut that nobody knows about, a faded undercut that looks expensive, a designed undercut that turns your neck into art, or a bold side undercut that is the whole look — the cut works because it is yours to control. Wear it down and it disappears; tie it up and it is suddenly the most interesting thing about your hair.
Start low and start hidden: a narrow nape undercut, a consultation, and a stylist who will check the coverage with your hair down and dry. Live with it for a month, learn how often you want to show it, and then decide whether to go higher, wider, or bolder. And remember the real point of an undercut — it is not about what other people see. It is about how your hair feels on a hot day, how light it is when you tie it up, and the small, private satisfaction of knowing there is an edge hiding under all that hair.