Ladder Braid Tutorial: The Eye-Catching Style
Have you ever scrolled through social media, stopped by a breathtakingly intricate braid, and thought, “I could never do that”? We’ve all been there. The ladder braid, with its elegant, lattice-like appearance, looks like it belongs on a runway or a fantasy film set. But here’s a secret: with the right guidance, this eye-catching style is absolutely achievable at home. More than just a braid, it’s a piece of wearable art that transforms ordinary hair into a statement of texture and creativity.
What Exactly is a Ladder Braid?
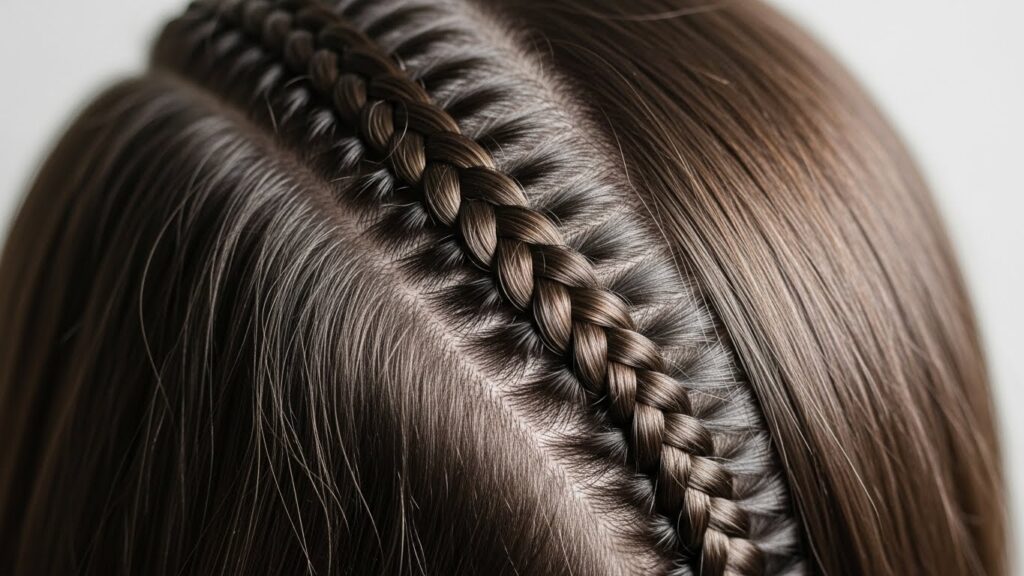
Before we pick up our comb, let’s understand what makes a ladder braid so special. At its core, the ladder braid is a mesmerizing variation of the classic Dutch (or inverted) braid. Instead of a single, solid plait, this style creates the illusion of a delicate ladder woven into your hair. The magic lies in the strategic release of sections as you braid, forming open “windows” or “rungs” between secured sections.
Think of it as a hybrid between a braid and a pull-through ponytail, but far more refined. The result is a pattern that is both structured and airy, offering a unique blend of complexity and elegance. It’s a versatile technique that can serve as a standout accent braid along your hairline, a central feature in an updo, or even a full-head masterpiece.
Essential Tools You’ll Need to Get Started
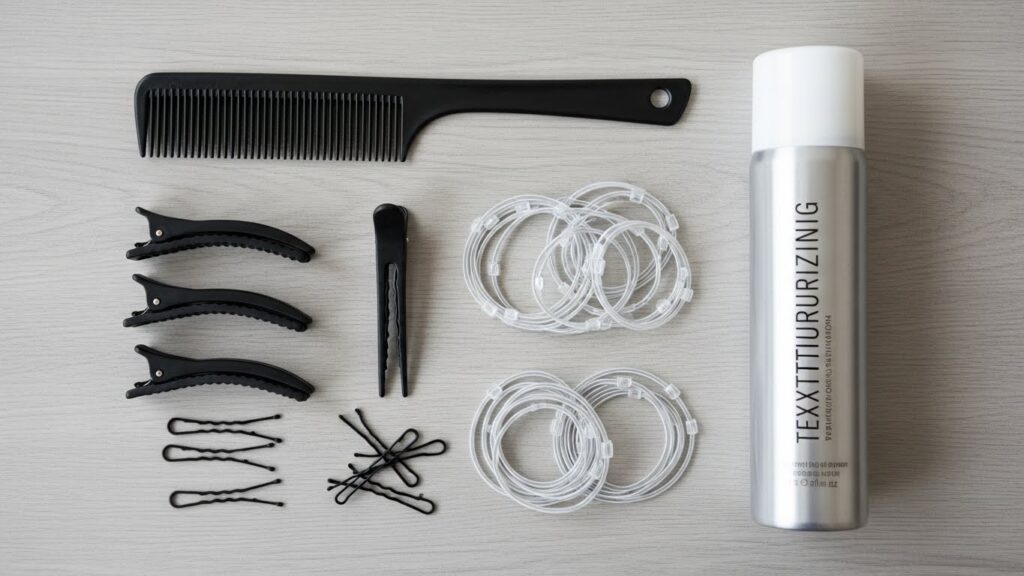
Gathering the right tools is half the battle for a smooth braiding experience. You don’t need a professional salon kit, but a few key items will make the process infinitely easier.
A fine-tooth comb or tail comb: Precision is paramount for creating clean partings and sections. A tail comb is excellent for teasing out small, even strands.
Hair elastics (clear or matching your hair color): You’ll need a few small, snag-free elastics to secure the starting point and the end of your braid.
Sectioning clips: These are non-negotiable for managing the hair you’re not actively working with, keeping it out of the way to maintain clarity.
Light-hold hairspray or texturizing spray: Slightly textured, second-day hair often holds braids better. A light spray can provide grip without making hair stiff or sticky.
Hair pins (bobby pins): Useful for tucking away ends and securing the braid if you incorporate it into an updo.
Optional: A mirror you can position to see the back of your head. Practice makes perfect, and seeing what you’re doing is a huge help.
Step-by-Step Ladder Braid Tutorial
Now for the main event. Follow these steps slowly. It’s better to go slow and get the technique right than to rush and become frustrated. We’ll start with a classic side ladder braid.
Step 1: Preparation is Key
Begin with detangled hair. If your hair is very silky, a light mist of texturizing spray can add necessary grip. Decide where you want your braid to sit—along the hairline from temple to opposite ear is a popular and flattering placement. Use your comb to create a clean, diagonal parting for the section of hair you’ll be braiding.
Step 2: Create Your First Section and Secure
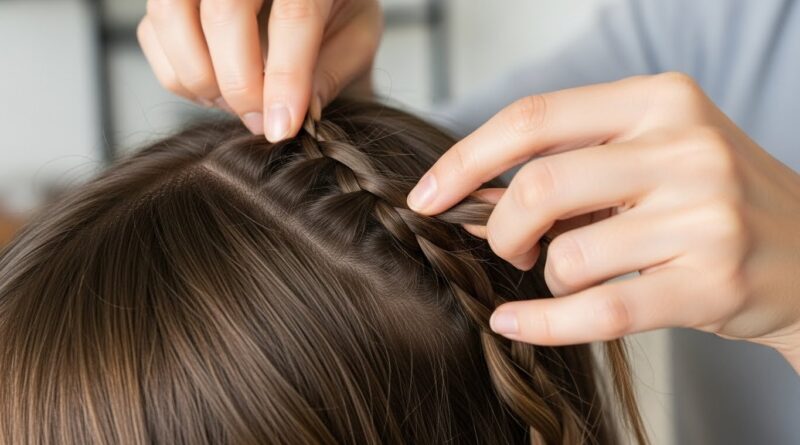
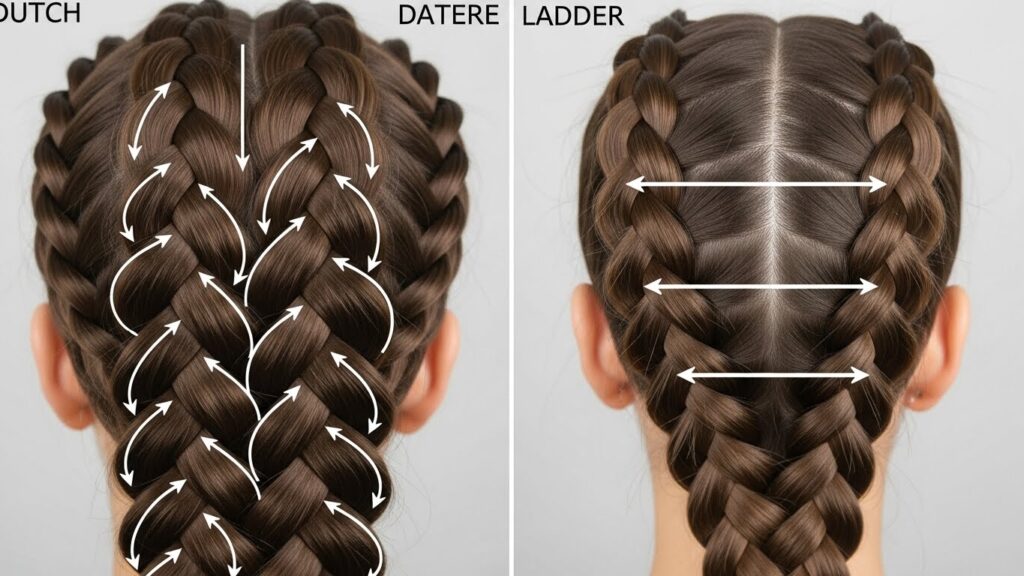
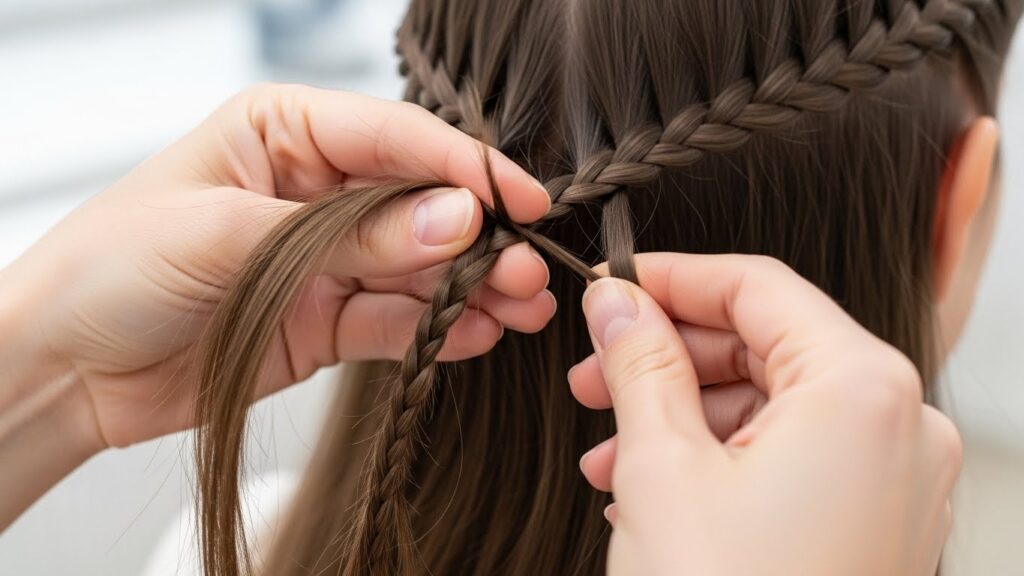
Take a triangular section of hair at the starting point (e.g., near your temple). Divide this section into three equal strands, just as you would for a regular braid. Do a single stitch of a Dutch braid: cross the right strand under the middle, then the left strand under the new middle. This anchors your braid.
Step 3: The “Drop” That Creates the Ladder
Here’s where the magic happens. After that first Dutch braid stitch, you will add hair to the braid as usual, but only from the top section (the side closer to the crown of your head). Pick up a new, thin subsection of hair from the top and add it to the current top strand before crossing it under the middle.
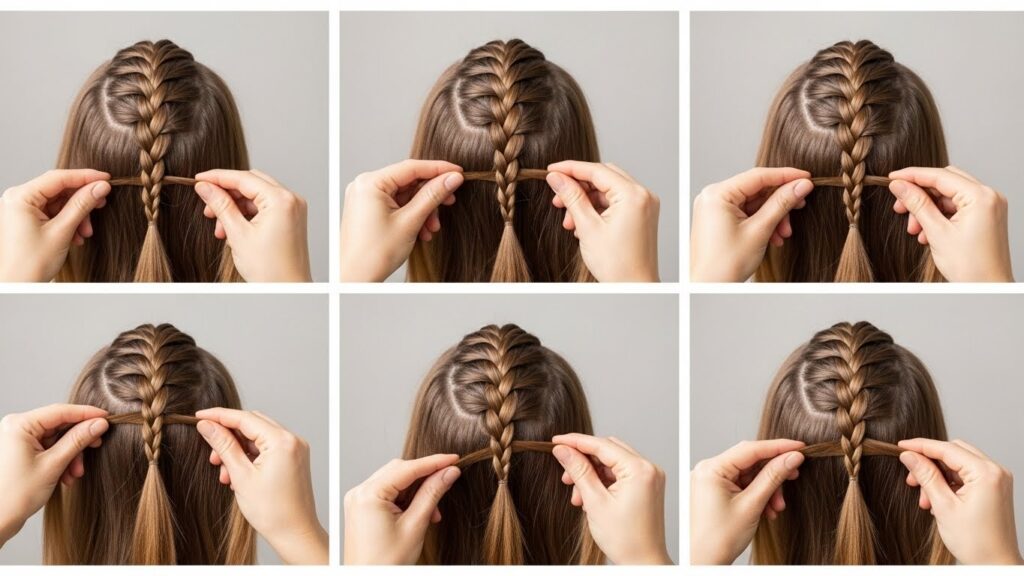
Step 4: Forming the Pattern
You now have only two strands in your hands: the top (which just had hair added) and the middle. The bottom strand is hanging free. To get back to three strands, pick up a new, thin section of hair from the bottom area (from the hair you just dropped). This becomes your new bottom strand.
Continue the pattern: Add hair to the top strand, Dutch braid it under. Release the bottom strand. Pick up a new bottom section from the dropped hair. Repeat. As you continue, you’ll see the beautiful ladder pattern forming, with gaps between the points where the bottom strand was secured.
Step 5: Finishing the Braid
Continue this pattern until you run out of hair to incorporate along your chosen path. Once you can no longer pick up new sections, simply finish by braiding the remaining three strands in a regular three-strand braid (or continue Dutch braiding without adding hair) and secure the end with a clear elastic.
Pro Tips and Troubleshooting Common Issues
Issue: My braid looks loose and messy.
Solution: Ensure you are taking small, thin subsections when adding hair. Keep tension consistent by pulling strands firmly (but not painfully) as you cross them under. The braid should feel secure against your scalp.
Issue: The “rungs” or gaps are uneven.
Solution: Consistency is key. Try to pick up new bottom sections that are roughly the same size as the top sections you’re adding. Using the teeth of your comb as a measuring guide can help.
Issue: I keep losing my strands/getting confused.
Solution: Go back to basics. Practice the motion without a mirror first: Add (top), Braid (cross under), Drop (bottom), Pick Up (new bottom). Say it out loud as you do it. Use sectioning clips to isolate the hair you’re not using.
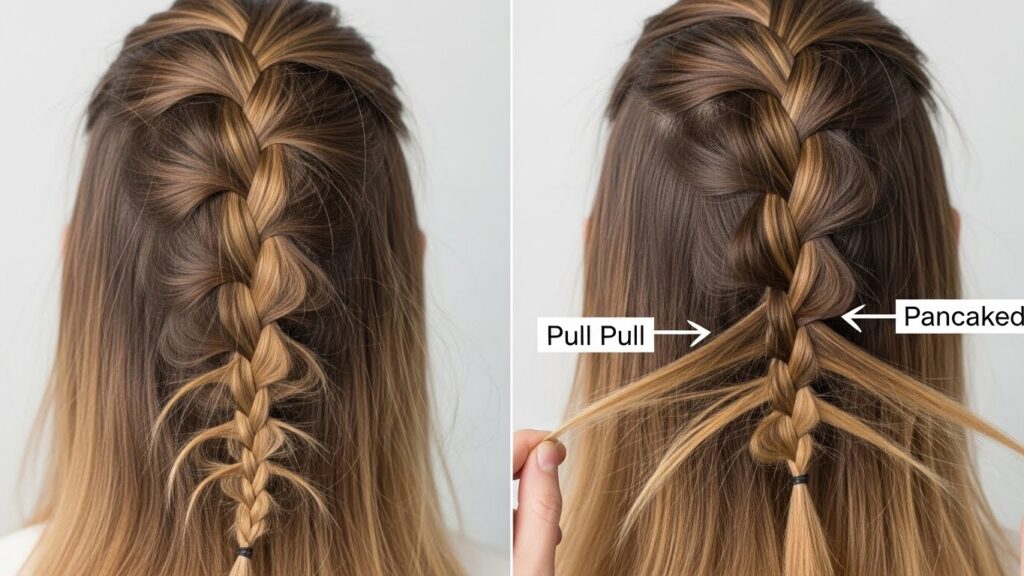
Pro-Tip for Volume: Once your ladder braid is complete, you can gently pull on the outer edges of the solid sections to pancake the braid. This makes the ladder effect more dramatic and adds volume.
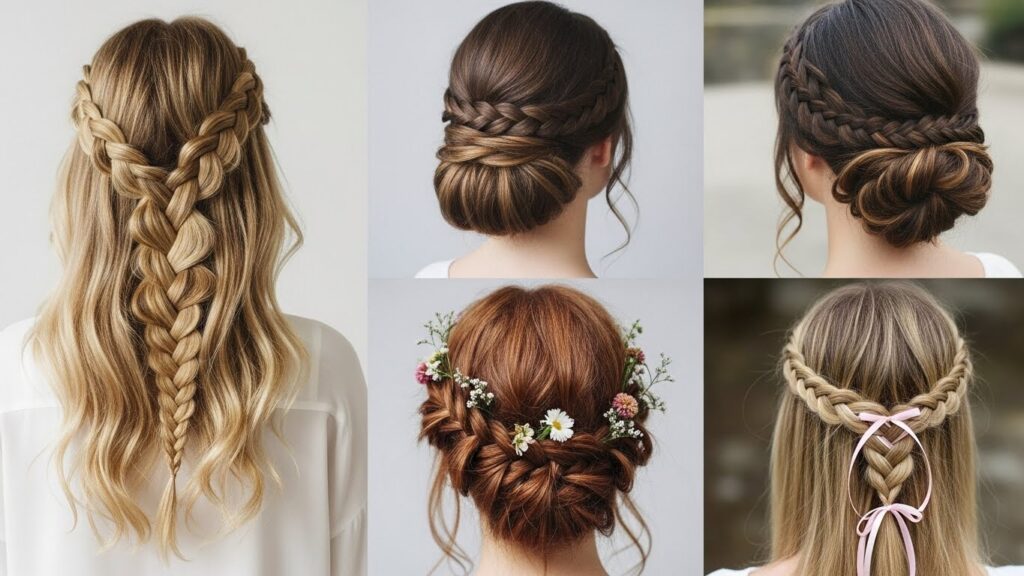
Creative Variations to Try Once You’ve Mastered It
The classic ladder braid is just the beginning. Once you’re comfortable, explore these stunning variations:
The Double Ladder Braid: Create two parallel ladder braids on either side of a center part, then join them at the back for a symmetrical, crown-like effect.
Ladder Braid into an Updo: Use a ladder braid as a dazzling headband, then twist the remaining hair into a low bun or chignon at the nape of your neck. Secure the tail end of the braid into the updo.
Boho Ladder Braid: For a softer look, braid loosely and leave a few face-framing pieces out. After finishing, gently pull apart the rungs to make them wider and more ethereal.
Accessorized Ladder Braid: Weave a delicate ribbon, a string of pearls, or a chain hair accessory through the rungs of the ladder for a formal or festival look.
Why the Ladder Braid is Worth the Practice
In a world of quick ponytails and simple twists, the ladder braid stands out as a testament to skill and creativity. It’s more than a hairstyle; it’s a conversation starter and a confidence booster. The process of learning it teaches you about hair tension, sectioning, and pattern creation—skills that translate to countless other styles.
Don’t be discouraged if your first attempt isn’t perfect. Even seasoned hairstylists had to start somewhere. The beauty of this braid lies in its structured yet forgiving nature. Each “rung” is a chance to reset and continue. So grab your tools, be patient with yourself, and enjoy the journey of creating something truly eye-catching with your own two hands.
Now that you have the knowledge, it’s time to practice. Tag us in your ladder braid creations—we can’t wait to see the stunning styles you weave!