The Awkward Stage, Solved: 41 Hairstyles for Growing Out a Pixie Cut Without Losing Your Mind
Growing out a pixie cut is a test of patience disguised as a haircut. The first few weeks feel easy — your pixie is still a pixie, just a little longer. Then comes the in-between: the sides stick out, the back flips up, the fringe falls into your eyes, and every mirror seems to whisper that you should just cut it all off again. This is the awkward stage, and every woman who has grown out a pixie knows it by name. The good news is that it is a stage, not a sentence — and with the right styles, trims and tricks, it can look intentional instead of accidental.
This guide gives you 41 hairstyles for growing out a pixie cut, arranged along the journey itself: fresh pixie reshapes for the early months, clever camouflage for the awkward middle, accessory saves for the days nothing cooperates, and the bob and lob styles waiting at the finish line. Eight guides first explain the timeline month by month, the trim schedule that keeps the shape, the products that genuinely help, and the mistakes that make a grow-out look messy. Whether you are two months in or ten, there is a style here for the exact length you have today.
The Grow-Out Timeline: What to Expect Month by Month
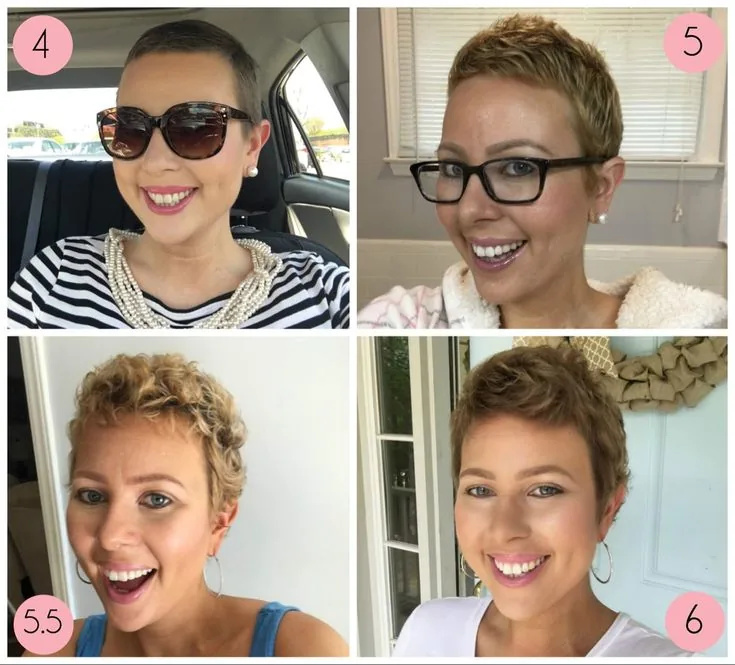
Hair grows about half an inch a month, so the pixie grow-out is a slow reveal — and knowing the map makes the trip far less frustrating. Months 1–2: the pixie simply gets longer and softer, and a reshaping trim keeps it looking like a style, not an accident. Months 3–4: the top starts to flop, the sides puff out, and the fringe needs sweeping aside — this is where headbands, clips and texture products earn their keep. Months 5–6: the back starts to flip and the shape goes shaggy; a bixie or shaggy bob cut turns the mess into a look. Months 7–9: the hair starts to sit at chin length in places, and the first low ponytail appears. Months 10–12: you are in bob territory, and the finish line is a proper bob or lob.
The timeline is not a deadline, and your hair type changes everything. Straight hair shows every awkward angle sooner, while wavy and curly hair hides the uneven stages much better — curls disguise a multitude of sins. Fine hair grows out looking flatter, so texture and layers matter more; thick hair grows out looking bigger, so thinning and shaping matter more. Quick verdict: mark your calendar in three-month blocks rather than counting days, and judge the grow-out by the style you are wearing now, not by the length you do not have yet.
How Long It Really Takes — and How to Make It Feel Faster
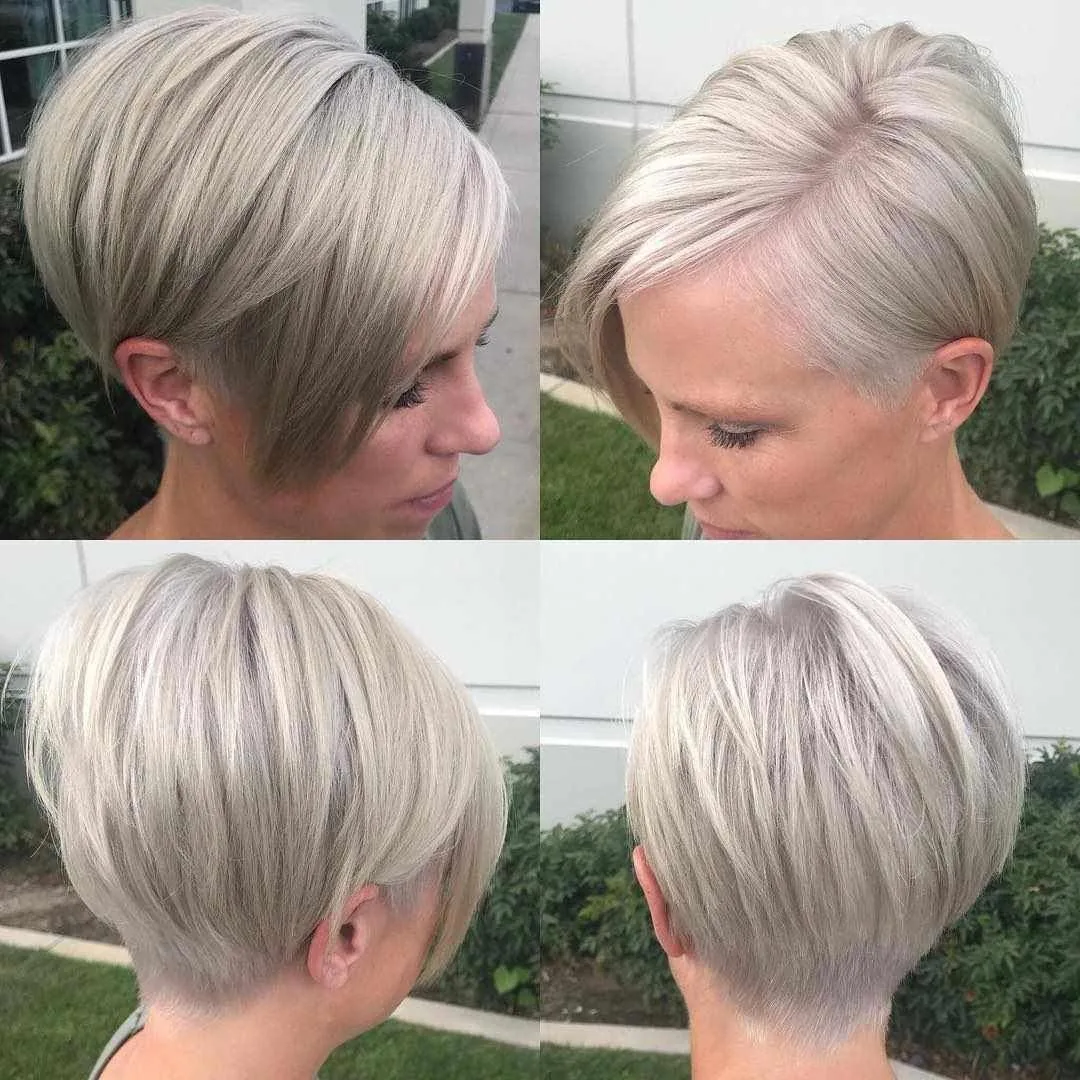
The honest answer: a pixie cut takes roughly 12 to 18 months to reach a chin-length bob, and 18 to 24 months to reach a shoulder-length lob, because hair grows about six inches a year. That sounds like forever on day one, which is why so many grow-outs end at month four with a frustrated re-cut. But the number is less scary when you break it down — most of the awkwardness lives in months three to seven, and after that the hair starts working with you instead of against you.
You cannot make hair grow dramatically faster — no supplement, oil or shampoo overrides genetics — but you can make the journey feel shorter and look better. Regular shaping trims stop the grow-out looking neglected, which is the real reason people give up. Protective, low-manipulation styling reduces breakage, so more of what grows actually stays. And changing the style every few weeks — a new part, a new accessory, a new texture — resets your eyes, so the same length feels new. Pros and cons: the slow pace is frustrating, but it is also forgiving — a bad week of styling grows out in a fortnight. Common mistake: measuring your hair every week. Measure monthly, at most.
The Trim Schedule That Keeps a Grow-Out Looking Intentional
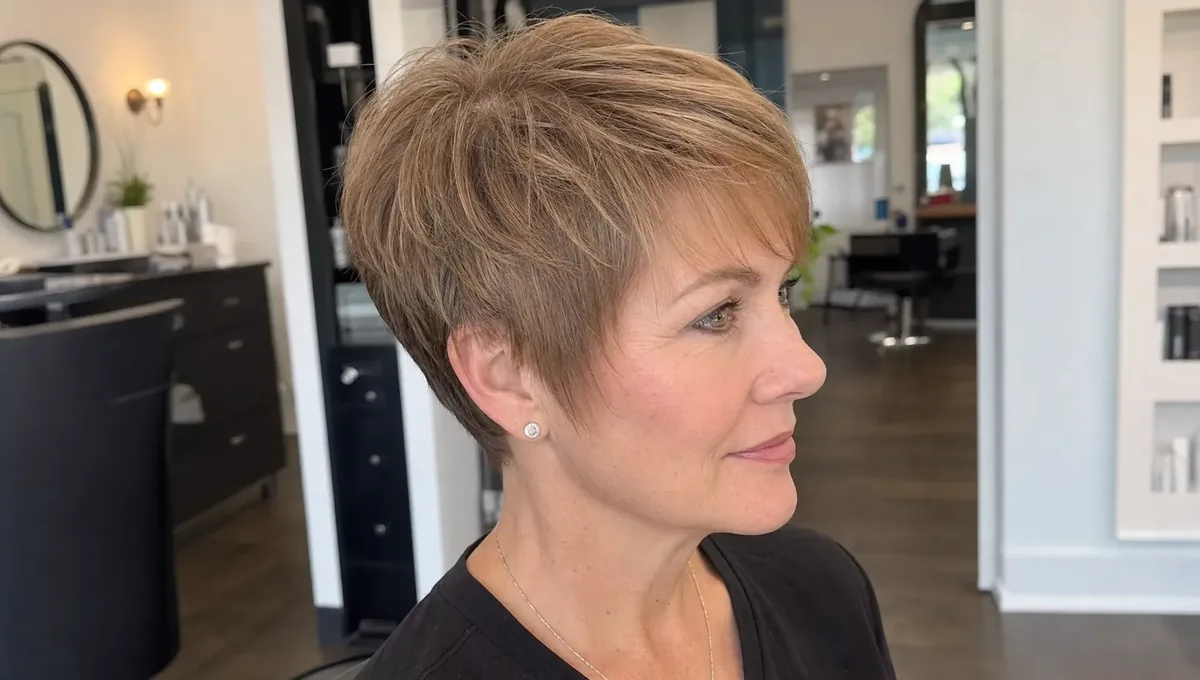
The single biggest myth about growing out a pixie is that you must stop cutting your hair. The truth is the opposite: small, strategic trims are what keep a grow-out looking like a haircut instead of a mistake. The rule is simple — trim the back and sides to keep the shape, and let the top grow. Every 6 to 8 weeks, ask your stylist to clean up the nape and the area around the ears while leaving the top and fringe alone. That one habit carries you through the worst months.
What to ask your stylist: say you are growing out a pixie and want to keep the silhouette neat while the top gains length — a good stylist will shape the back into a soft taper and blend the sides instead of cutting the length you are trying to keep. Bring a photo of the bob or lob you are aiming for, so the trims steer toward it. Cost and time: a shaping trim is usually cheaper and quicker than a full cut, and it stretches the time between appointments. Who should avoid trims: nobody, but skip the stylist who insists on cutting the top to match the sides — that resets the clock. Quick verdict: trim the shape, grow the length.
Products That Actually Help Hair Grow (and the Ones That Don’t)
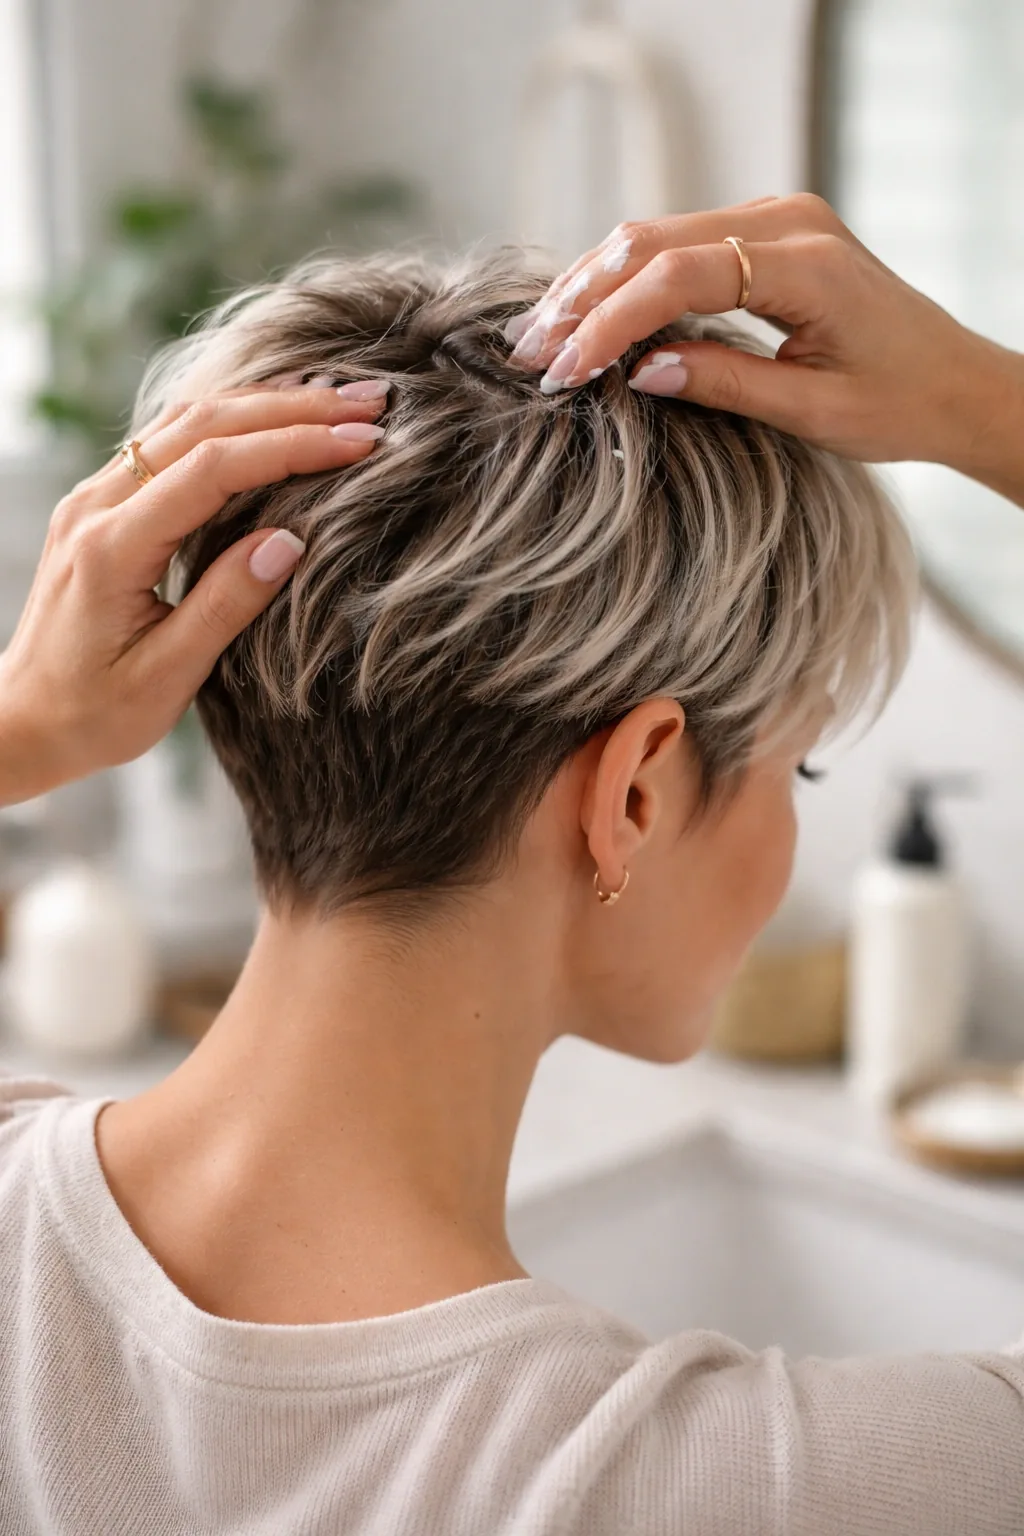
The hair-growth aisle is full of promises, so here is the honest split. What genuinely helps: a healthy scalp, because hair grows from the follicle — a gentle shampoo, regular washing, and not overloading the scalp with heavy product. A light leave-in conditioner or hair oil on the ends prevents breakage, which is the real enemy: hair that breaks at the ends never looks longer. Protein treatments, used sparingly, strengthen fragile grow-out hair. What does not help: miracle growth shampoos, most supplements (unless you are actually deficient), and anything promising inches in weeks.
Best for: anyone whose grow-out keeps breaking before it reaches bob length. How to style it: during the awkward stage, a texture spray, a sea-salt spray or a light pomade is worth more than any growth serum — they give short, in-between hair grip, shape and hold, which is the actual daily problem. Maintenance: keep heat styling gentle while the hair is short, because short hair shows heat damage fast and there is not much length to hide it in. Common mistake: piling on heavy oils and butters to ‘feed’ the hair — they weigh short hair flat and make the awkward stage look greasy, not glossy. Quick verdict: protect the ends, feed the scalp, and style with texture, not miracles.
Tools and Accessories That Save the Awkward Stage
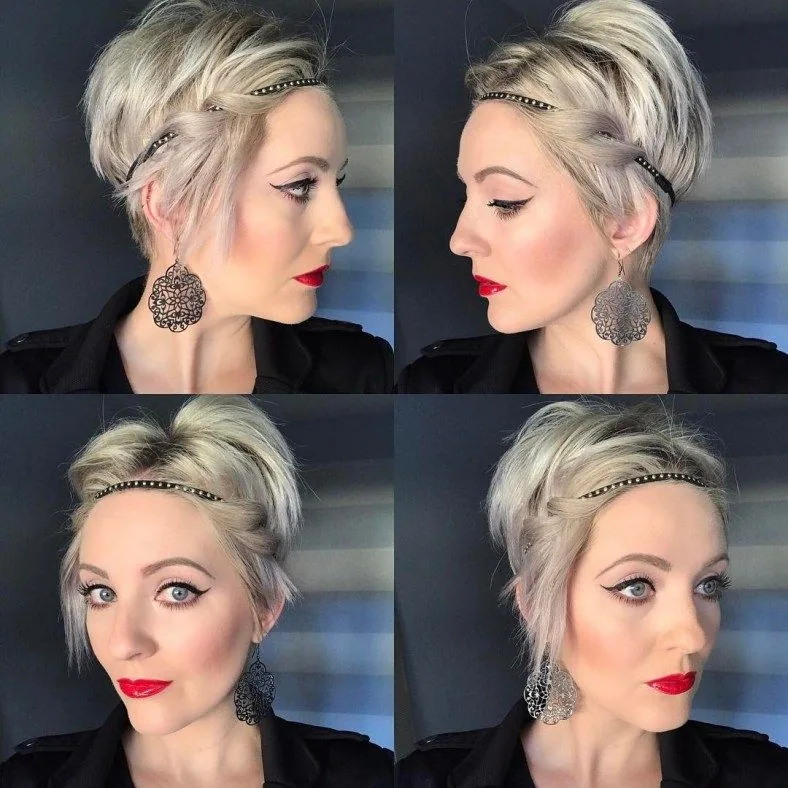
When the length will not cooperate, accessories do the work. A good grow-out kit is small and cheap: a few bobby pins that match your hair colour, two or three claw clips, a wide headband and a thin one, a silk scarf, and a handful of small elastics. With those six things you can pin back the fringe, clip up the sides, hide the flippy back, and turn a bad hair day into a style in two minutes. No accessory in the kit costs much, and together they are the difference between giving up and carrying on.
Best for: months three to seven, when the length is too long to ignore and too short to tie up. How to style it: keep the accessories visible and deliberate — a tortoiseshell claw clip or a silk headband looks like a choice, while a single random bobby pin looks like a rescue mission. Pros and cons: accessories are instant, cheap and commitment-free, but they only work if they are in your bag, not in a drawer at home. Maintenance: none, though silk scarves and fabric headbands need an occasional wash. Quick verdict: buy the kit before you need it, and keep a clip and two pins in every bag you own.
How to Hide the Awkward Stage: Camouflage Tricks That Work
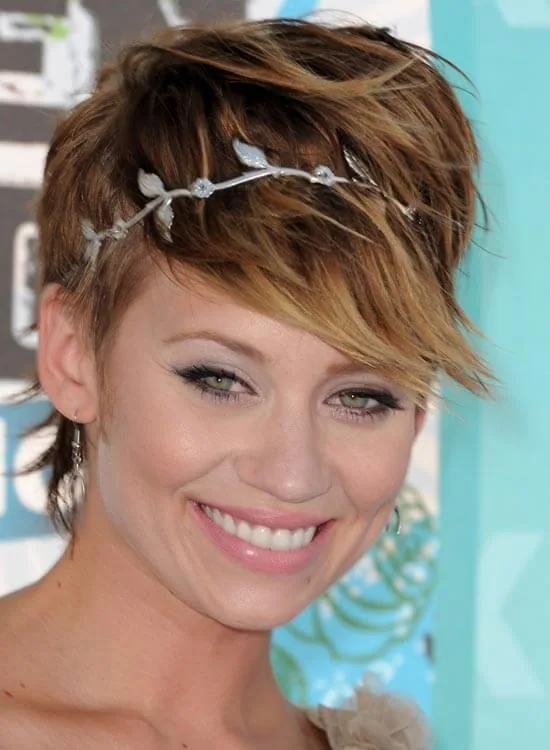
The awkward stage is really just a visibility problem: the parts of the hair that look wrong are the parts you can see. So hide them. The back flips up? A low scarf or a tucked-under finish hides it. The sides puff out? A deep side part and a tuck behind the ear flatten them. The fringe falls in your eyes? Sweep it to one side and pin it, or twist it back. The whole shape looks shaggy? Texture product and a little messiness on purpose make shaggy look like a style, not a failure.
The trick is to pick one problem and solve it, not to fight the whole head at once. Best for: work days, photos, and any day you catch yourself in a mirror and sigh. How to style it: stand in front of a mirror, find the one thing that bothers you most, and fix only that — a pin, a part change, a headband — then walk away. Pros and cons: camouflage is fast and free, but it is a daily habit, not a one-time fix. Common mistake: over-styling the awkward stage with heat and product until the hair looks stiff — a little mess reads as intentional, a lot of product reads as a struggle. Quick verdict: hide one thing, not everything.
Growing Out a Pixie With Every Hair Type: Straight, Wavy, Curly and Coily
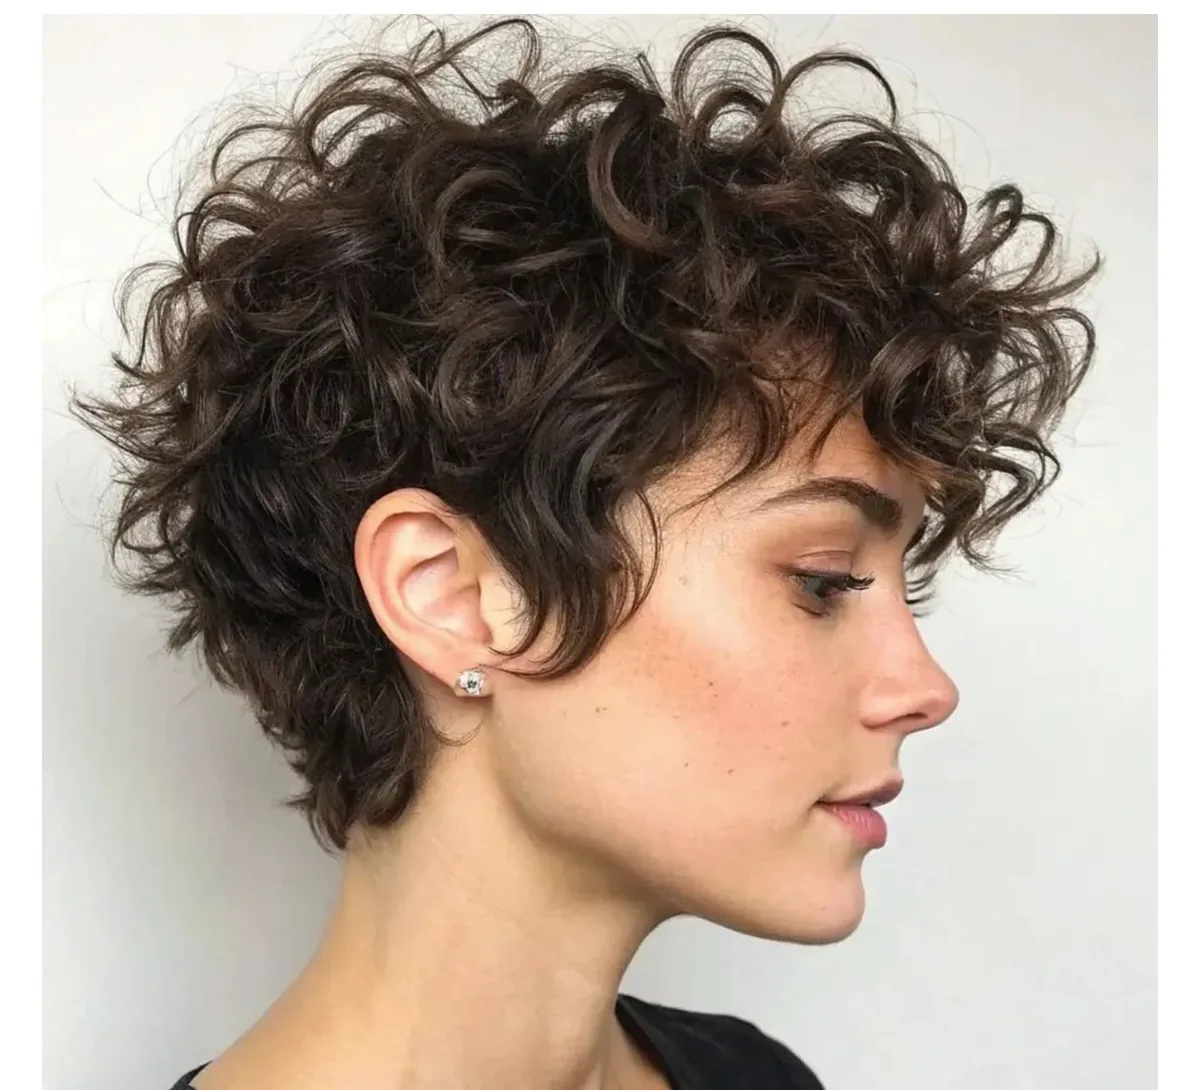
Hair type decides how the grow-out behaves, so the strategy changes with it. Straight hair shows every uneven length, which means more frequent shaping trims and more reliance on parts, pins and accessories — but it also slicks back beautifully and reaches ponytail length fastest. Wavy hair is the easiest grow-out: the wave hides unevenness, texture spray enhances it, and the shaggy stages look like a deliberate shag cut. Curly hair hides the awkward stage better than any other type — curls disguise length differences — but it needs moisture and a curly-cut approach, with layers shaped to the curl pattern, not against it.
Coily hair grows out with the most shrinkage, so length appears slowly even when growth is healthy — stretching, twist-outs and protective styles make the progress visible. What to ask your stylist: ask for a cut that works with your texture at every stage, not a cut that fights it into straightness. Maintenance: curly and coily grow-outs need more moisture and less heat; straight grow-outs need more texture product and more frequent trims. Who should avoid it: nobody — every hair type can grow out a pixie, but the plan must match the texture. Quick verdict: work with the texture you have, and the awkward stage shrinks by half.
Mistakes That Make a Grow-Out Look Messy — and How to Fix Them
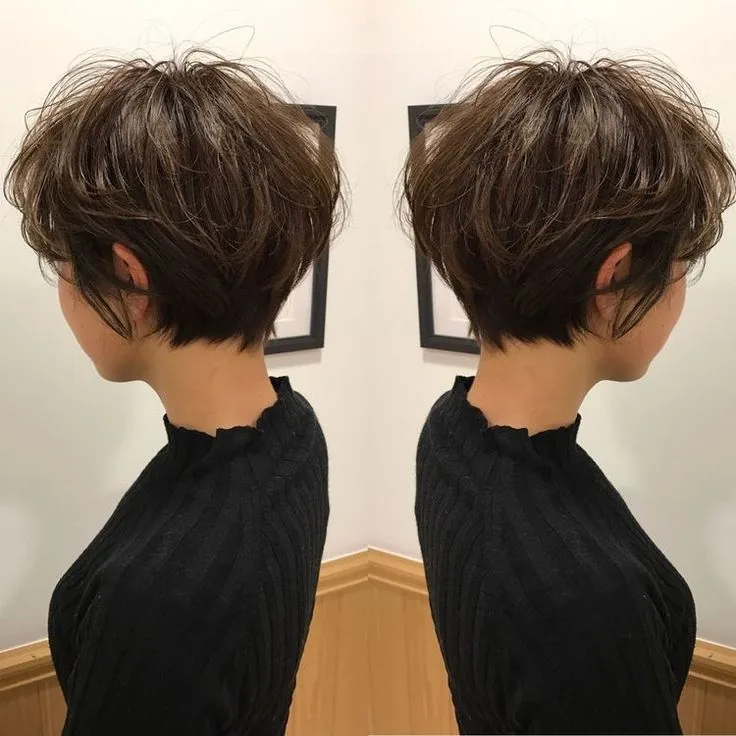
Most grow-outs do not fail because the hair is wrong — they fail because of three fixable mistakes. First, no trims at all: the back grows into a mullet shape and the whole head looks neglected, when one shaping trim would have fixed it. Second, fighting the hair’s natural direction: flat-ironing a wave flat every day, or forcing a side part on hair that wants to fall forward, creates a daily battle you will lose. Third, the wrong products: heavy creams and oils flatten short hair, while too much hairspray makes it stiff and helmet-like.
Other easy fixes: if the back flips up, tuck it under with a round brush or a scarf rather than ironing it flat every morning — heat on the same short section daily causes breakage. If the fringe is in your eyes, pin it or sweep it rather than cutting it yourself; a home fringe trim during a grow-out is how most people end up back at the salon for a re-cut. Pros and cons: every one of these mistakes is free to fix, and fixing one usually fixes the look. Common mistake: comparing your month-four hair to someone else’s month-twelve hair on social media. Quick verdict: trim the shape, follow the hair’s direction, keep products light — and the grow-out looks intentional.
1. The Textured Pixie Refresh
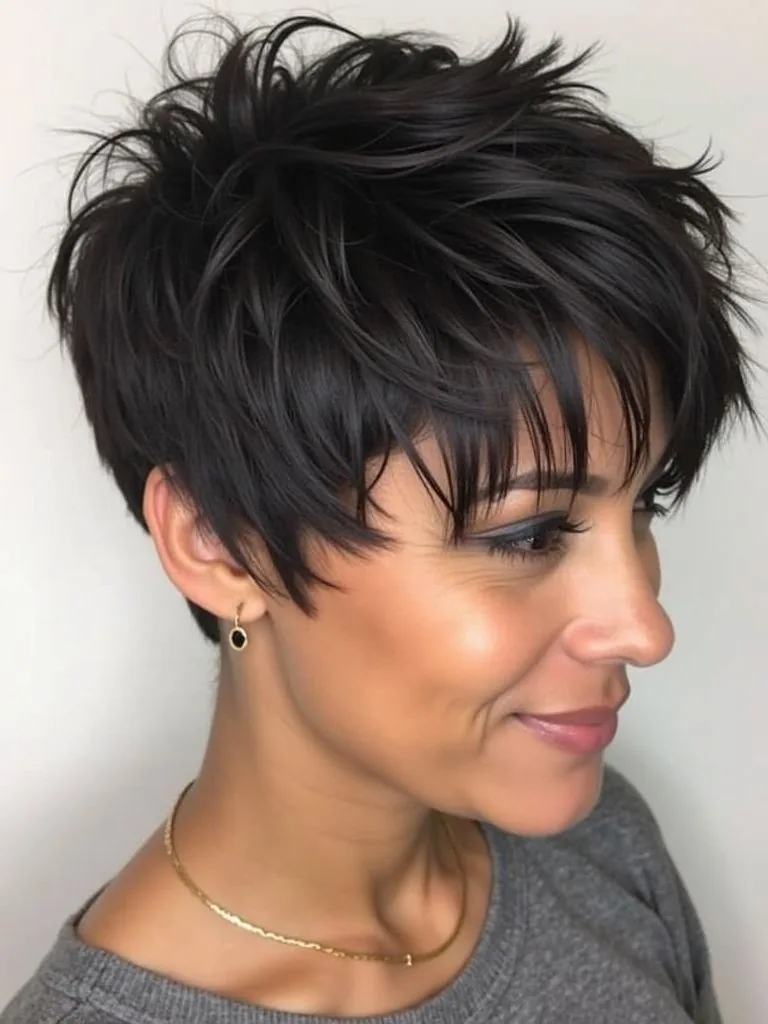
Before the grow-out really starts, give your pixie one last great cut — a textured refresh. Ask your stylist to add choppy layers and point-cut the ends, which breaks up the blunt outline and gives the hair movement. That texture is the secret weapon of the early grow-out: as the hair lengthens, the layers keep it from sitting like a helmet, and the choppy ends make each new inch look deliberate. A textured pixie is also the easiest version to style, because the layers do half the work.
Best for: the first two months of the grow-out, when the hair is still short enough to be a pixie. How to style it: work a pea-sized amount of matte pomade or texture paste through the layers with your fingers, and push the front pieces in different directions for a piecey finish. Maintenance: a refresh trim every 6 weeks keeps the texture crisp while the length builds. Common mistake: keeping the pixie blunt and one-length while it grows — blunt ends show every new inch as a shelf. Quick verdict: start the grow-out with texture, and the first months look like a style, not a waiting room.
2. The Side-Swept Pixie
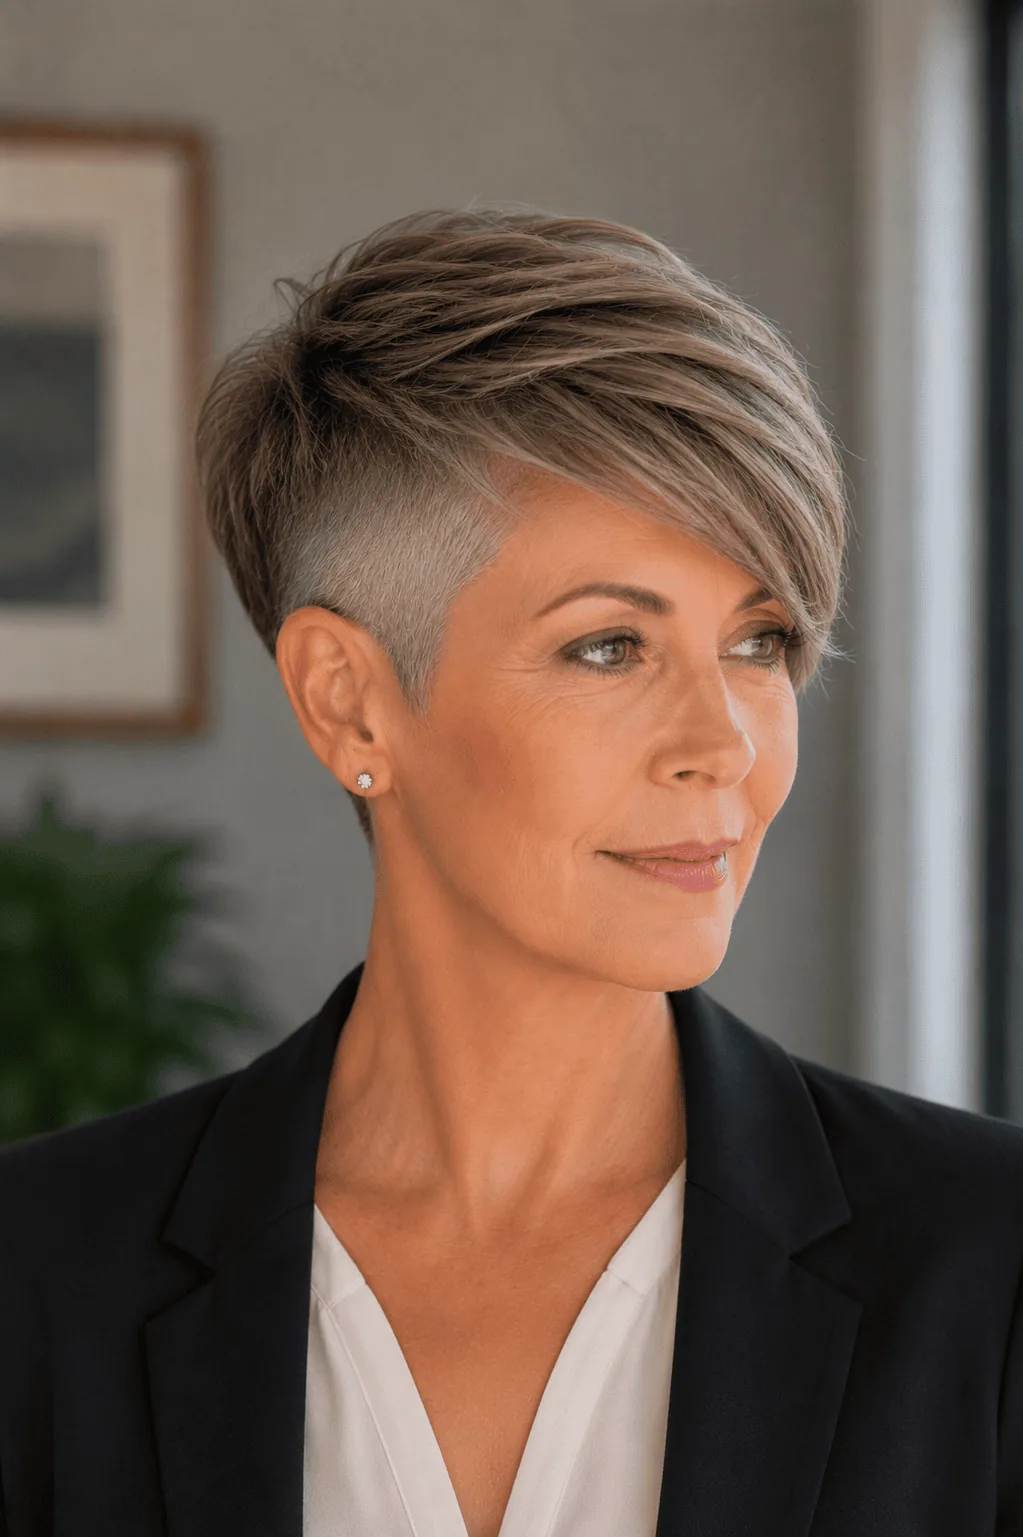
When the fringe starts to reach your eyebrows, sweep it to the side and you have a whole new haircut without cutting anything. The side-swept pixie takes the growing fringe and turns it into the feature: a deep part, the long front swept across the forehead, and the shorter side tucked neatly behind the ear. It reads as a deliberate, elegant style — the kind of look that belongs in a meeting or at dinner — and it hides the fact that the fringe is in that in-between place where it is too long for a pixie and too short for bangs.
Best for: months two to five, and anyone whose fringe grows faster than the rest. How to style it: blow-dry the fringe across the forehead with a small round brush, then set it with a light-hold spray; a bobby pin hidden behind the ear keeps it from falling forward. Pros and cons: it is instant, polished and free, but it needs a little product to stop the sweep collapsing by lunchtime. Who should avoid it: nobody — if your fringe is long enough to reach your eyebrow, it is long enough to sweep. Quick verdict: the easiest grow-out style there is, and the one you will use most.
3. The Micro Bob Milestone
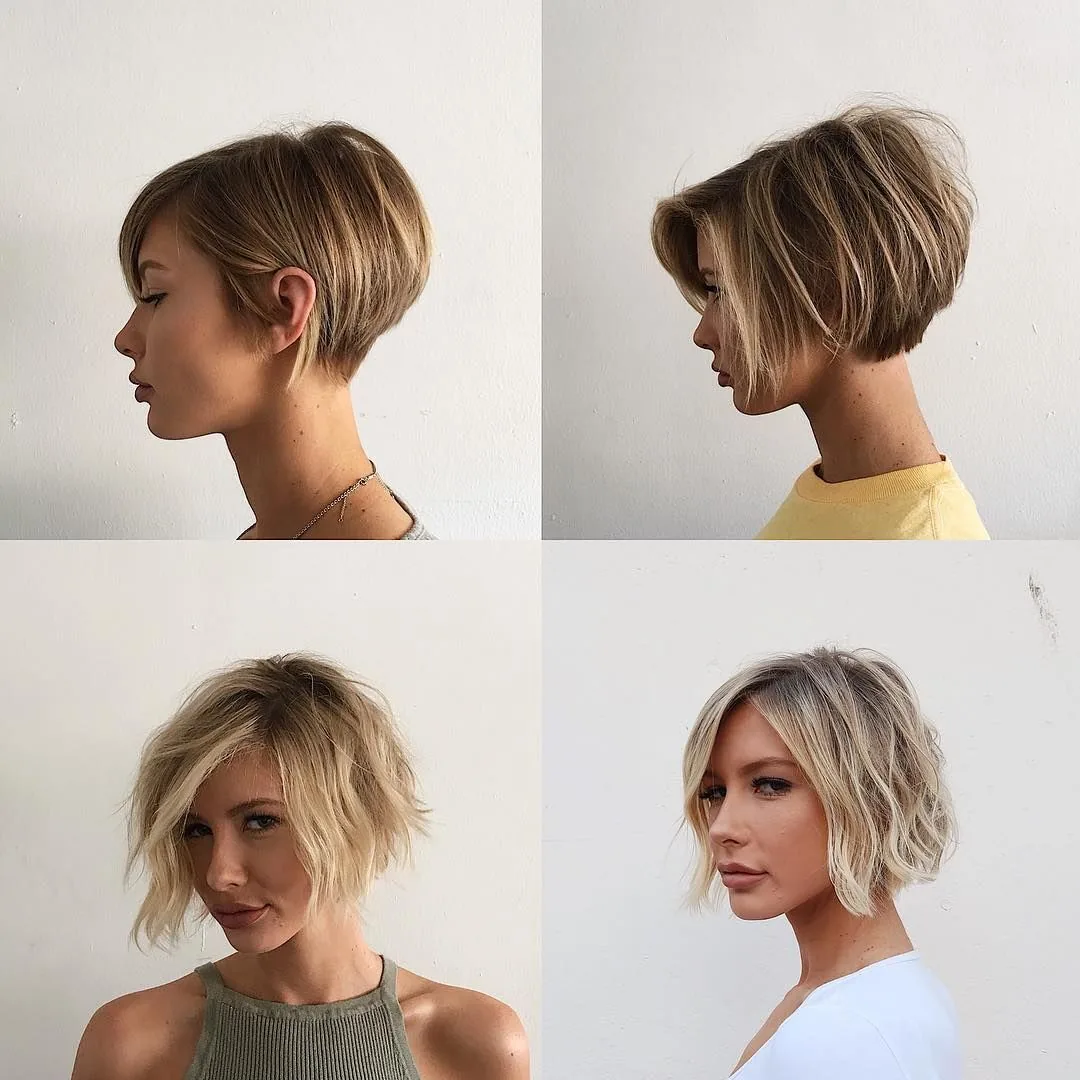
The micro bob is the first real milestone of the grow-out — the day the hair reaches the jawline and stops being a pixie at all. It is short, sharp and chin-grazing, with the ends sitting just at the jaw, and it feels like a reward after months of awkward length. The micro bob suits almost everyone because the jaw-length cut frames the face and shows off the cheekbones, and it is the first length where the hair starts to move when you turn your head.
Best for: months six to nine, when the top and sides finally meet at jaw length. How to style it: a little texture spray at the roots and a tuck behind one ear gives it a modern, undone finish; a sleek blow-dry makes it sharp and Parisian. What to ask your stylist: ask for the ends to be cut blunt for a strong line, or softly layered if your hair is thick and needs the weight taken out. Cost and time: one salon visit to shape it, then five minutes a day. Quick verdict: the milestone that makes the whole grow-out feel worth it.
4. The Baby Bob
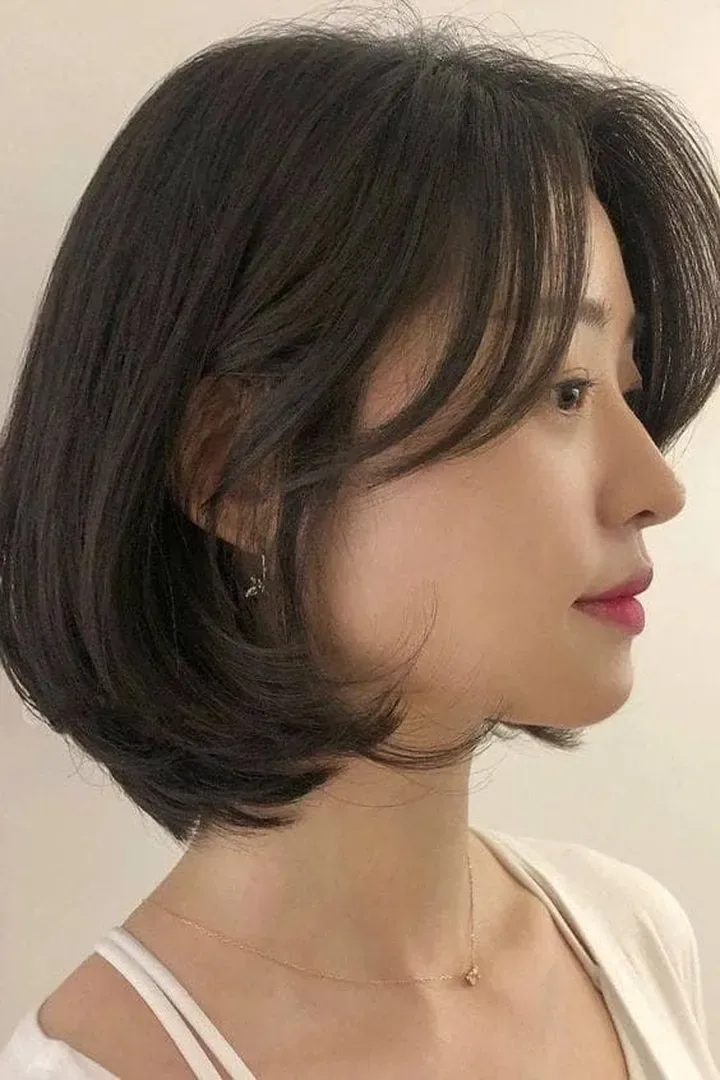
The baby bob is the micro bob’s softer little sister — a chin-length cut with soft, rounded ends and gentle layers that make the grow-out look gentle rather than graphic. Where the micro bob is sharp, the baby bob is sweet: the ends curve under slightly, the layers are light, and the whole shape sits close to the head in a way that flatters the face. It is the perfect grow-out style for anyone who wants the milestone without the severity.
Best for: fine to medium hair, and the first bob after a pixie. How to style it: blow-dry with a round brush, turning the ends under, and finish with a shine spray for a soft, healthy look. Pros and cons: it is flattering, low-maintenance and very forgiving of uneven growth, but it needs a trim every six weeks or the soft ends start to look straggly. Maintenance: a pea of smoothing cream keeps the layers from frizzing out. Quick verdict: the gentle way to arrive at bob length.
5. The French Bob at Grow-Out Length
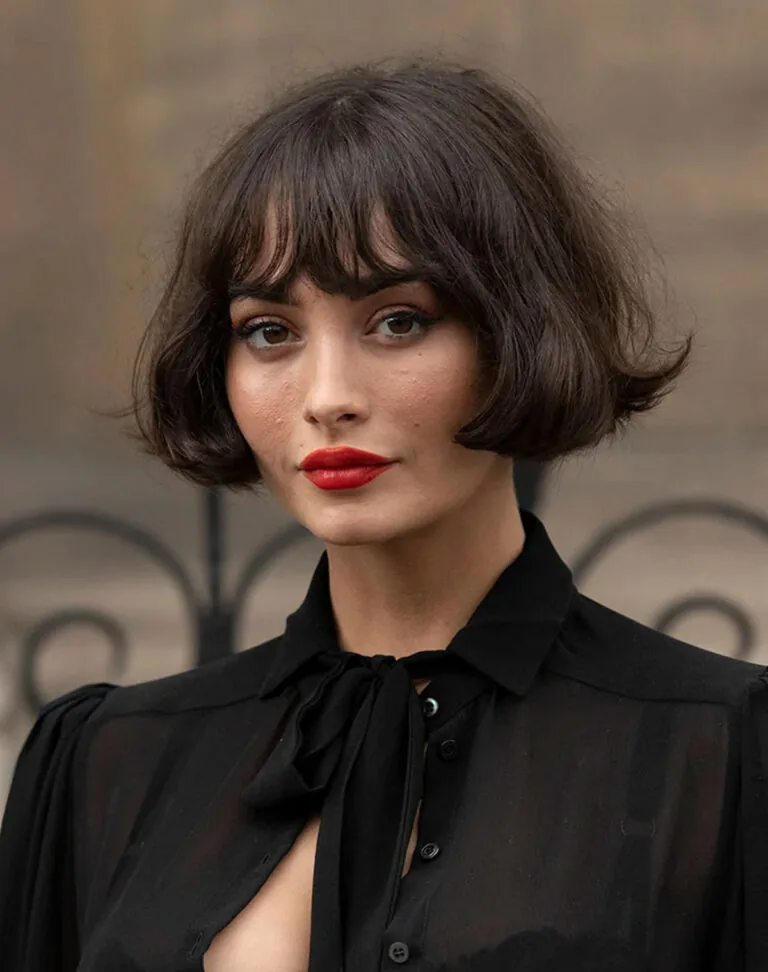
The French bob is the chicest reward in the grow-out: a jaw-length cut with a blunt line, a little volume at the crown, and — if you dare — a short fringe. It is the style that makes people say your hair looks amazing, not that it is growing out. The French bob works so well at grow-out length because it embraces the shortness instead of apologising for it — the length you have is exactly the length the cut wants.
Best for: straight to wavy hair, and anyone who loves a strong, graphic shape. How to style it: keep it simple — a rough blow-dry, a little texture at the roots, and let the ends do what they want. A centre part makes it very Parisian; a side part makes it softer. Common mistake: over-styling it with a flat iron until it looks stiff — the French bob is supposed to look a little undone. What to ask your stylist: ask for the blunt line and the volume at the crown, and skip the fringe unless you are sure. Quick verdict: the grow-out’s first truly fashionable moment.
6. The Shaggy Pixie-Bob
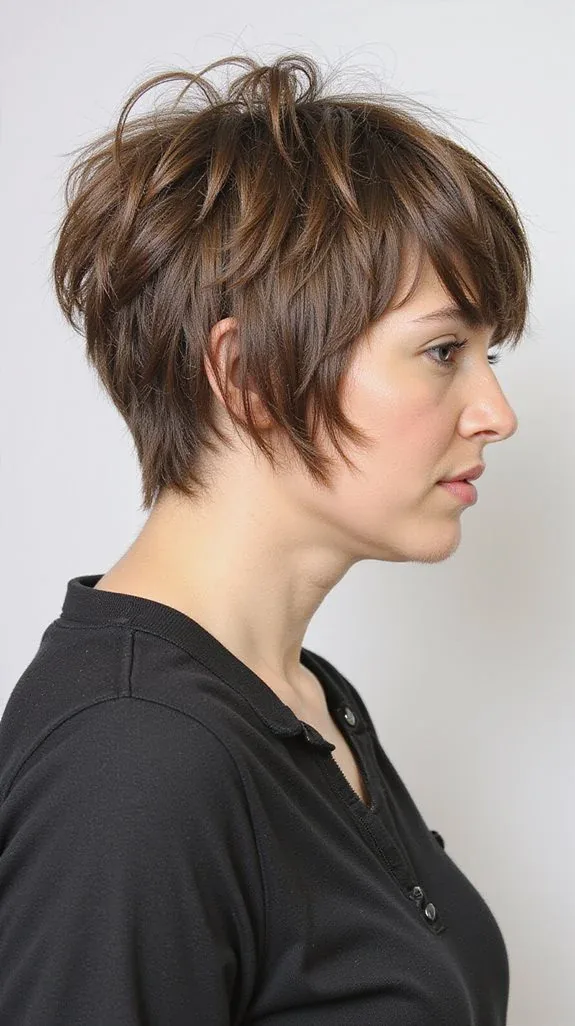
When the pixie has grown enough to be shaggy but not enough to be a bob, stop fighting it and call it a shaggy pixie-bob. This is the grow-out’s most forgiving style: choppy layers, a little mess on purpose, texture everywhere, and a shape that looks like a deliberate shag cut rather than a pixie that got away from you. The shaggy pixie-bob is the style that turns the worst months of the grow-out into the coolest ones.
Best for: months four to seven, wavy hair especially, and anyone who likes a rock-and-roll edge. How to style it: scrunch in sea-salt spray or texture spray, let it air-dry, and shake it out — the messier the better. Pros and cons: it hides uneven growth brilliantly and needs almost no effort, but it can look untidy in very formal settings, so keep a headband handy for those days. Maintenance: a shaping trim every 8 weeks keeps the layers from turning into a mullet. Quick verdict: if the grow-out is going to be shaggy anyway, make it a shag.
7. The Wolf Cut Transition
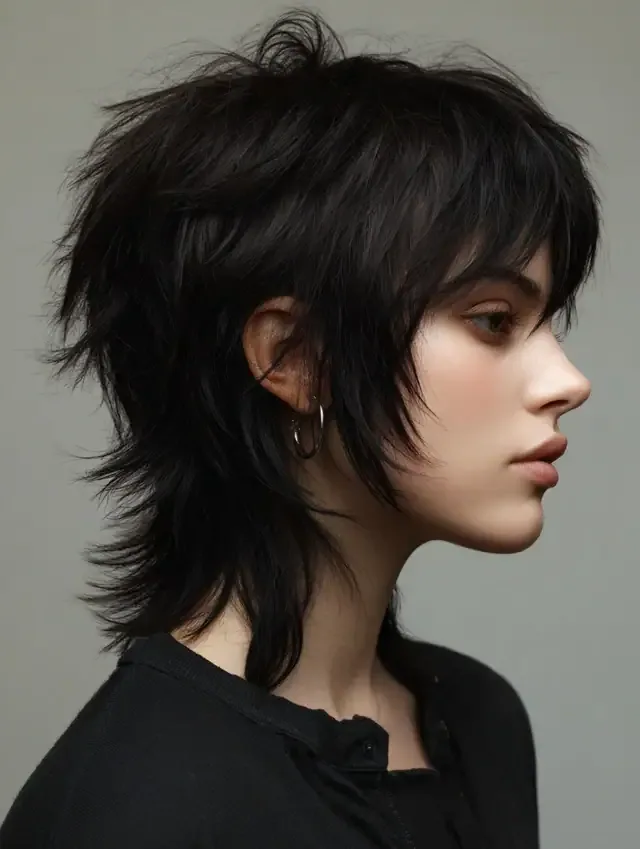
The wolf cut is the shaggy pixie-bob’s wilder cousin, and it is the perfect disguise for a pixie grow-out. Short, choppy layers on top, longer pieces at the back, lots of texture, and a shape that is supposed to look a little wild — the wolf cut takes the uneven lengths of a grow-out and makes them the whole point. It is edgy, modern, and very forgiving, which is exactly what months four to eight need.
Best for: thick or wavy hair, and anyone who wants the grow-out to look intentional and cool. How to style it: texture spray, a rough blow-dry with your fingers, and let the layers fall where they want. Who should avoid it: anyone who needs a very polished look for work every day — the wolf cut is deliberately messy. Cost and time: one salon cut to set the shape, then two minutes of styling a day. Common mistake: trying to make it neat — the wolf cut’s charm is its chaos. Quick verdict: the grow-out disguise that looks like a fashion choice.
8. The Layered Bixie
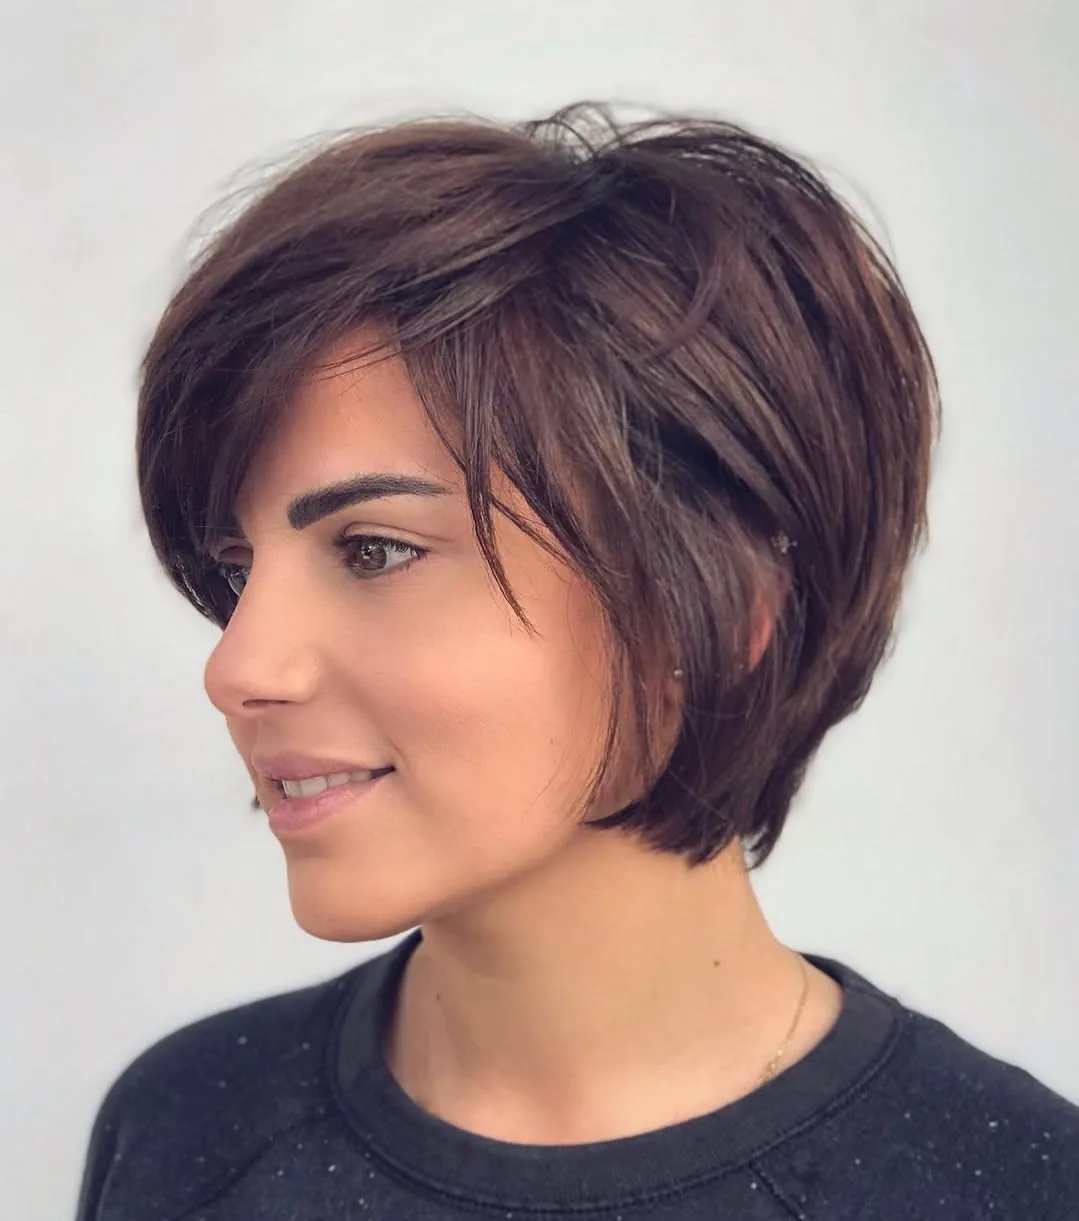
The bixie — half pixie, half bob — is the grow-out’s signature cut, and it exists precisely because so many women grow out pixies. It is longer than a pixie and shorter than a bob, with layers that give it movement and a shape that sits beautifully at the in-between length. The layered bixie is the cut your stylist reaches for when you say ‘I am growing it out but I need it to look like something’ — and it does, it looks like a bixie.
Best for: months five to nine, and every hair type. How to style it: a little pomade on the ends defines the layers, and a side part gives it shape; air-drying works fine for wavy hair. What to ask your stylist: ask for layers that blend the short back into the longer top, so the grow-out looks connected rather than two different haircuts. Pros and cons: it is the most flattering in-between cut there is, but it needs a trim every 6 to 8 weeks to keep its shape. Quick verdict: the bixie is not a compromise — it is the destination for this stage.
9. The Curly Pixie Grow-Out
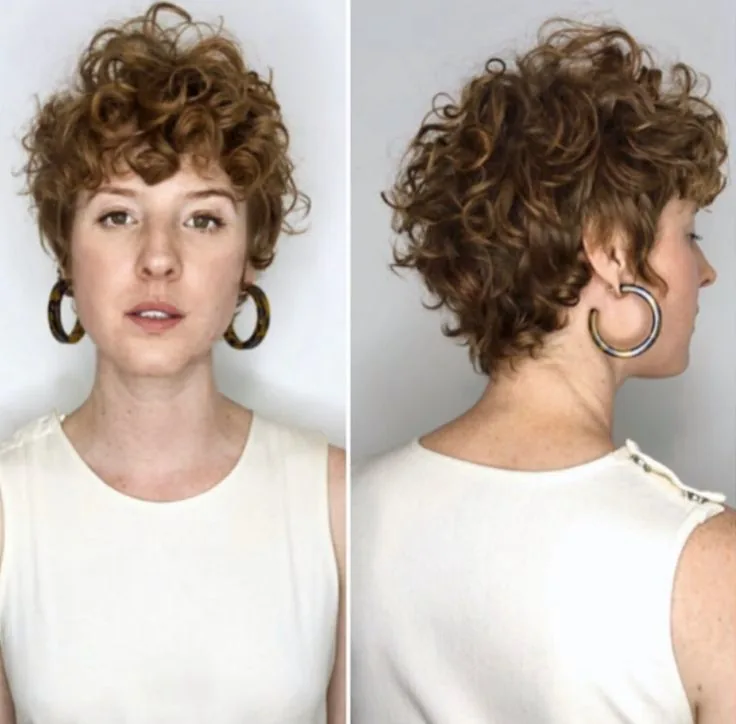
Curly hair has a secret advantage in the grow-out: curls hide uneven length better than any other texture. The curly pixie grow-out is about letting the curls do the work — keep them moisturised, define them with a curl cream, and let the shape grow into a soft, rounded cloud that looks like a style at every length. The awkward stage barely exists for curls, because a curl pattern disguises the in-between lengths that straight hair shows so clearly.
Best for: curly and wavy hair, months three to ten. How to style it: apply curl cream to damp hair, scrunch, and let it air-dry or diffuse on low heat — do not brush it out, or the shape turns to frizz. Maintenance: a curly cut, with layers shaped to the curl pattern, matters more than the trim schedule — find a stylist who cuts curly hair dry. Common mistake: straightening the curls to check the length, which hides the real shape and tempts you to cut. Quick verdict: curls make the grow-out easy — trust them.
10. The Slicked-Back Grow-Out
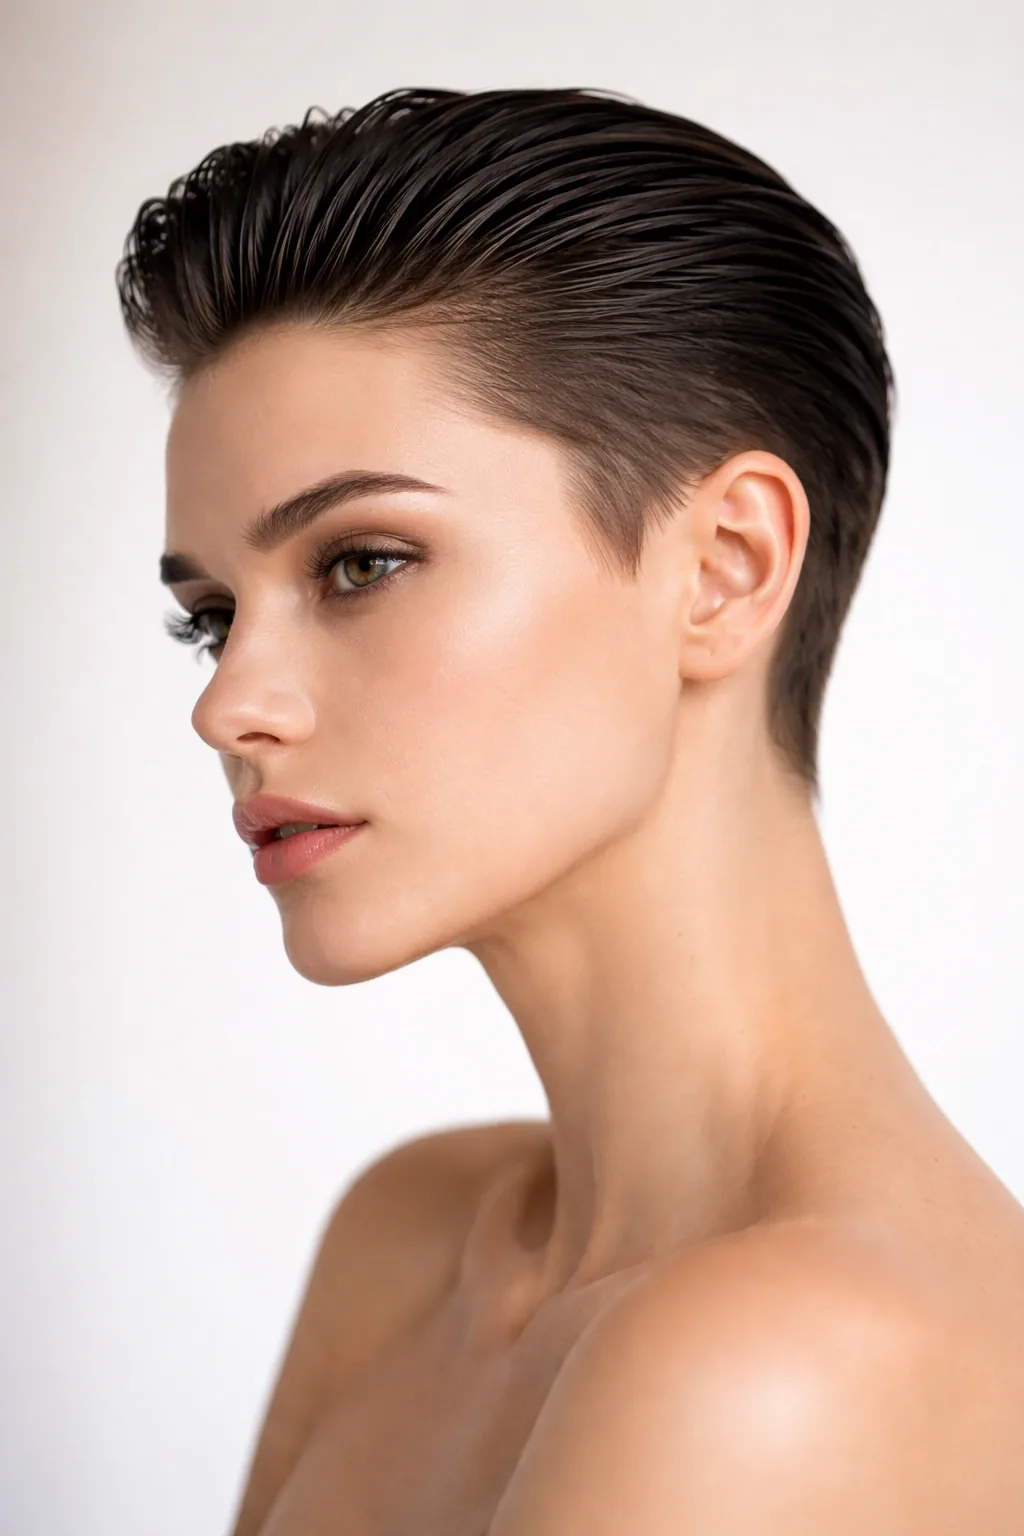
When the top is long enough to sweep back but the sides are still short, the slicked-back grow-out is your most polished option. Comb the hair back from the forehead with a little gel or pomade, smooth the sides down, and you have a sleek, editorial look that hides every awkward angle at once. It is the style for the days when the grow-out feels messy — slick it back, and the mess disappears.
Best for: evenings, work events, and anyone with straight or wavy hair. How to style it: apply gel or pomade to damp hair, comb it straight back, and let it set — a light-hold spray keeps it in place without stiffness. Pros and cons: it is fast, sleek and very flattering, but it shows the face fully, so it suits confident days. Who should avoid it: anyone whose hairline is very high or who dislikes showing the forehead. Maintenance: wash it out at night — sleeping in gel makes short hair greasy. Quick verdict: the slicked-back look turns the awkward stage into a statement.
11. The Deep Side Part
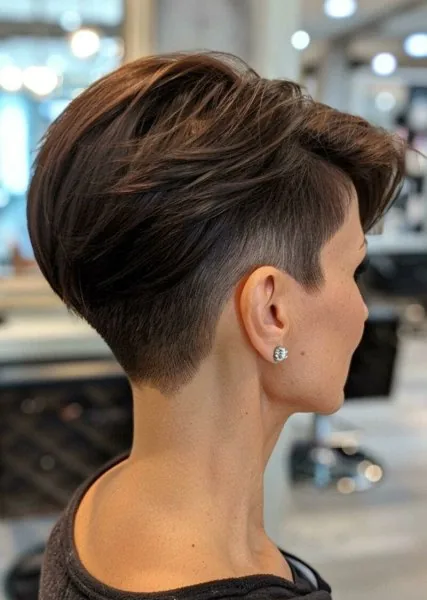
A deep side part is the cheapest haircut you will ever get, because it costs nothing and changes everything. Move the part far to one side, sweep the heavy side across, and suddenly the growing fringe has a direction, the flat side lies neatly, and the whole shape looks styled. The deep side part is the grow-out’s best friend in months two to six, when the length is uneven and the fringe is in your eyes — it gives the hair a plan.
Best for: straight and wavy hair, and any day the grow-out looks shapeless. How to style it: part the hair while it is damp, blow-dry the heavy side across the forehead, and tuck the short side behind the ear. Cost and time: zero, and thirty seconds. Common mistake: parting the hair in the same place every day for months — the hair gets used to it and goes flat, so switch sides now and then. Quick verdict: if you do nothing else today, change your part.
12. The Middle Part Grow-Out
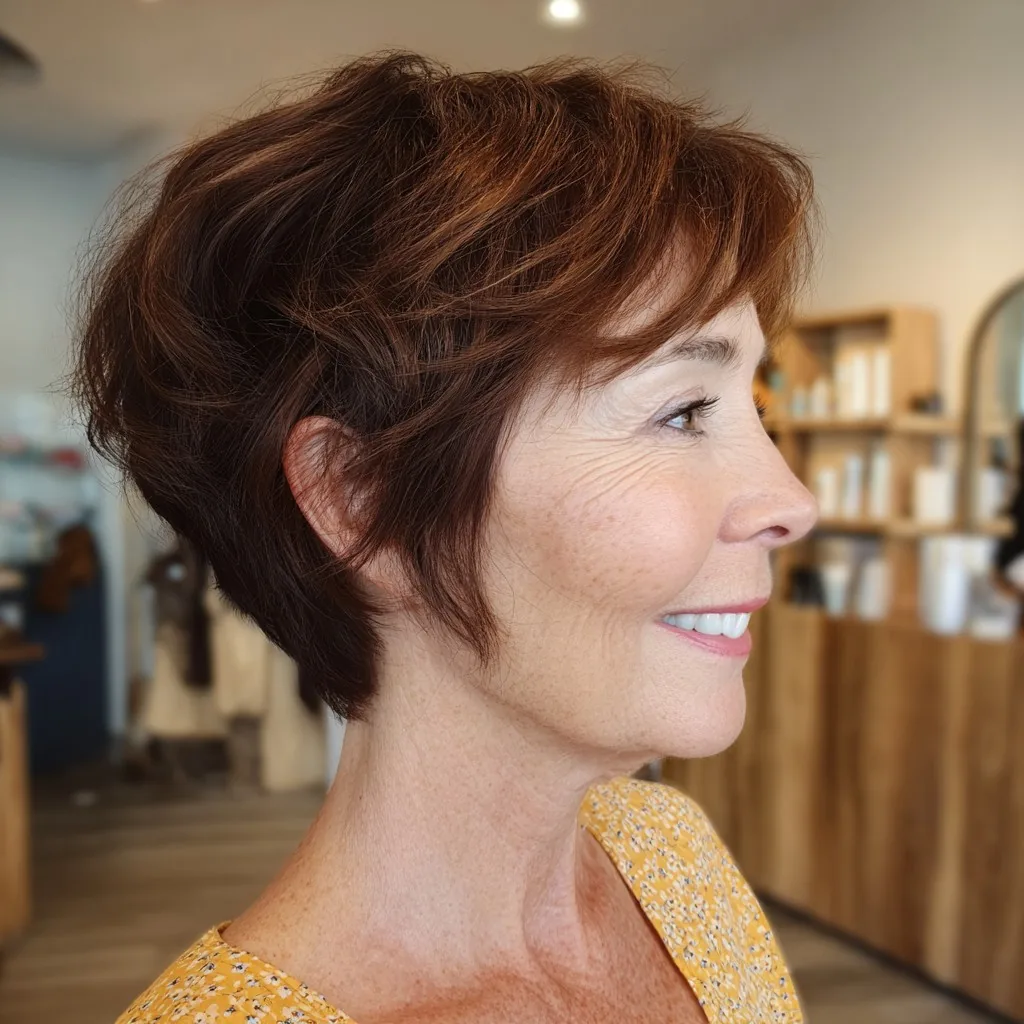
Once the fringe is long enough to split in the middle, the middle part opens up a whole new set of styles. The hair falls evenly on both sides, frames the face symmetrically, and — crucially — the fringe stops falling into your eyes, because it is parted away from the centre. The middle part grow-out looks modern and clean, and it is the part that leads most naturally into curtain bangs and a bob.
Best for: months five to nine, and oval or heart-shaped faces. How to style it: part the damp hair dead centre, let the front pieces fall forward on both sides, and tuck the sides behind the ears for a neat finish. Pros and cons: it is balanced, modern and low-effort, but it shows the face very symmetrically, so it suits faces that are already fairly even. Maintenance: none — the part does the work. Quick verdict: the middle part is the bridge from pixie to bob.
13. The Curtain Bangs Bridge
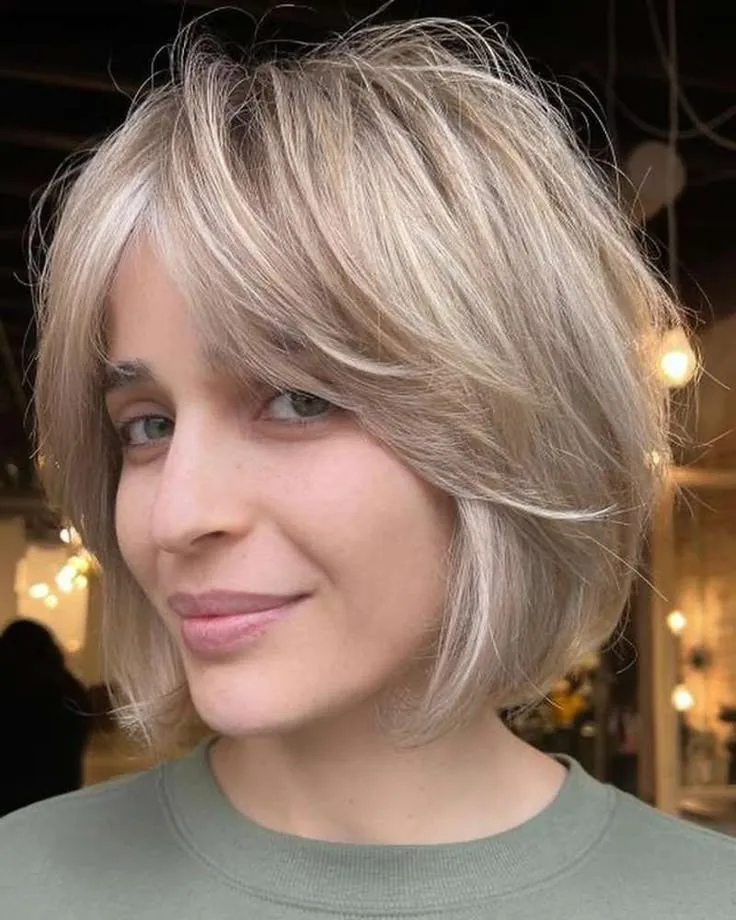
Curtain bangs are the grow-out’s greatest gift, because they are what the fringe becomes when you stop cutting it. Instead of fighting the growing fringe, shape it into two soft, face-framing pieces that part in the middle and curve around the cheeks. Curtain bangs hide the awkward fringe stage completely — the fringe is not too long, it is a curtain bang — and they lead directly into a layered bob.
Best for: months five to ten, and anyone whose fringe keeps falling in their eyes. How to style it: blow-dry the fringe forward with a round brush, then split it in the middle and sweep each side outward; a little texture spray keeps the curve. What to ask your stylist: ask for the fringe to be cut into a soft, curved curtain shape rather than straight across, so it blends into the sides. Common mistake: cutting the fringe short again because it is annoying — the curtain bang is the reward for leaving it alone. Quick verdict: stop cutting the fringe, start calling it curtain bangs.
14. The Micro Fringe Phase
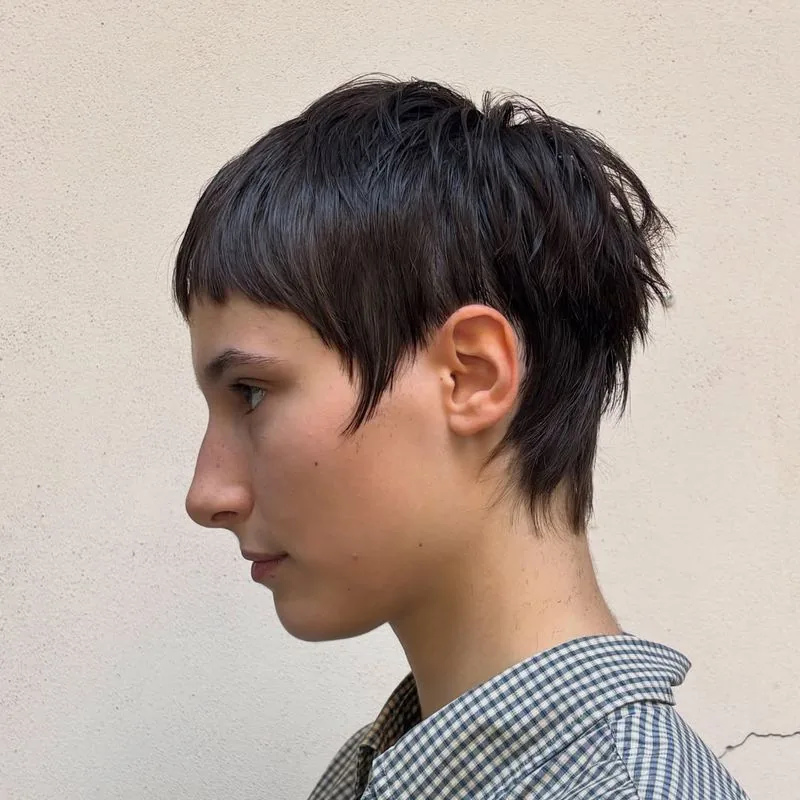
There is a brief, brave window in the grow-out when the fringe is short enough to be a micro fringe — a short, straight fringe that sits high on the forehead and looks deliberately fashion-forward. It is not for everyone, but if you have the face for it, the micro fringe turns the early grow-out into a statement: the fringe is short on purpose, the rest of the hair is growing, and the combination looks like a bold editorial cut rather than a haircut in progress.
Best for: the early months, and confident faces with strong brows. How to style it: keep the fringe straight and neat with a flat iron or a small brush, and let the rest of the hair stay textured. Who should avoid it: anyone who dislikes attention on the forehead, or whose fringe grows very fast — the window closes in weeks. Maintenance: the fringe needs a trim every three weeks to stay micro. Quick verdict: a short, sharp detour that makes the early grow-out look fearless.
15. The Wispy Bangs Phase

Wispy bangs are the gentle version of the fringe grow-out: a light, feathered fringe that softens the forehead and blends into the growing sides. Unlike a blunt fringe, wispy bangs do not need to be perfect — the lightness is the point, and a few strands falling out of place look soft rather than messy. They are the ideal fringe for the grow-out, because they look good at every length the fringe passes through.
Best for: fine hair, and anyone who wants softness rather than a statement. How to style it: blow-dry the bangs forward with a small round brush, then separate them lightly with your fingers — do not use heavy product, or the wispiness disappears. Pros and cons: they are forgiving, flattering and easy, but they need a trim every four weeks or they stop being wispy and start being a curtain. Maintenance: a quick trim at home is tempting — resist it, and let your stylist shape them. Quick verdict: the softest way through the fringe stage.
16. The Headband Hero
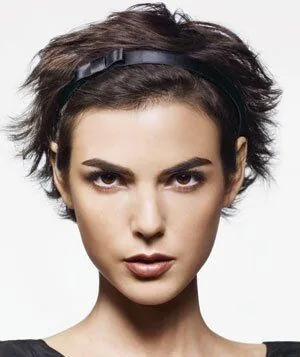
A headband is the grow-out’s single most useful tool, and the headband hero style makes it the star. A wide, padded headband, a thin metal one, a velvet one, a knotted one — each one pushes the growing fringe back, frames the face, and turns the awkward stage into a look in five seconds. The headband does not hide the grow-out; it accessorizes it, and that is why it works.
Best for: every stage, especially bad hair days and months three to six. How to style it: push the headband back from the hairline so a little fringe shows in front, or wear it right at the hairline for a sleek finish. Cost and time: a few pounds or dollars, five seconds. Pros and cons: it is instant, cheap and endlessly variable, but a headband worn in the same place every day can leave a dent — move it around. Common mistake: choosing a headband that slips — a velvet-lined or toothed band stays put on short hair. Quick verdict: the headband is not a cover-up, it is a style.
17. The Scarf-Wrapped Grow-Out
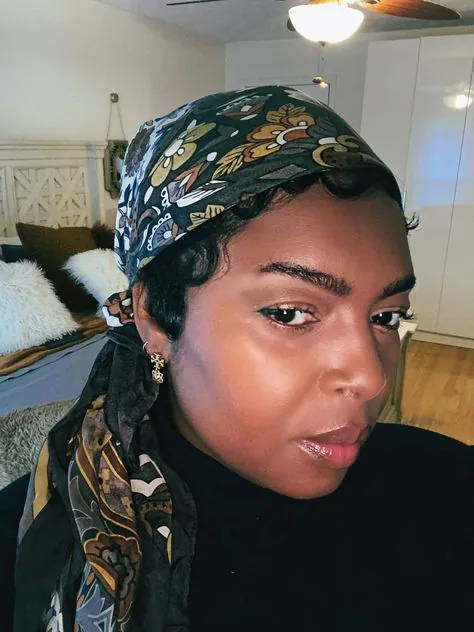
A silk scarf is the grow-out’s most glamorous rescue. Fold it into a band and wear it as a headband, wrap it turban-style over the whole head, or tie it around a low bun — each version hides the awkward lengths and adds colour, polish and intention. The scarf-wrapped grow-out is the style for the days when the hair simply will not cooperate, and it is also the style for the days when you want to look like you tried very hard, because a scarf always looks deliberate.
Best for: bad hair days, travel, and months three to seven. How to style it: fold a square scarf into a wide band, place it over the crown, and tie it at the nape — leave a few front pieces out so it looks like a style, not a cover-up. Maintenance: silk scarves need a gentle hand wash now and then. Pros and cons: it is the fastest full-coverage fix there is, but it needs a scarf big enough to wrap — a small one will slip. Quick verdict: one silk scarf, endless grow-out saves.
18. The Claw Clip Half-Up
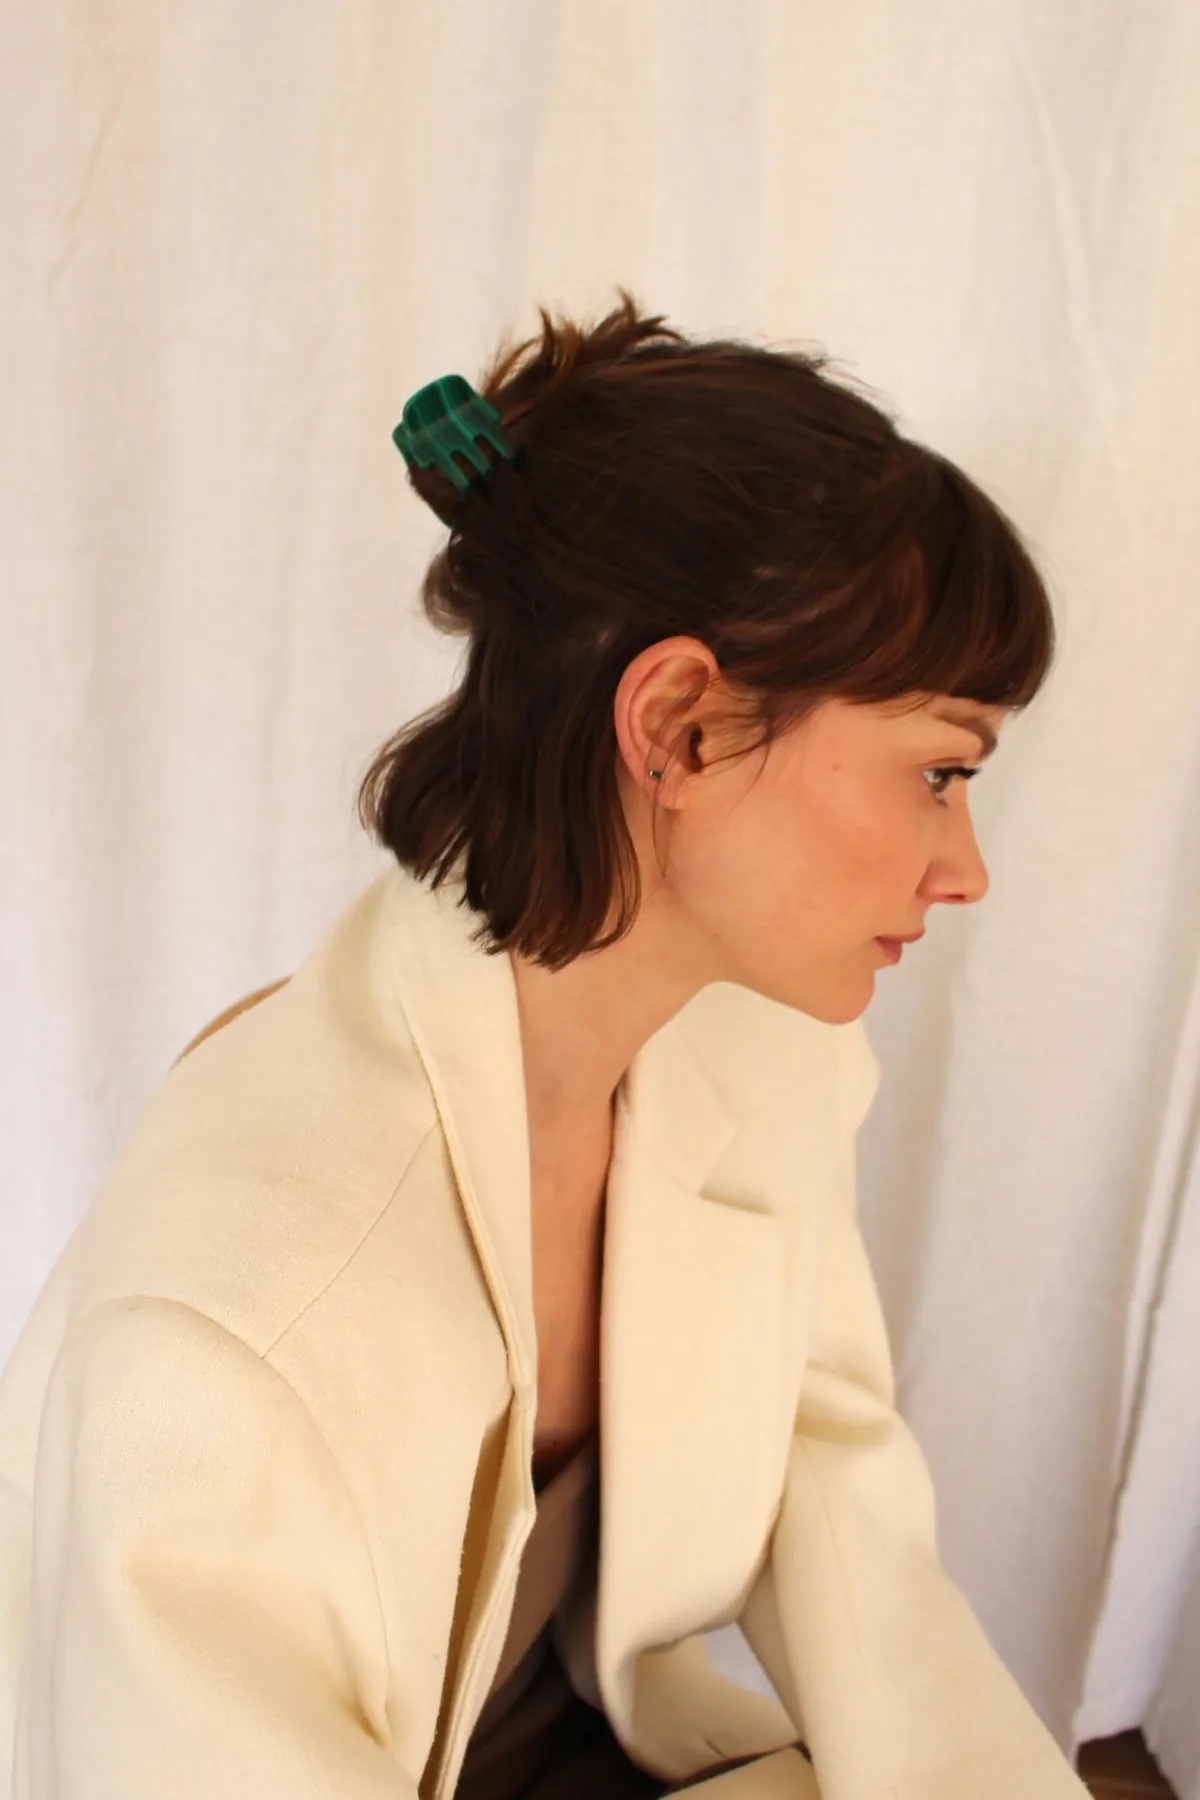
The claw clip half-up is the first updo of the grow-out, and it arrives earlier than you think. Once the top is long enough to gather — usually around month five or six — sweep the top section back, twist it once, and clip it with a small claw clip. The sides stay down, the top stays up, and the awkward lengths are suddenly a deliberate half-up style. It is the style that makes you feel like your hair is long again, even though only the top is up.
Best for: months five to nine, and anyone with enough top length to gather. How to style it: use a small or medium claw clip — a large one will swallow short hair — and leave a few face-framing pieces out. Cost and time: one clip, one minute. Common mistake: pulling the top too tight, which shows the scalp and looks severe — keep it loose and a little messy. Quick verdict: the first updo is a milestone, and the claw clip is how you get there.
19. The Mini Top Knot
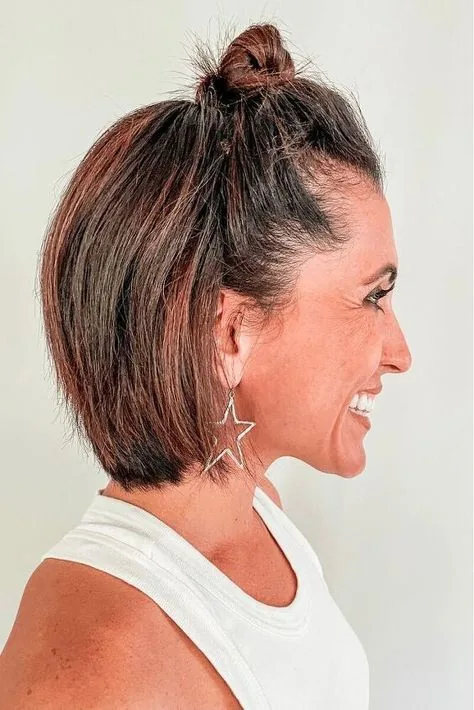
The mini top knot is the claw clip’s playful cousin: gather the top into a tiny knot on the crown, secure it with a small elastic, and let the rest of the hair fall loose. It is small, cute, and — crucially — it uses only the longest hair on your head, so it works at lengths where a full bun is still impossible. The mini top knot is the grow-out’s most charming style, and it hides the awkward top layer completely.
Best for: casual days, months five to eight, and anyone who likes a playful look. How to style it: gather the top section loosely, twist it into a small knot, and pin it — do not pull it tight. Pros and cons: it is fast, fun and very forgiving, but it only works once the top is long enough to gather, so do not force it in month three. Maintenance: none. Quick verdict: the tiny bun that proves the grow-out is working.
20. The First Low Ponytail
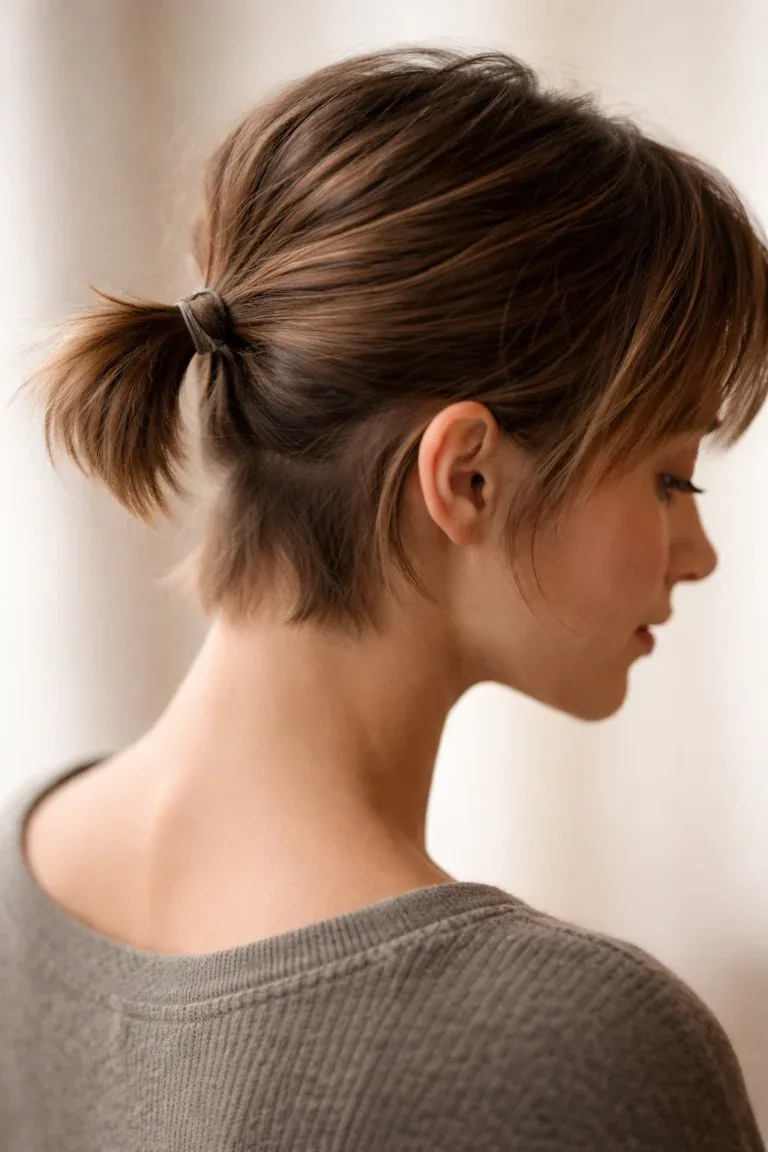
The first low ponytail is a genuine milestone — the day you can gather all of your hair into one elastic at the nape. It usually arrives around month seven or eight, and it feels like a triumph after months of pins and headbands. The ponytail itself is simple: smooth the hair back, gather it low, secure it, and let the shorter front pieces frame the face. It is not a glamorous style, but it is a proof-of-progress style, and that makes it special.
Best for: months seven to ten, and the first day the hair finally gathers. How to style it: use a snag-free elastic, keep the ponytail low and loose, and wrap a small piece of hair around the elastic to hide it. Common mistake: pulling it too tight to make it look longer — a tight ponytail on grow-out hair shows every uneven length. What to ask your stylist: nothing — this is a home milestone, not a salon one. Quick verdict: the first ponytail is the grow-out’s graduation day.
21. The Half-Up Mini Ponytail
The half-up mini ponytail is the first low ponytail’s little sister: gather just the top half into a tiny ponytail at the crown, and leave the rest down. It works earlier than the full ponytail — usually by month five — because it only needs the top to be long enough to gather. The result is playful and practical: the fringe is out of your face, the sides fall naturally, and the awkward top layer is suddenly a style.
Best for: months five to eight, and days when the fringe will not stay put. How to style it: gather the top section loosely, secure it with a small elastic, and pull out a few pieces around the face for softness. Pros and cons: it is quick, cute and very easy, but it needs the top to be at least three inches long — do not force it before then. Maintenance: none. Quick verdict: the half-up is the grow-out’s first real updo.
22. The Braided Front Pieces
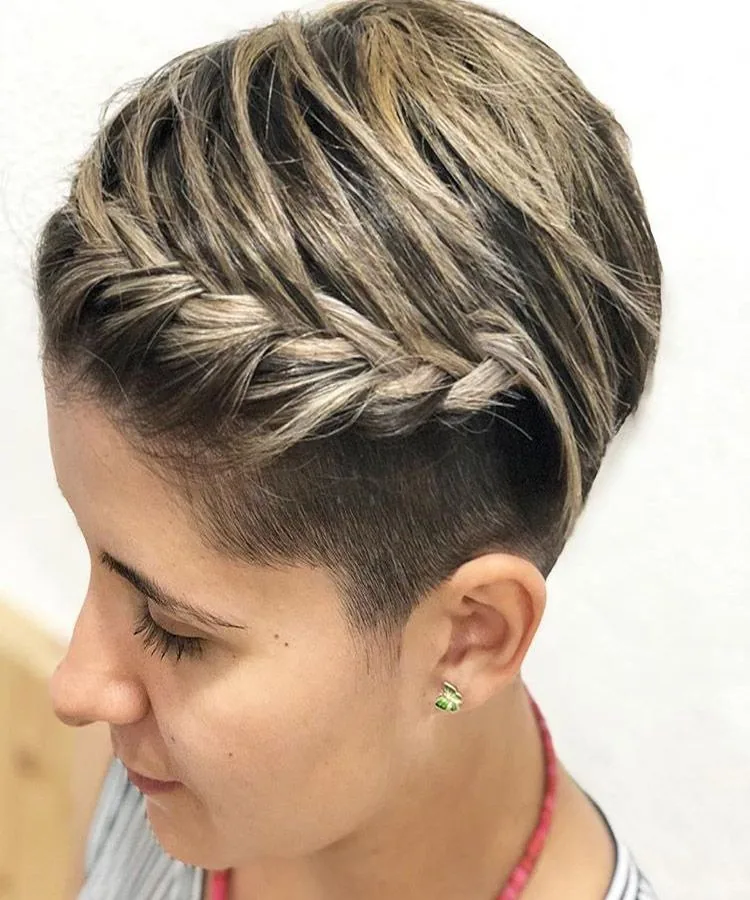
When the front pieces are long enough to braid — even a tiny, two-inch braid — the braided front pieces style turns them into a feature. Braid a small section on each side of the part, pin the ends back, and the fringe is gone, the face is framed, and the grow-out looks like a festival style rather than a waiting game. It is a small detail with a big effect, and it works at lengths where almost nothing else does.
Best for: months four to eight, and anyone whose front pieces keep falling in their eyes. How to style it: take a small section at the hairline, braid it back, and pin it behind the ear — repeat on the other side. Cost and time: two bobby pins, two minutes. Common mistake: braiding too tightly, which pulls at the hairline — keep it loose. Quick verdict: a tiny braid solves the biggest grow-out annoyance.
23. The Twist-and-Pin Sides
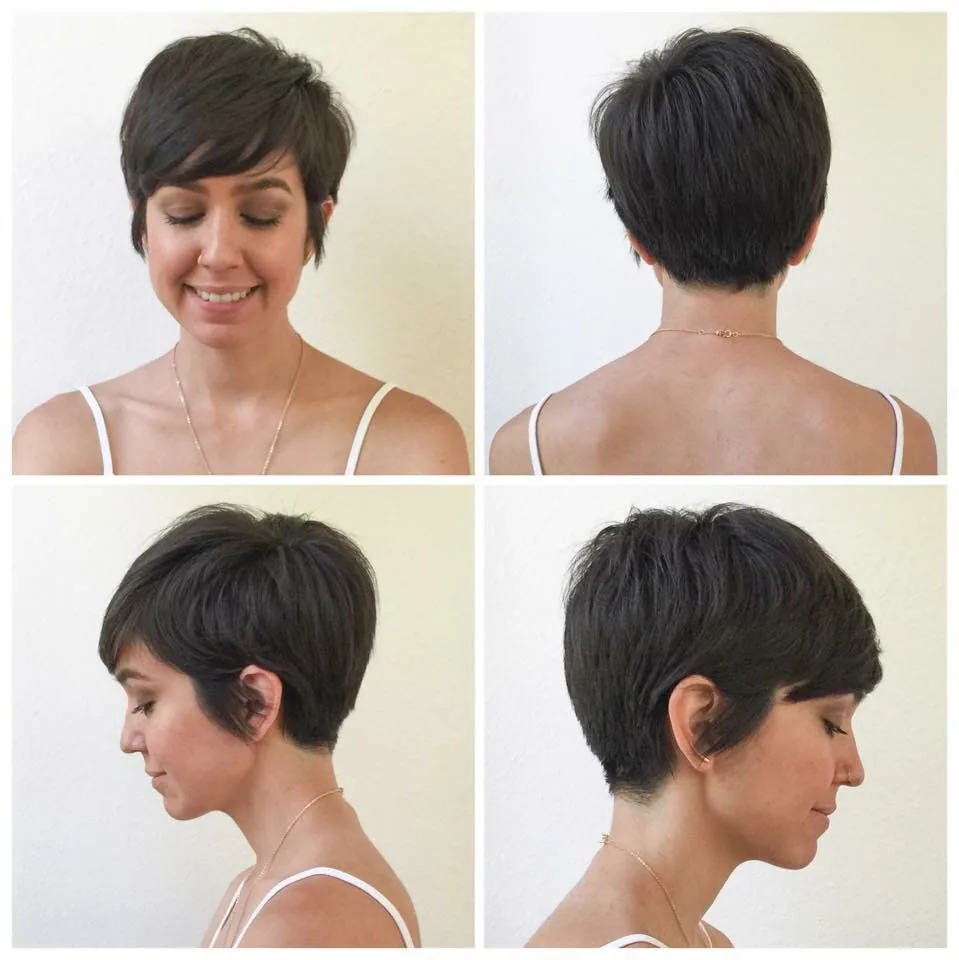
The twist-and-pin is the braided front pieces’ easier cousin, and it needs no braiding skill at all. Take a section at the temple, twist it back, and pin it — that is the whole style. The twist flattens the puffy sides, pulls the fringe out of the face, and creates a soft, romantic detail that looks like you spent ten minutes on it. It is the grow-out’s most useful two-minute fix, and it works on every hair type.
Best for: months three to seven, and anyone who cannot braid. How to style it: twist each side back toward the crown, cross the two twists at the back if they are long enough, and pin them. Pros and cons: it is instant and needs no skill, but it only holds if the pins are placed well — criss-cross two pins for a secure hold. Maintenance: none. Quick verdict: if you can twist, you can do this style.
24. The Bobby Pin Art
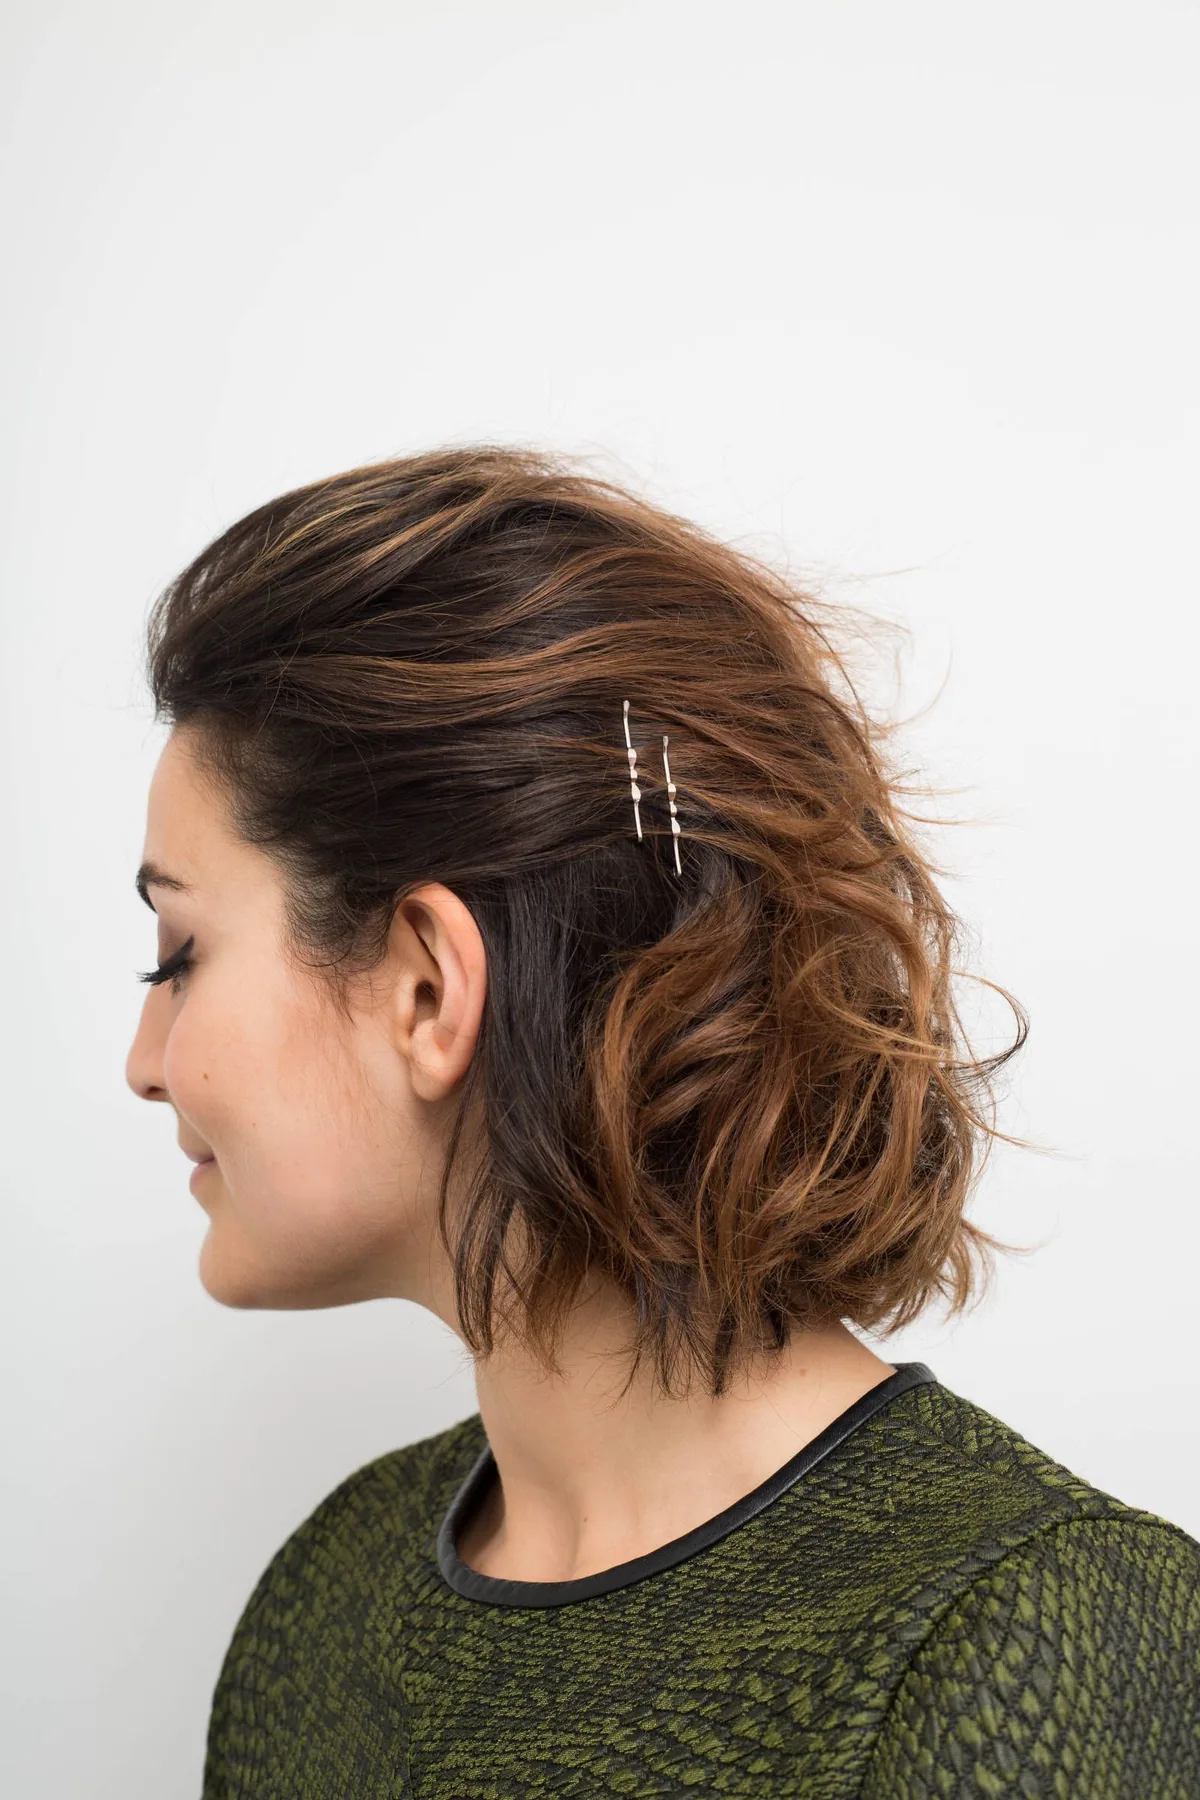
Bobby pins are not just a tool in the grow-out — they are a style. The bobby pin art look uses decorative pins — gold, pearl, tortoiseshell, or coloured — arranged in a deliberate pattern on one side of the head: a row of three, a criss-cross, a little fan. The pins hold back the awkward lengths and, at the same time, they are the accessory. It is the grow-out style that turns a rescue mission into jewellery.
Best for: the awkward middle months, and anyone who likes a little sparkle. How to style it: sweep the hair to one side, pin the short side back with two or three decorative pins in a neat row, and leave the long side loose. Cost and time: a pack of decorative pins, one minute. Common mistake: using pins that match your hair colour for this look — the point is that they show, so choose pins that stand out. Quick verdict: the pins are the style, not the secret.
25. The Textured Crop With Volume
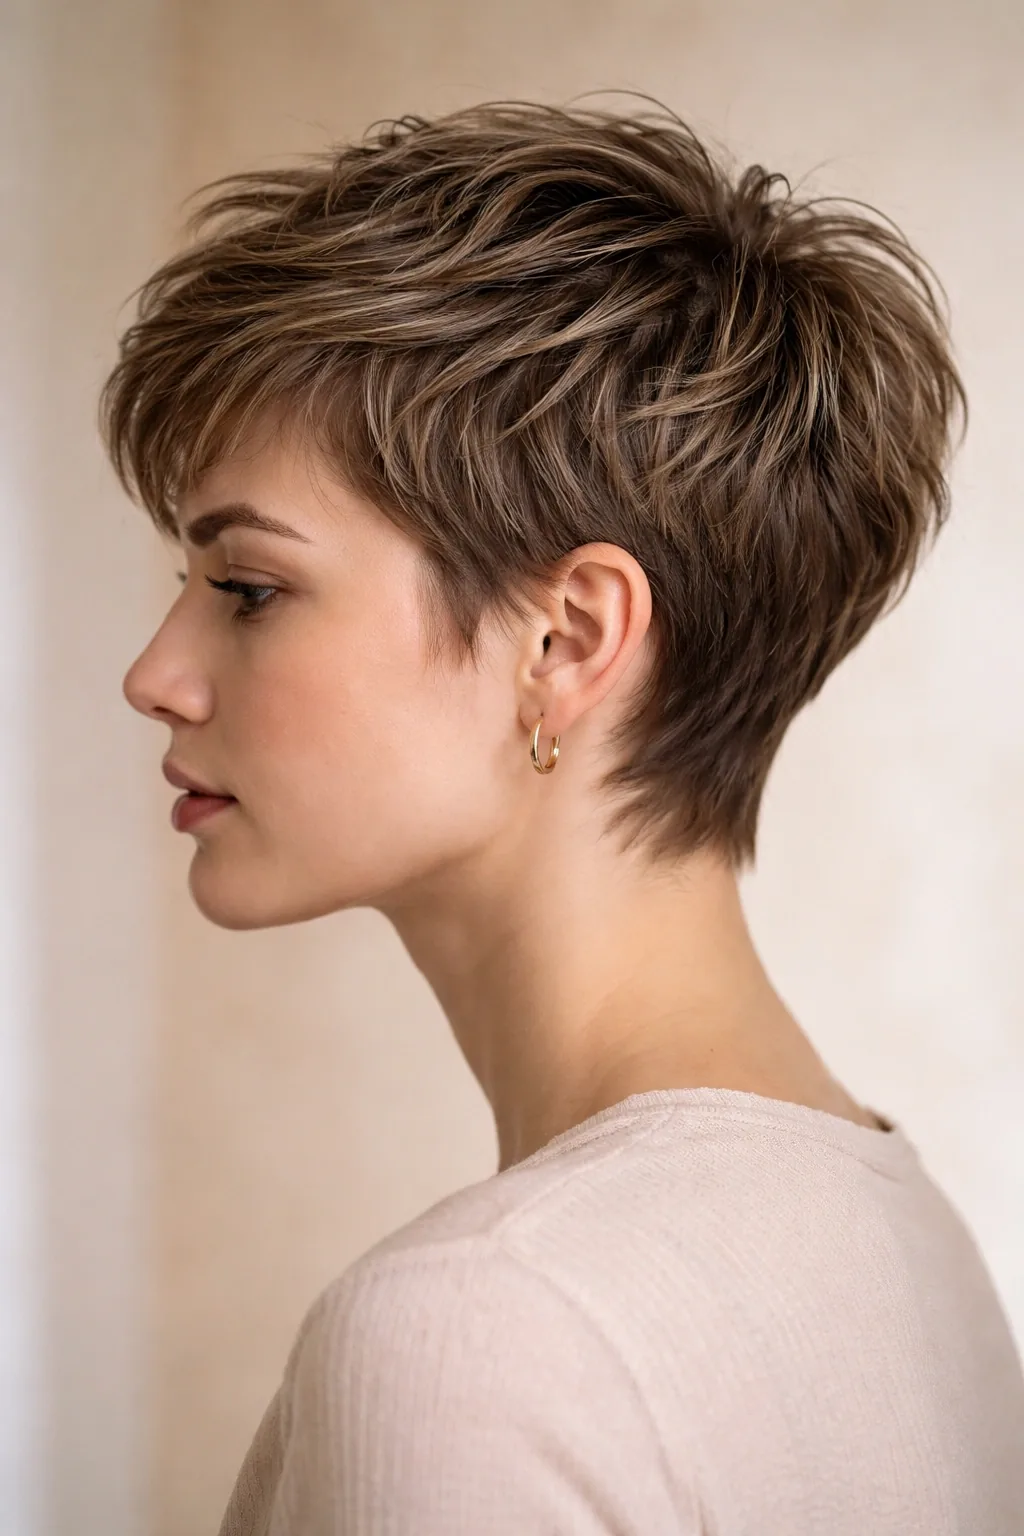
When the grow-out starts to go flat, the textured crop with volume is the answer. Blow-dry the roots upward with a round brush, add a little volumising powder or texture spray, and push the top into a piecey, lifted shape. The volume hides the uneven lengths, lifts the face, and makes the hair look thicker and more deliberate. It is the style for the flat, tired days of the grow-out, when the hair feels like it is doing nothing at all.
Best for: fine hair, and months three to six when the grow-out goes flat. How to style it: blow-dry the hair upward at the roots, then work a little texture paste through the ends for definition. Pros and cons: it is flattering and gives instant life to flat hair, but it needs a blow-dry — air-drying will not give the same lift. Maintenance: a volumising powder at the roots on day two revives it. Quick verdict: volume is the grow-out’s best disguise.
26. The Messy Bedhead Grow-Out
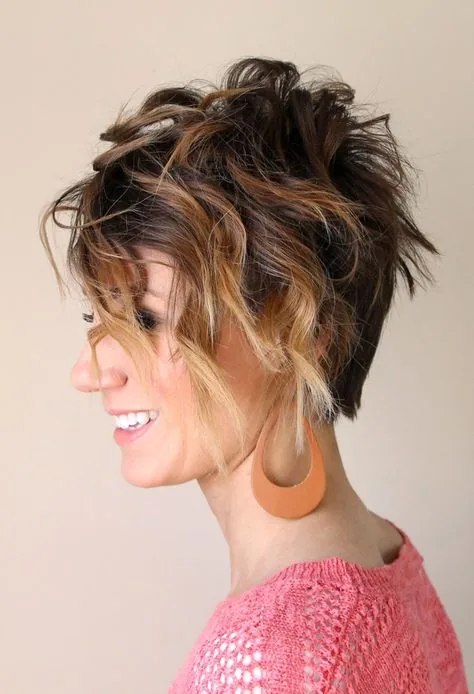
The messy bedhead grow-out is the style that stops pretending. Instead of fighting the uneven lengths, it embraces them: texture spray, a rough scrunch, a shake of the head, and the hair looks deliberately tousled rather than accidentally messy. It is the grow-out’s most honest style, and it works because a little mess on purpose reads as a look, while a little mess by accident reads as a failure. The difference is intention, and intention is free.
Best for: wavy hair, casual days, and months four to seven. How to style it: spray texture spray through damp hair, scrunch, let it air-dry, and do not brush it — brushing kills the texture. Common mistake: adding too much product, which makes the mess look greasy rather than tousled. Who should avoid it: anyone who needs a polished look that day — keep a headband in your bag for those moments. Quick verdict: if it is going to be messy, make it messy on purpose.
27. The Sleek Tucked-Behind-Ears Look
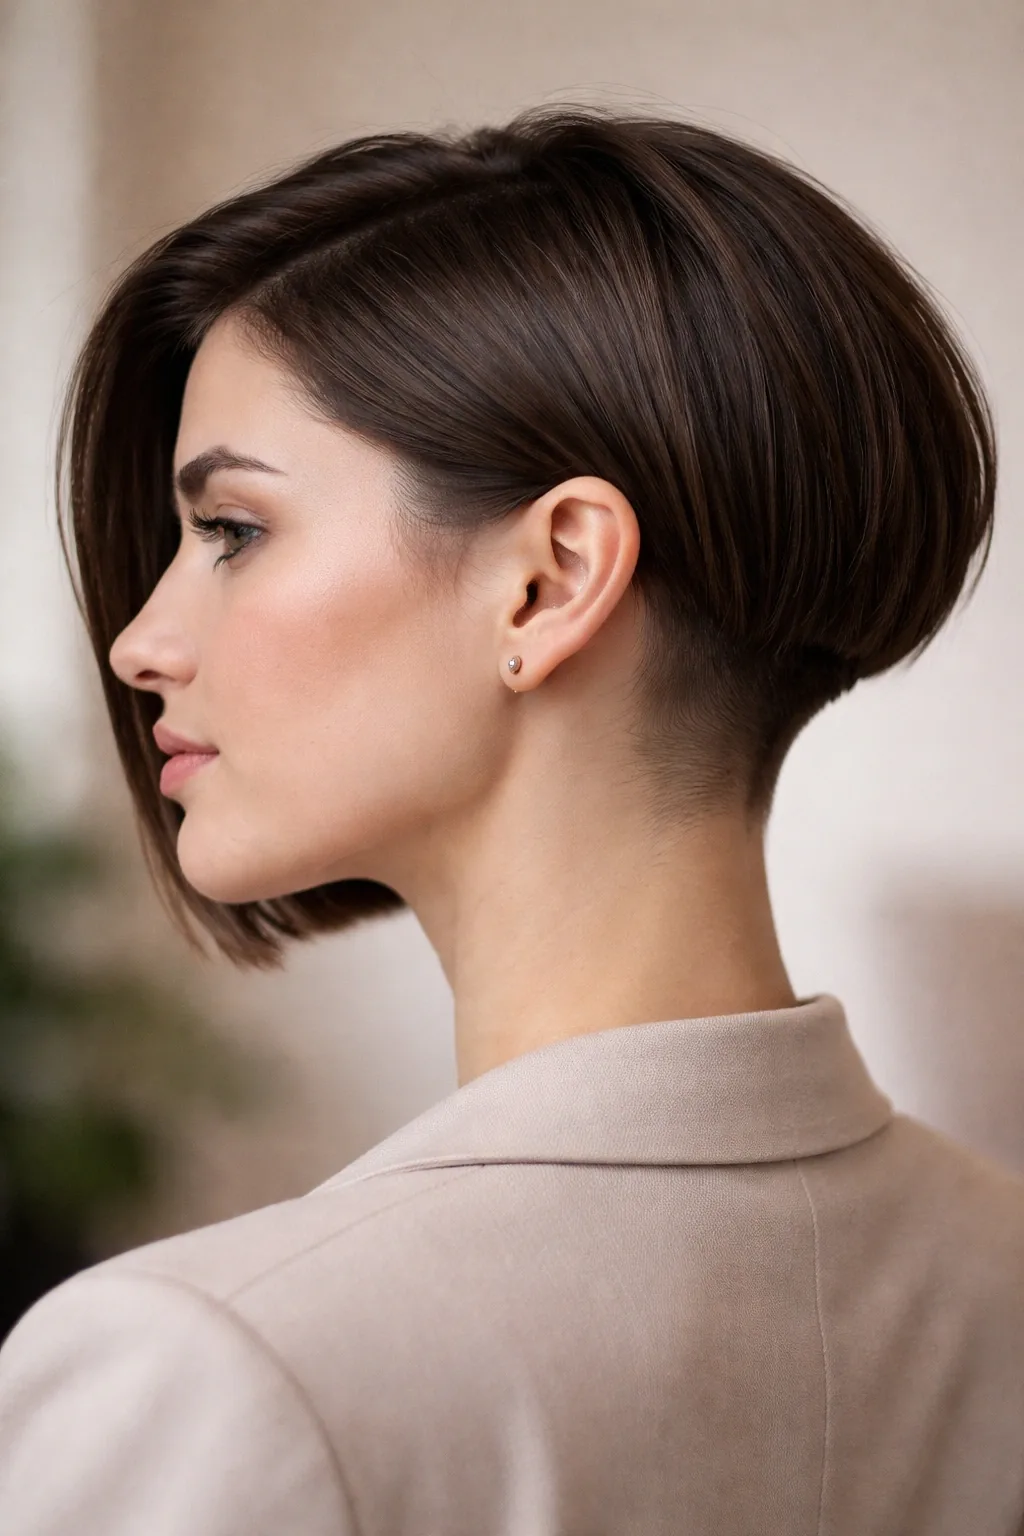
Once the sides are long enough to tuck, the sleek tucked-behind-ears look is the grow-out’s most elegant option. Smooth the hair with a little serum, tuck both sides behind the ears, and the face is framed, the awkward puff is gone, and the hair looks neat, intentional and polished. It is the style for work, for dinner, for any day you want to look like the grow-out is going exactly to plan.
Best for: months six to nine, and straight to wavy hair. How to style it: apply a little smoothing serum, tuck the sides behind the ears, and let the ends sit at the jaw. Pros and cons: it is sleek, simple and very flattering, but it only works once the sides reach the ears — before that, they will not stay tucked. Maintenance: a light-hold spray keeps the tuck in place. Quick verdict: the tuck is the grow-out’s simplest polish.
28. The Asymmetrical Grow-Out
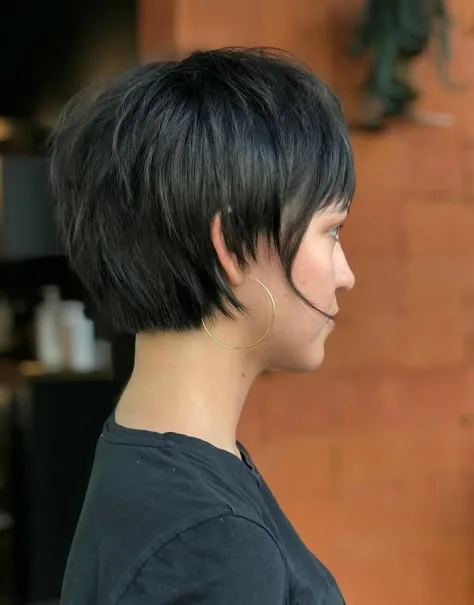
If one side of your pixie is growing faster than the other — or if the shape has gone lopsided — lean into it with the asymmetrical grow-out. Keep one side longer and sleeker, the other shorter and textured, and the unevenness becomes a deliberate, edgy shape rather than a mistake. The asymmetrical grow-out is the style for anyone who likes a little edge, and it is the smartest way to handle a grow-out that refuses to grow evenly.
Best for: anyone whose hair grows unevenly, and lovers of edgy cuts. How to style it: part the hair deeply to one side, smooth the long side, and add texture to the short side for contrast. What to ask your stylist: ask for the asymmetry to be shaped deliberately, so it looks like a cut, not an accident. Common mistake: trying to even it out by cutting the long side — the asymmetry is the style, so keep it. Quick verdict: uneven growth is not a problem, it is a haircut.
29. The Undercut Grow-Out
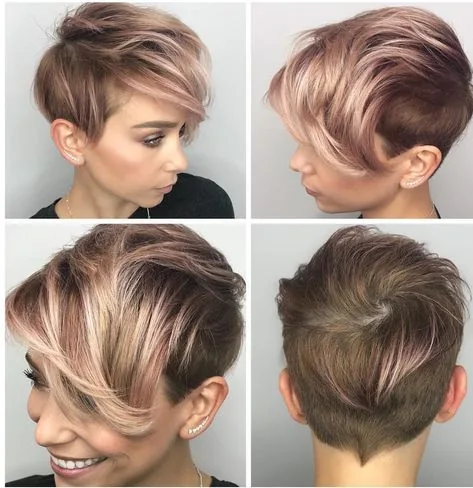
Growing out an undercut pixie is the hardest grow-out of all, because the shaved section grows back at a different rate and sticks out in every direction. The strategy is to blend, not to hide: keep the undercut section trimmed short while the top grows, so the two lengths meet gradually, and use texture and a side part to disguise the join. It takes patience, but the undercut grow-out is entirely doable — it just needs more shaping trims than a standard pixie grow-out.
Best for: anyone growing out a pixie with a shaved nape or sides. How to style it: keep the undercut neat with a trim every 4 to 6 weeks, and style the top forward or to the side so it covers the join. Maintenance: more frequent trims than a normal grow-out, but each one is quick. Common mistake: letting the undercut grow wild while the top grows — the two lengths will never meet neatly without shaping. Quick verdict: blend the undercut, grow the top, and the two will meet.
30. The Faux Bob Trick
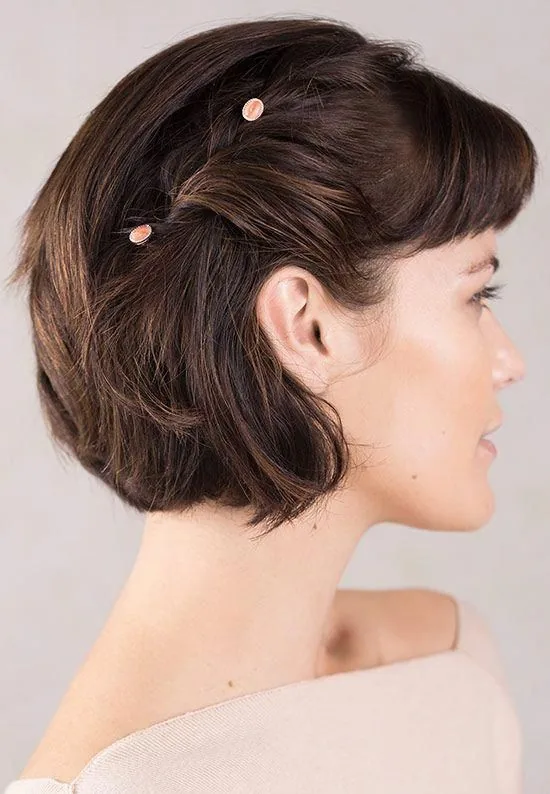
The faux bob is the grow-out’s best party trick: it makes your hair look like a bob when it is not one yet. Tuck the ends under and pin them at the nape, roll the length under, or gather the back into a low, hidden ponytail — and from the front, you have a bob. It is the style for the days when you want to see the finish line, or for an evening when you want to look like you have arrived.
Best for: special occasions, and months seven to ten when the hair is almost bob length. How to style it: curl the ends under with a flat iron, tuck them under at the nape, and pin them — a scarf or a headband hides the pins. Pros and cons: it is a brilliant illusion and it previews the bob, but it takes a few pins and a mirror to get right. Cost and time: ten minutes, a few bobby pins. Quick verdict: the faux bob lets you wear the finish line early.
31. The Shaggy Lob Transition
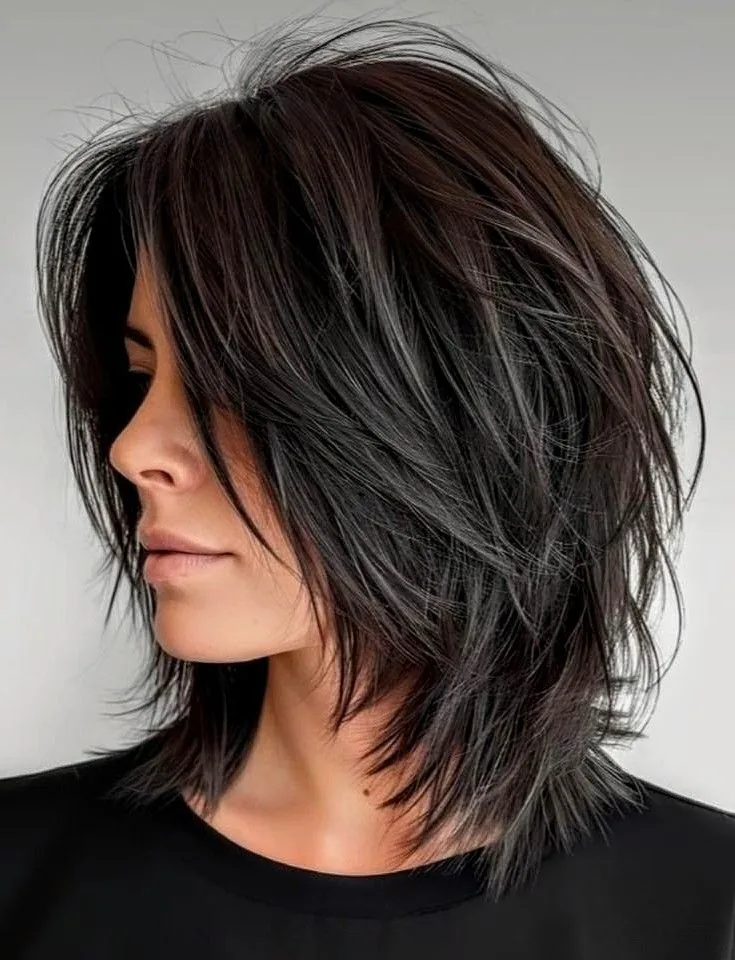
The shaggy lob is the grow-out’s finish line for anyone who loves texture. Once the hair reaches the shoulders, ask for long, choppy layers and a little texture through the ends, and the grow-out becomes a shaggy lob — a long bob with movement, mess and attitude. It is the style that makes the whole journey feel worthwhile, because it is a genuinely fashionable cut in its own right, not just a stage on the way to somewhere else.
Best for: months twelve to eighteen, and wavy or thick hair. How to style it: scrunch in texture spray, let it air-dry, and shake it out — the shaggy lob is at its best a little messy. What to ask your stylist: ask for long layers that keep the shape light, and for the ends to be point-cut rather than blunt. Pros and cons: it is modern, flattering and low-maintenance, but it needs the length — do not ask for it before the hair reaches the shoulders. Quick verdict: the shaggy lob is the grow-out’s reward for the patient.
32. The Wavy Grow-Out With Sea Salt Texture
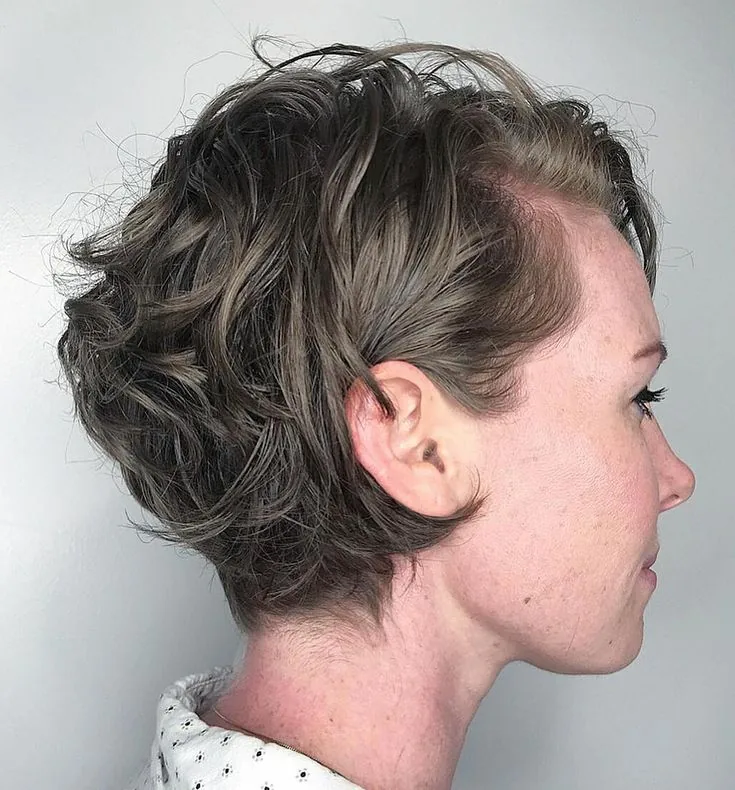
Sea salt spray is the grow-out’s best friend for wavy hair, because it turns the natural wave into texture and the texture into a style. Spray it through damp hair, scrunch, and let it air-dry — the wave becomes more defined, the ends look piecey, and the uneven lengths disappear into the texture. The wavy grow-out with sea salt texture is the style that makes wavy hair feel lucky, because the wave does the styling for you.
Best for: wavy hair, and months four to ten. How to style it: spray sea salt spray through damp hair, scrunch the ends, and let it dry naturally — do not brush it out. Maintenance: a little leave-in conditioner keeps the salt from drying the hair out. Common mistake: using too much spray, which makes the hair stiff and crunchy — a few spritzes is enough. Quick verdict: salt spray turns a wave into a style.
33. The Voluminous Blowout at Bob Length
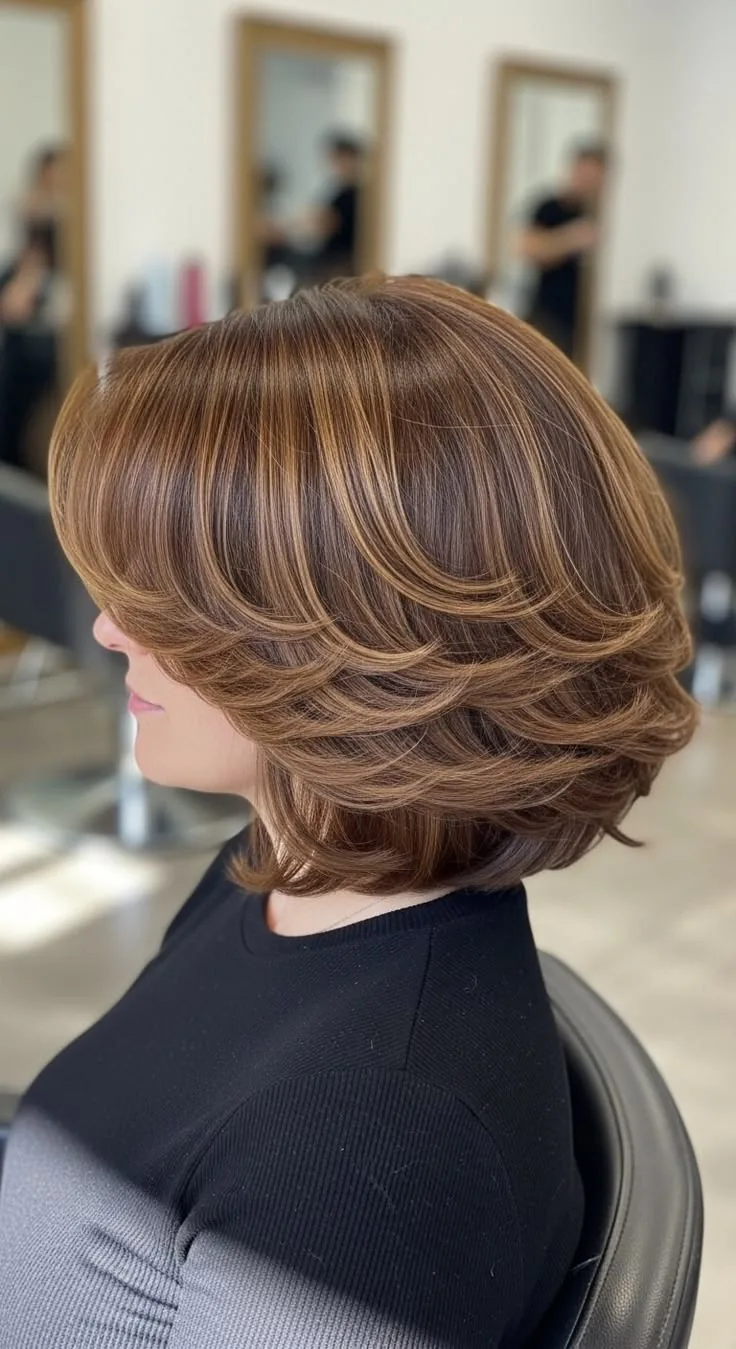
The voluminous blowout is the grow-out’s glamour moment: once the hair reaches bob length, a round-brush blow-dry gives it bounce, movement and shine, and the hair looks like it belongs in a salon advert. It is the style for the days when you want to celebrate the length you have finally reached, and it is also the style that photographs best — the bounce and shine make the bob look expensive.
Best for: months nine to twelve, and anyone who loves a polished, bouncy finish. How to style it: blow-dry with a large round brush, lifting at the roots and turning the ends under, then finish with a shine spray. Cost and time: twenty minutes at home, or a salon blow-dry as a treat. Pros and cons: it looks spectacular, but it needs heat and time, so save it for special days. Maintenance: a silk pillowcase keeps the blowout alive for a second day. Quick verdict: the blowout is the bob’s coming-out party.
34. The Vintage Finger Wave Grow-Out
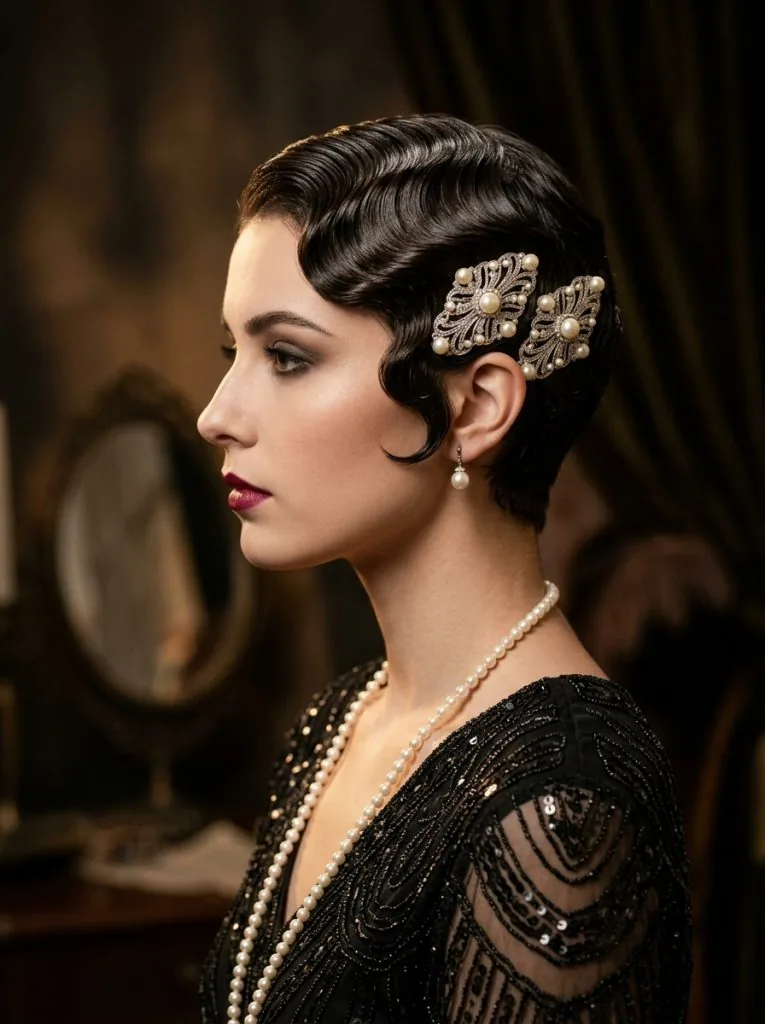
The vintage finger wave is the grow-out’s most elegant surprise: the soft, sculpted waves of the 1920s work beautifully on short, growing-out hair, because the waves hide the uneven lengths and the sculpted shape looks deliberate and glamorous. It is the style for a party, a wedding, or any evening when you want the grow-out to look like old Hollywood rather than a work in progress.
Best for: special occasions, and straight to wavy hair at bob length. How to style it: set the waves with a strong-hold gel and a comb, or use a flat iron to create the S-shaped waves, then set them with spray. Who should avoid it: anyone short on time — the finger wave takes practice and patience. Maintenance: a silk scarf overnight keeps the waves in place. Quick verdict: the finger wave turns the grow-out into a vintage portrait.
35. The Space Buns for Short Grow-Out Hair
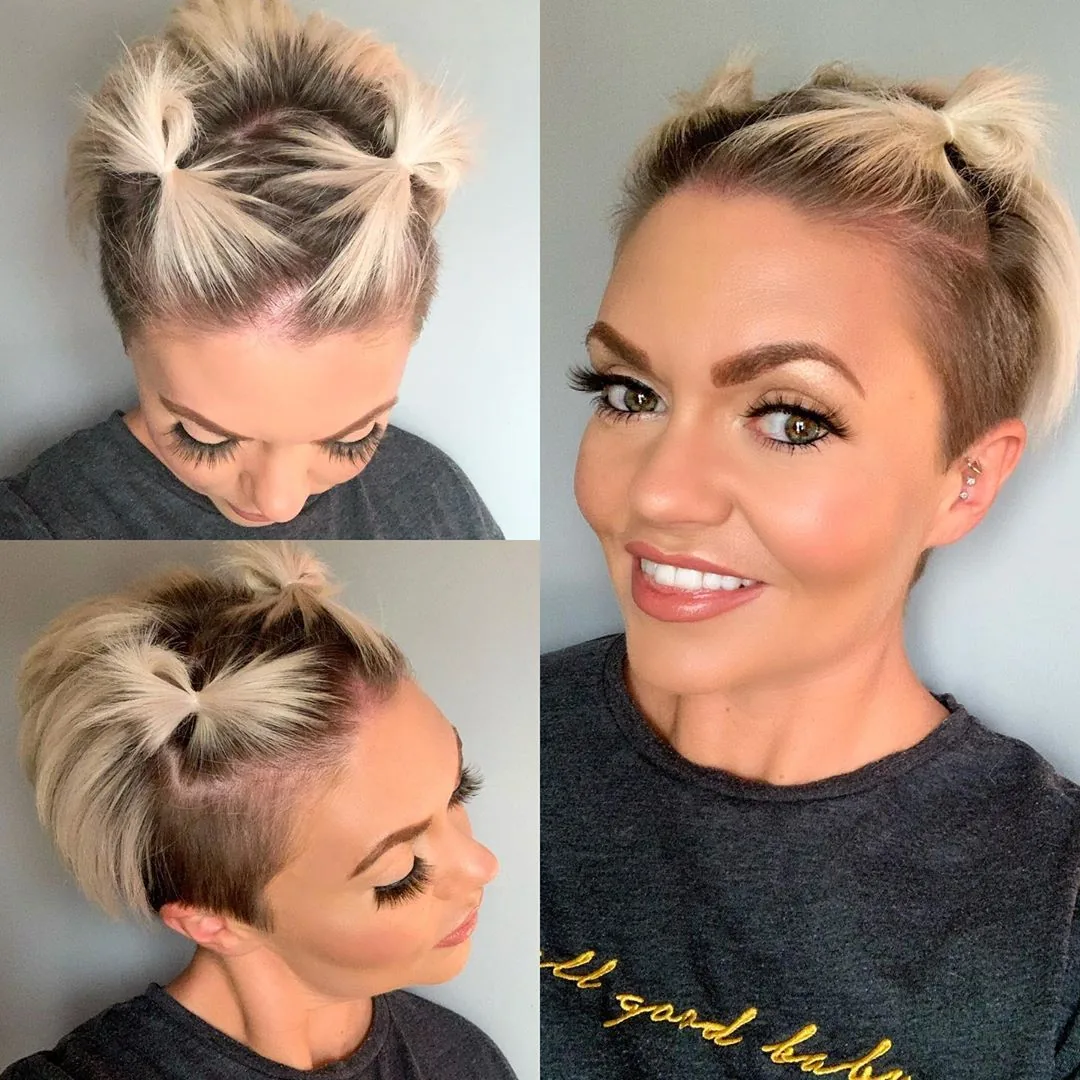
Space buns are the grow-out’s most playful style, and they work earlier than you would expect. Once the top is long enough to gather into two small buns — usually around month six — divide the hair in two, twist each side into a tiny bun, and secure them. The result is fun, youthful and surprisingly chic, and it hides the awkward lengths completely, because the hair is up and the buns are the story.
Best for: casual days, festivals, and months six to nine. How to style it: keep the buns small and a little messy, and leave a few face-framing pieces out for softness. Pros and cons: they are fun, quick and very photogenic, but they are a casual look — keep them for weekends and festivals. Common mistake: making the buns too tight, which looks severe — loose and a little messy is the grown-up version. Quick verdict: space buns make the grow-out fun.
36. The Low Messy Bun Milestone
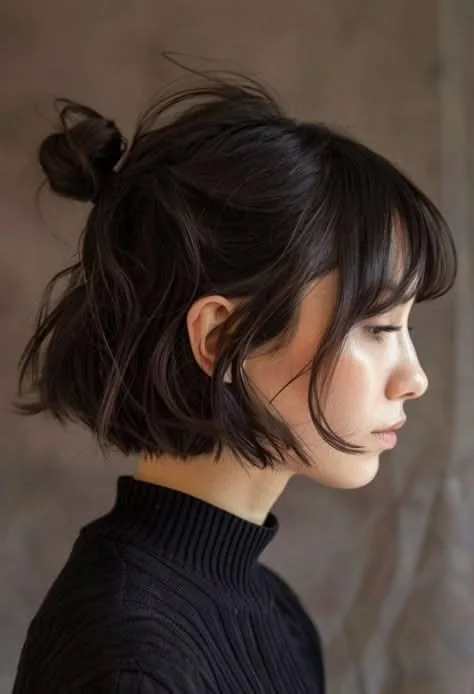
The low messy bun is the first real bun of the grow-out, and it arrives when the hair can finally gather at the nape — usually around month eight or nine. Gather the hair low, twist it loosely, pin it, and let the shorter pieces fall out around the face. The mess is the point: a low messy bun is supposed to look a little undone, which means the uneven lengths that used to be a problem are now part of the style.
Best for: months eight to twelve, and anyone who loves an easy updo. How to style it: gather the hair loosely at the nape, twist it, pin it, and pull out a few pieces for softness. Maintenance: a few bobby pins in your bag for touch-ups. Pros and cons: it is the easiest updo in the guide and it looks effortless, but it needs the hair to reach the nape — do not force it before then. Quick verdict: the first bun is a milestone worth celebrating.
37. The Braided Crown at Bob Length
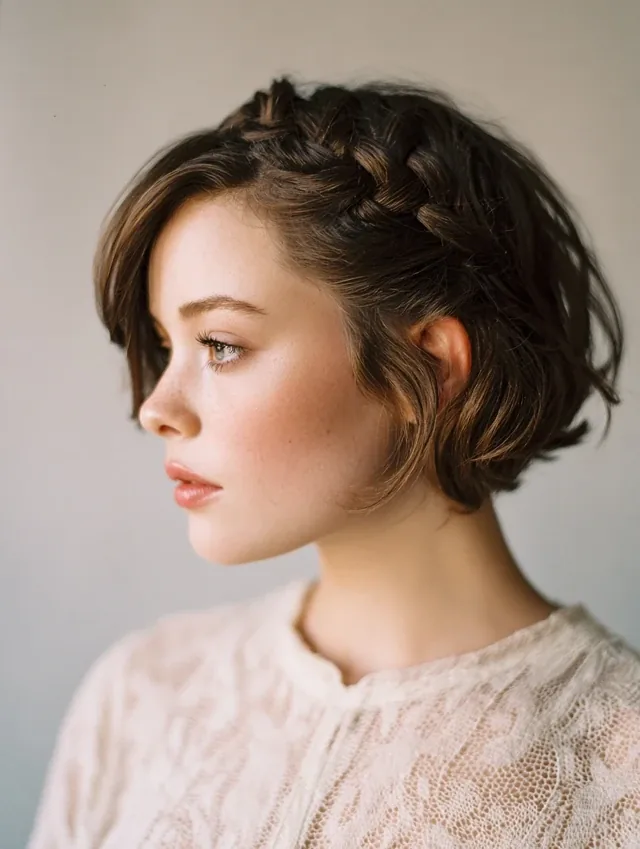
The braided crown is the grow-out’s most romantic finish-line style. Once the hair reaches bob length, braid it around the head like a halo, pin the end under the start, and you have a crown braid that looks like it belongs at a wedding. It is the style that shows off the length you have finally grown, and it hides any remaining unevenness completely, because the braid is the whole shape.
Best for: months ten to fourteen, and special occasions. How to style it: braid loosely around the head, pull the edges out for fullness, and pin the end securely. What to ask your stylist: if you cannot crown-braid your own hair, ask for a Dutch braid around the head instead — it looks just as good. Maintenance: pin the braid in several places, because it is heavy. Quick verdict: the crown braid is the grow-out’s tiara.
38. The Side-Swept Lob
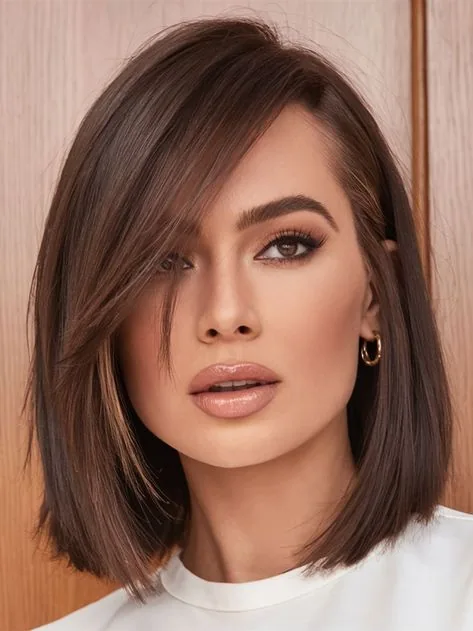
The side-swept lob is the grow-out’s destination for anyone who loves a deep side part. Once the hair reaches the shoulders, sweep it all to one side, and the lob becomes a sweeping, glamorous shape with movement and shine. It is the style that makes the grow-out feel complete, because the lob is a real haircut in its own right — not a stage, but a destination.
Best for: months fourteen to eighteen, and anyone who loves a side part. How to style it: part the hair deeply to one side, blow-dry the heavy side across, and finish with a shine spray. Pros and cons: it is glamorous, flattering and very versatile, but it needs the length — do not ask for it before the hair reaches the shoulders. Maintenance: a trim every 8 weeks keeps the ends healthy. Quick verdict: the side-swept lob is the grow-out’s red-carpet finish.
39. The Layered Lob Finish Line
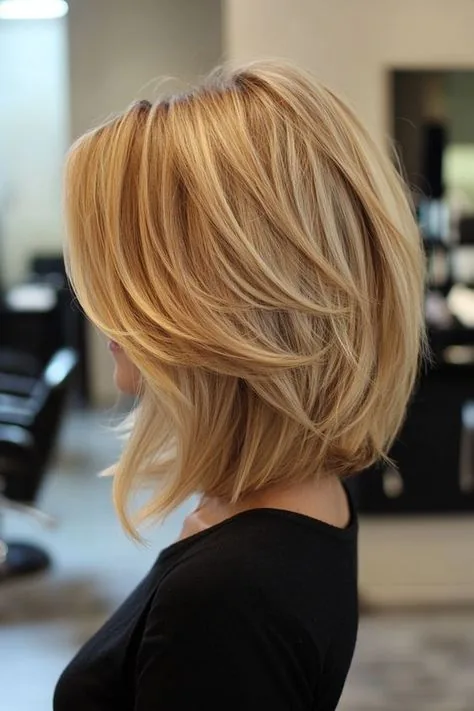
The layered lob is the grow-out’s official finish line: shoulder-length hair, long layers, movement, and a shape that looks like you chose it rather than arrived at it. It is the cut that most pixie grow-outs are aiming for, and when you finally get there, it feels like a victory. The layers keep the lob light and moving, the length is enough for ponytails and buns, and the awkward stage is officially over.
Best for: months eighteen to twenty-four, and every hair type. How to style it: blow-dry with a round brush for bounce, or let it air-dry for a natural finish — the layers work either way. What to ask your stylist: ask for long layers that keep the shape light, and for the ends to be healthy — a good trim at the finish line is worth it. Cost and time: one salon visit to shape it, then five minutes a day. Quick verdict: the layered lob is the grow-out, complete.
40. The Reset Cut: When to Chop It Back
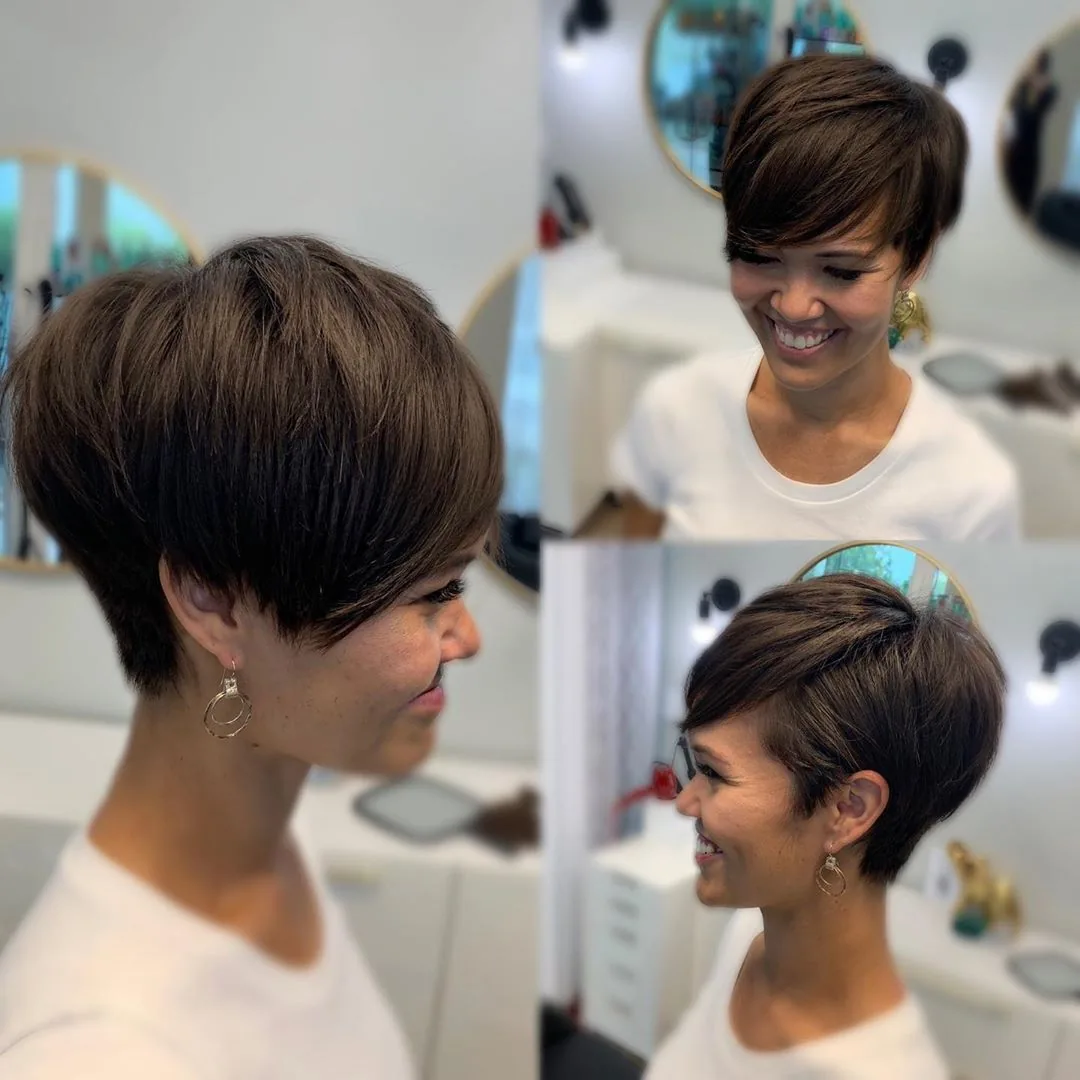
Sometimes the bravest grow-out decision is to stop growing and cut it back. If the shape has gone wrong, the ends are damaged, or you simply miss the pixie, a reset cut is not a failure — it is a fresh start. A good stylist can reshape the grow-out into a beautiful short cut in one visit, and you can start growing again from a healthy, intentional shape. The reset cut is the grow-out’s safety valve, and knowing it exists makes the whole journey less stressful.
Best for: anyone whose grow-out has gone badly wrong, or who realises they prefer short hair after all. How to style it: ask your stylist for a fresh pixie or bixie shape that works with the length you have now. Pros and cons: it is instant relief and a beautiful cut, but it does reset the clock — so be sure before you chop. Common mistake: cutting it back in frustration on a bad hair day — wait a week, try a headband, and then decide. Quick verdict: the reset cut is always there, and that is what makes the grow-out brave, not scary.
41. The Celebration Cut: Your First Proper Bob
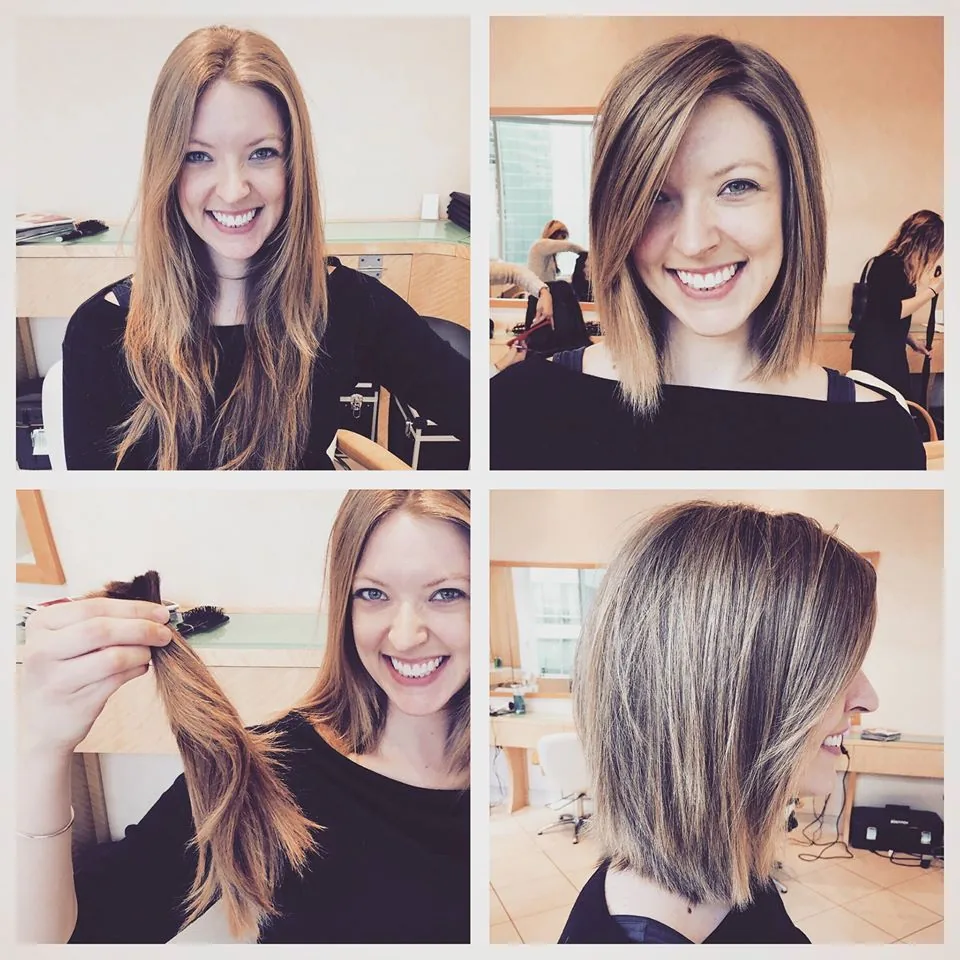
The celebration cut is the grow-out’s final chapter: the day you sit in the salon chair and ask for a proper bob, not a grow-out shape, not a bixie, but a bob — because you have arrived. Your stylist shapes the length you have grown into a clean, intentional bob, and the awkward stage is officially history. Book it like a celebration, because that is what it is: eighteen months of patience, turned into a haircut.
Best for: the day the hair reaches chin length or beyond, and you are ready to call it a bob. How to style it: ask for the bob that suits your face — blunt, layered, French, or asymmetrical — and enjoy it. Cost and time: one salon visit, and the best feeling of the whole grow-out. What to ask your stylist: bring the photo you have been saving since month one, and ask for the cut you have been growing toward. Quick verdict: the celebration cut is the grow-out’s happy ending — book it, enjoy it, and take a photo.
How long does it take to grow out a pixie cut?
About 12 to 18 months to reach a chin-length bob, and 18 to 24 months to reach a shoulder-length lob, because hair grows roughly half an inch a month. The awkward stage is worst in months three to seven; after that, the hair starts working with you. Regular shaping trims do not slow the grow-out — they keep it looking intentional, which is what stops most people giving up.
How often should I trim while growing out a pixie?
Every 6 to 8 weeks, ask your stylist to clean up the nape and the area around the ears while leaving the top and fringe alone. Trimming the back and sides keeps the shape neat while the top gains length. Never let a stylist cut the top to match the sides — that resets the clock. If you are growing out an undercut, trim the shaved section every 4 to 6 weeks so it blends gradually.
What is the hardest stage of growing out a pixie?
Months three to seven are the hardest: the top flops, the sides puff out, the back flips up, and the fringe falls into your eyes. This is the stage where headbands, claw clips, bobby pins and texture products matter most, and where a bixie or shaggy cut can turn the mess into a style. Almost everyone who gives up does so in this window — knowing it is coming makes it much easier to get through.
Can I grow out a pixie without looking messy?
Yes — with three habits: a shaping trim every 6 to 8 weeks, a style that suits the length you have today rather than the length you want, and one camouflage trick for the part that bothers you most, whether that is a headband, a deep side part or a clip. Texture product and a little deliberate mess also help: hair that looks intentionally tousled reads as a style, while hair that looks accidentally messy reads as a grow-out gone wrong.
What products help hair grow faster?
No product makes hair grow dramatically faster — growth is mostly genetics. What genuinely helps is a healthy scalp, gentle washing, and protecting the ends from breakage with a light leave-in conditioner or oil, so more of what grows actually stays. During the awkward stage, texture spray, sea-salt spray and light pomade matter far more than growth serums, because they give short, in-between hair grip, shape and hold.
How do I deal with the mullet stage?
The mullet stage happens when the back grows faster than the top, and the fix is a shaping trim: ask your stylist to taper the nape and blend the back into the top, without cutting the top length. At home, tuck the back under with a round brush, wear a scarf or a headband, or try a shaggy or wolf cut, which turns the uneven lengths into a deliberate style. The mullet stage usually lasts a few weeks, not months, if you keep the back shaped.
Can I colour my hair while growing out a pixie?
Yes, and colour can actually help the grow-out: highlights and lowlights add dimension that disguises uneven lengths, and a gloss or toner adds shine that makes short hair look healthy. Avoid very harsh bleaching while the hair is short, because damage shows fast and there is not much length to cut away. If you want a big colour change, do it once the hair reaches bob length, when there is more hair to work with.
What hairstyles hide a growing-out pixie?
The best camouflage styles are the headband, the scarf wrap, the deep side part, the claw clip half-up, the twist-and-pin sides, and the slicked-back look — each one hides a different awkward part. For the back, tuck it under or cover it with a scarf; for the fringe, sweep it aside or pin it; for the sides, tuck them behind the ears or flatten them with a deep part. Pick the one problem that bothers you most and solve only that.
Should I use extensions while growing out a pixie?
Extensions can help, but they are a commitment: clip-in extensions work best once the hair reaches bob length, because very short hair cannot hide the clips. Tape-ins and bonded extensions need enough hair to attach to, and they can damage fragile grow-out hair if they are too heavy. For most people, the better investment is a good shaping trim and a few accessories — extensions are worth considering only once the hair is long enough to blend with them.
When can I tie my hair into a ponytail?
Most people can gather all their hair into a low ponytail around month seven or eight, though it depends on your hair type and how short the pixie was. The top usually reaches ponytail length before the sides do, so a half-up ponytail or a mini top knot often works from month five. If the sides keep falling out, use bobby pins to secure them — a few pins are normal, and nobody will notice them.
Conclusion
Growing out a pixie cut is not really about hair — it is about patience, and patience is easier when you have a plan. The 41 styles in this guide are that plan: a textured pixie for the early months, a bixie and a shag for the awkward middle, headbands and scarves and clips for the days nothing cooperates, and a bob, a lob and a celebration cut waiting at the finish line. No single style carries the whole grow-out; the journey is the collection, and each stage has a style that suits it.
Start where you are today. If you are in month three and the fringe is in your eyes, sweep it to the side and pin it. If you are in month six and the back is flipping, book a shaping trim and try the shaggy pixie-bob. If you are in month twelve and the hair finally gathers, tie the first low ponytail and take a photo — you have earned it. The awkward stage is temporary, the bob is coming, and every inch you grow is an inch closer to the cut you have been waiting for.