The Secret to Keeping retro braid Hair Fresh All Week
You’ve just spent hours at the salon or meticulously crafted the perfect set of retro braids at home. They look incredible—sleek, shiny, and full of timeless style. But then, a familiar dread sets in. How long will this last? By day three, you’re often battling frizz, a greasy scalp, and a general loss of that initial perfection. It’s a frustrating cycle that makes this gorgeous, low-maintenance style feel anything but.
What if we told you there was a secret? A method to the madness that allows you to wake up every morning for a full week—and beyond—with your braids looking as fresh as the day they were done? The truth is, the longevity of your braids isn’t just about the initial technique; it’s about a dedicated and strategic aftercare ritual.
This isn’t magic; it’s maintenance. And we’re about to let you in on all the secrets. Get ready to transform your braid game and embrace a whole week of flawless, retro-inspired hair.

The Foundation: It All Starts With a Perfect Braid
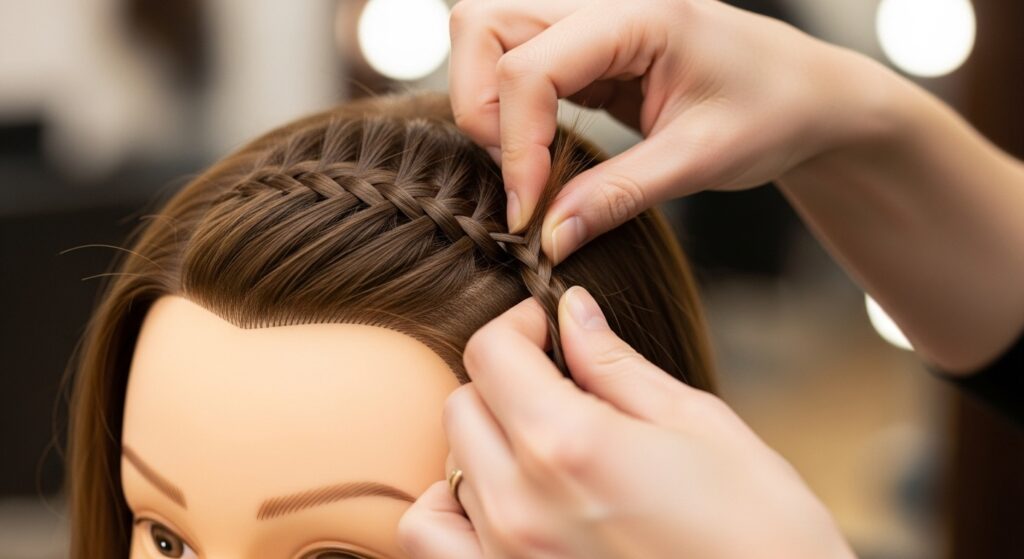
You cannot build a sturdy house on a weak foundation, and the same goes for long-lasting braids. The secret to week-long freshness begins before you even make the first plait. A flawless starting point is non-negotiable.
First, your hair must be immaculately clean and thoroughly detangled. Any product buildup, oil, or dirt trapped at the root will accelerate the need for a wash and can lead to irritation. More importantly, starting with even the smallest knots will result in a bumpy, uneven braid that is far more prone to frizz and unraveling. Take your time here. Section your hair carefully and use a wide-tooth comb and a detangling spray to ensure every strand is smooth and separate.
Next, consider the products used at the base. While a light holding mousse or gel can help lay down edges and flyaways, less is more. Heavy gels can flake and cause buildup, making your scalp feel dirty and look dusty. Opt for alcohol-free, moisturizing gels and apply them sparingly, focusing only on the hairline and the part lines.
Finally, the technique of the braider matters. Each braid should be started with enough tension to be secure but not so much that it causes traction alopecia or discomfort. The braids should be uniform and consistent from root to tip. A sloppy braid will not magically improve with time; it will only get worse.
The Overnight Miracle: Protecting Your Braids While You Sleep
This is, without a doubt, the single most important step for maintaining fresh braids. While you sleep, you toss, turn, and create friction between your hair and your cotton pillowcase. This friction is the primary culprit behind the dreaded “bed head” frizz that attacks your beautiful braids.
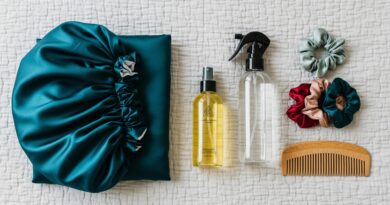
The solution is simple yet profoundly effective: a satin or silk bonnet or pillowcase. Unlike cotton, which roughs up the hair cuticle, silk and satin have a smooth surface that allows your hair to glide as you move. This drastically reduces friction, preventing frizz and helping your braids retain their sleekness.
For the best protection, loosely gather your braids on top of your head before putting on your bonnet. This prevents you from lying directly on them, which can cause flattening and misshaping. If you’re not a bonnet person, a satin scarf tied in a classic wrap will work just as well. Make this a non-negotiable part of your nightly routine. It is the closest thing to a time-freezing capsule for your hairstyle.

Mastering the Art of the Refresh: Your Daily Routine
Even with perfect overnight protection, your braids will need a little daytime TLC to stay crisp. Your daily routine should be quick, easy, and focused on two key areas: your edges and your scalp.
To combat flyaways and frizz along your hairline and parts, invest in a good edge control product and a soft-bristle brush (like a toothbrush dedicated to this purpose). Dampen the brush slightly with water, apply a tiny amount of edge control, and gently smooth the baby hairs and your part lines. Avoid over-applying product, as this can lead to a gunky, white residue by the end of the week.
For your scalp, a lightweight, alcohol-free moisturizing spray is your best friend. Mix a few drops of tea tree oil or lavender oil with water in a spray bottle for a DIY refreshing spritz. Lightly mist your scalp—not your braids—to soothe any itchiness and add moisture without heaviness. This step keeps your scalp healthy and comfortable, preventing the urge to scratch, which can loosen your braids.

The Wash Day Dilemma: How to Clean Braids Without Compromising Them
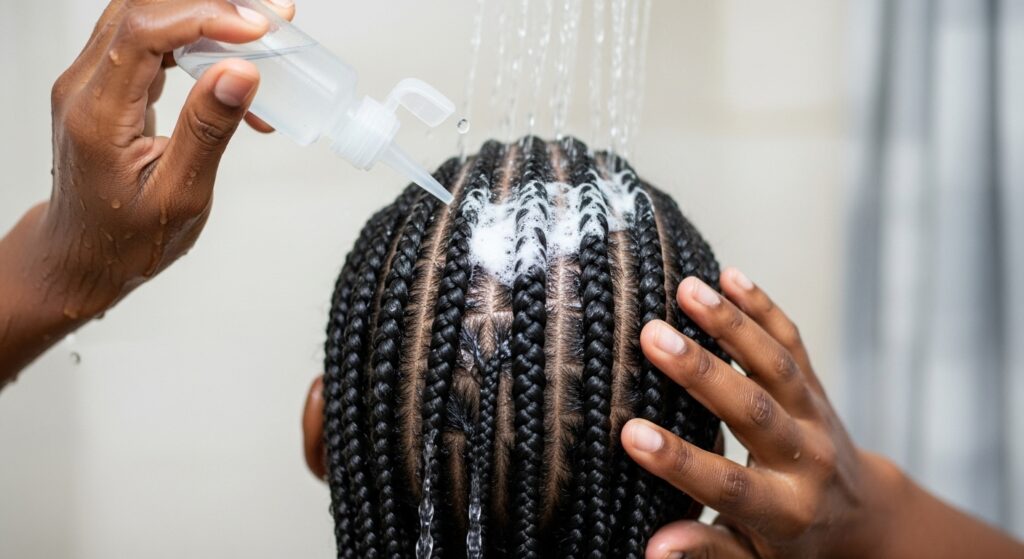
Many people believe that once you have braids, you can’t wash your hair. This is a myth that leads to itchy, uncomfortable scalps and can even hinder hair growth. You can and should wash your braided hair, but you must do it strategically.
Focus the cleanse entirely on your scalp. Dilute your shampoo with water in an applicator bottle to ensure it gets directly to the roots without saturating the length of your braids. Gently massage your scalp with the pads of your fingers (not your nails) to lift dirt and oil. When rinsing, tip your head back and let the water flow down your braids, carrying the shampoo suds with it. Avoid aggressively rubbing the braids themselves.
Conditioning requires even more caution. Apply a lightweight, leave-in conditioner only to your scalp and the very first inch of your braids if needed. Do not apply heavy cream conditioners to the length of the braids, as this will be nearly impossible to rinse out and will lead to major buildup. The goal is a clean, hydrated scalp, not conditioned braids.
After washing, gently squeeze excess water from your braids with a microfiber towel. Do not wring or rub. Then, allow your hair to air dry completely. Going to bed with damp braids is a recipe for mildew and a musty smell—definitely not fresh!
What to Absolutely Avoid: The Enemies of Long-Lasting Braids
Knowing what not to do is just as important as knowing the right steps. Certain habits will undo all your hard work in a flash.
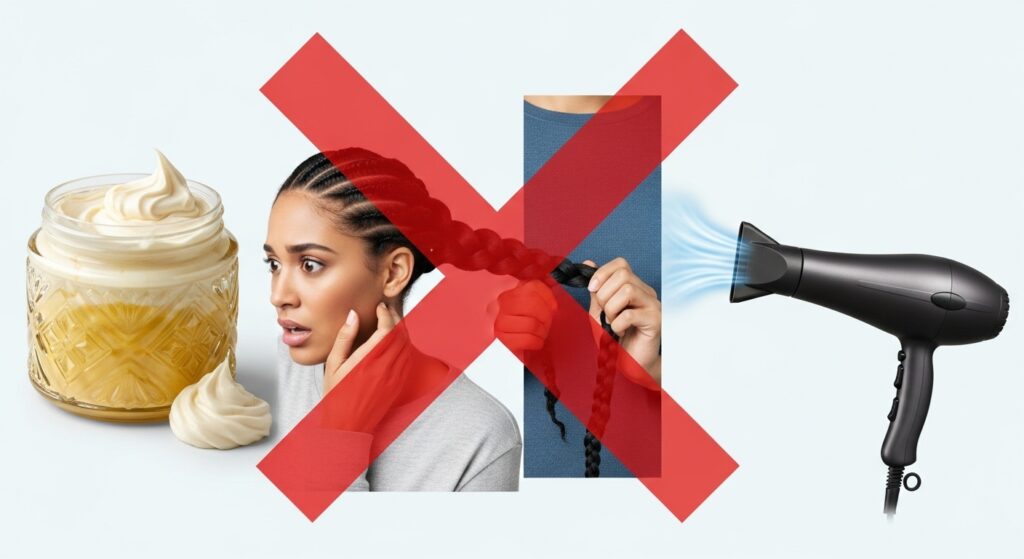
Avoid Heavy Oils and Creams: Putting heavy products like coconut oil, shea butter, or thick creams on your braids or scalp will attract dirt and dust, making your hair look greasy and feel heavy very quickly.
Don’t Play With Your Braids: Constantly fidgeting, twisting, or pulling on your braids loosens them from the root and creates frizz. Keep your hands out of your hair as much as possible.
Say No to High-Impact Exercise Without Protection: While you can still be active, intense workouts that cause heavy sweating require immediate attention. If you sweat a lot, gently rinse your scalp with water alone and allow it to dry fully to prevent itchiness.
Avoid Excessive Heat: Blow-drying your braids on high heat can cause frizz and damage. Always opt for air drying. Also, be mindful of the sun; prolonged exposure can dry out and fade your hair color if it’s dyed.
The Final Secret: Knowing When It’s Time to Let Go
No hairstyle, no matter how well-maintained, is meant to last forever. Part of the secret to always having fresh-looking braids is knowing the optimal time to take them out. Keeping braids in for too long can lead to matting, tangling, and even breakage.
A good rule of thumb is to keep most braided styles for no longer than 6 to 8 weeks. Pay attention to your hair. If you notice significant new growth at the roots (making the braids look puffy), an overwhelming amount of frizz you can no longer control, or an unpleasant odor despite washing, it’s time.
When you do take them down, be patient. Use a generous amount of conditioner or a dedicated take-down spray to help loosen any knots and gently unravel each braid with your fingers. This careful dismantling ensures your natural hair remains healthy and strong, ready for its next beautiful style—braided or otherwise.

Embrace a Week of Effortless, Retro Style
The secret to keeping your retro braids fresh all week isn’t a single, elusive trick. It’s a holistic approach that combines a perfect start, diligent overnight protection, a smart daily refresh, and a careful cleansing routine. It’s about being proactive rather than reactive.
By integrating these simple yet powerful steps into your regimen, you can finally break the cycle of frustration. You can confidently rock your braids day after day, knowing they look as stunning on Friday as they did on Monday. So go ahead, embrace that beautiful, timeless style. With these secrets in your arsenal, you’re not just wearing braids—you’re mastering them.