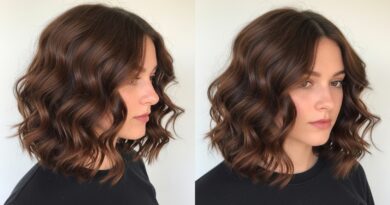
Easily 19 No Pin Victory Waves Curled Fingers Only
Okay, let’s be real for a second. You know those gorgeous, swooping victory rolls and vintage waves you see on Pinterest? The ones that look like they took a hot curling iron and a million bobby pins? I have a secret for you. You can get that same look with zero heat and literally zero pins. Just your two fingers.
I’m talking about the magic of finger waves. And before you think it’s too complicated or too 1920s, let me show you how to do a modern, soft version that works for everything from a coffee date to a wedding. It’s the easiest, most low-effort way to look polished without even trying. Ready to ditch the heat and look effortlessly chic? Let’s get those fingers wet.
What You Need to Start

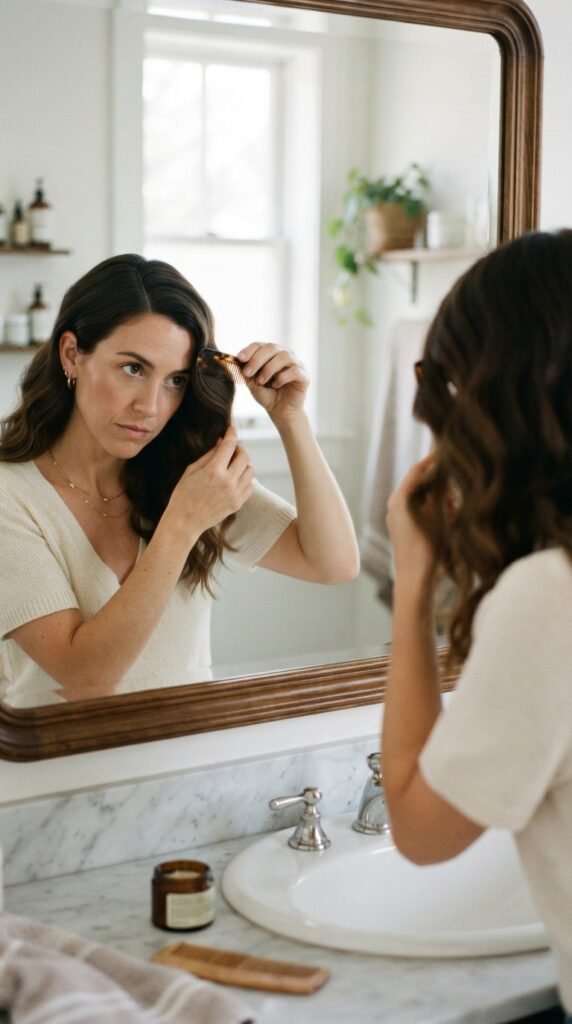
First things first, you need almost nothing. Grab a spray bottle filled with warm water, a wide-tooth comb, and your two index fingers. That’s it. No gel, no mousse, no clips. I like to do this on damp hair that’s about 80% dry. If your hair is dry, just spritz it until it’s slightly damp. You want it pliable, not dripping.
Start with clean, brushed hair. Part it wherever you like—center, deep side, or even a zigzag for a little drama. The key here is to work in small sections. Don’t try to do your whole head at once. Patience is your best friend, I promise.
The Basic Two-Finger Wave Technique
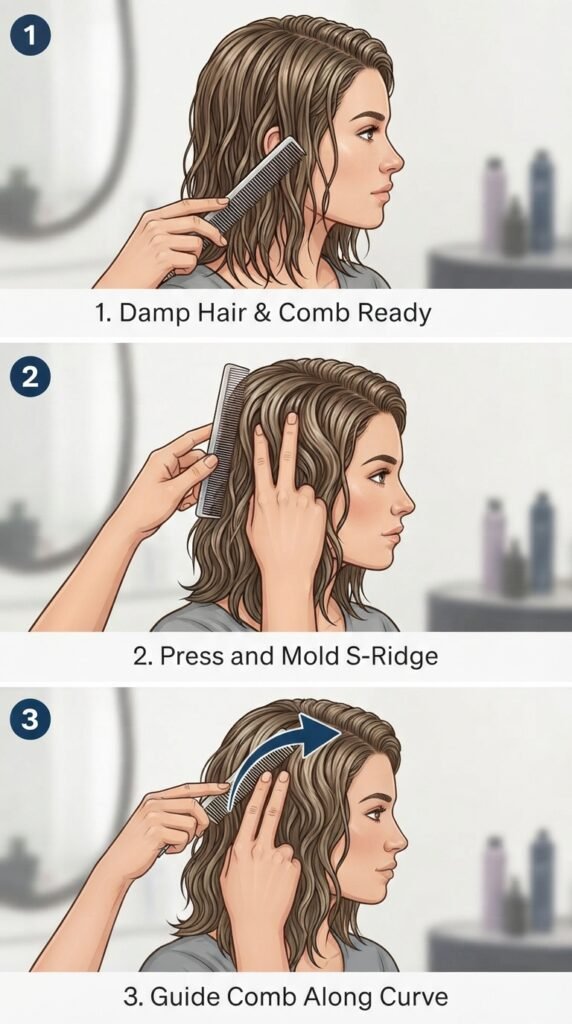
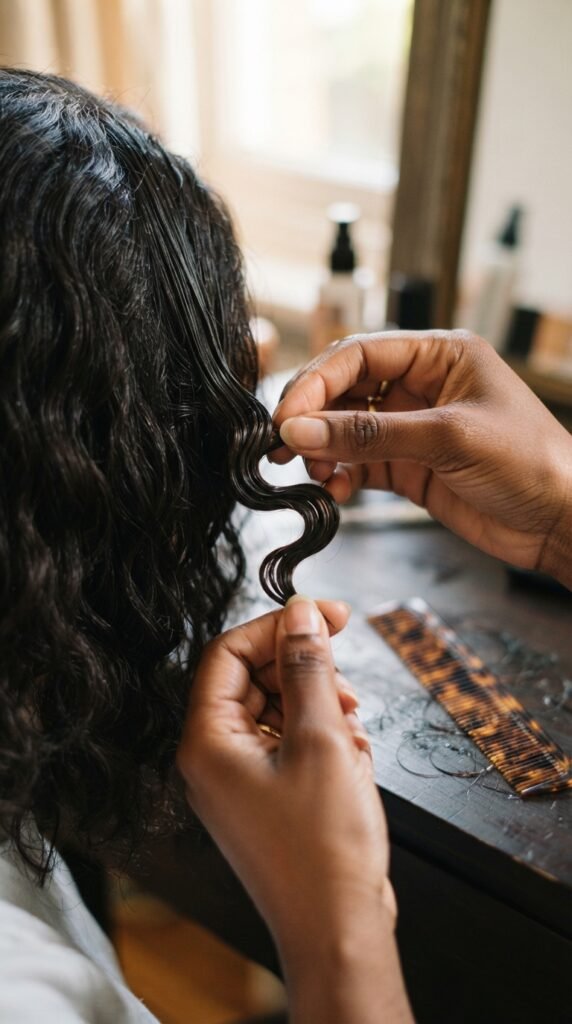
Here’s the magic trick. Take your index and middle fingers together (like a peace sign, but close together). Press them firmly against your scalp, right at your hairline. Now, slide them down about an inch, creating an “S” shape with your hair between your fingers. Use the comb to gently smooth the hair into that curve.
Hold the shape for about 10 seconds. The hair should hold the wave on its own as it dries. If it doesn’t, your hair might be too dry. Give it another spritz. You will get the hang of it after two or three waves. It’s like molding clay, but way less messy.
Why No Pins? (The Freedom Factor)
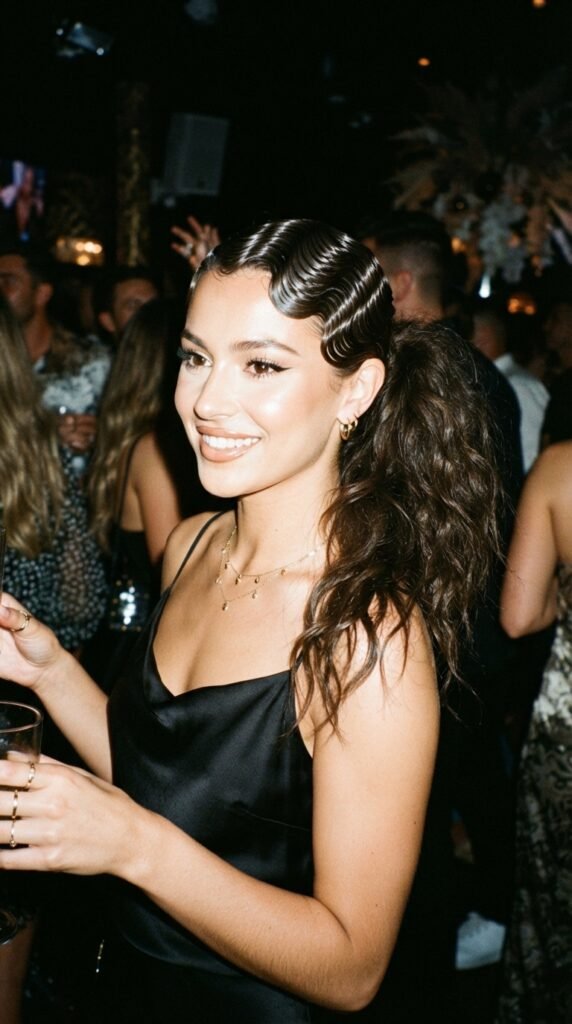
Let’s talk about why this is a game-changer. No pins means no dents, no headache from sleeping on a metal clip, and no panic when you pull your hair back and see a weird crimp. It’s pure, soft movement. This is exactly the vibe of the quiet luxury bob trend for 2026. It’s polished but looks like you just woke up with perfect hair.
Plus, it’s a total lifesaver for second-day hair. Spray the ends, re-wave them, and your hair looks fresh again. It’s the most practical skill I’ve ever learned, and it takes less than five minutes once you practice.
Perfecting Your First S-Curve
Start at your temple. Take a one-inch section of hair. Press your two fingers flat against your scalp at the root. Then, using your other hand, run the comb over the hair, following the shape of your fingers. The hair will naturally bend into a soft “S”.
Hold it for a count of ten. Release gently. Don’t pull your fingers straight out; lift them straight up so you don’t mess up the wave. Repeat this moving down the section. Each wave should sit next to the other, like a row of gentle hills. It’s rhythmic and honestly very relaxing.
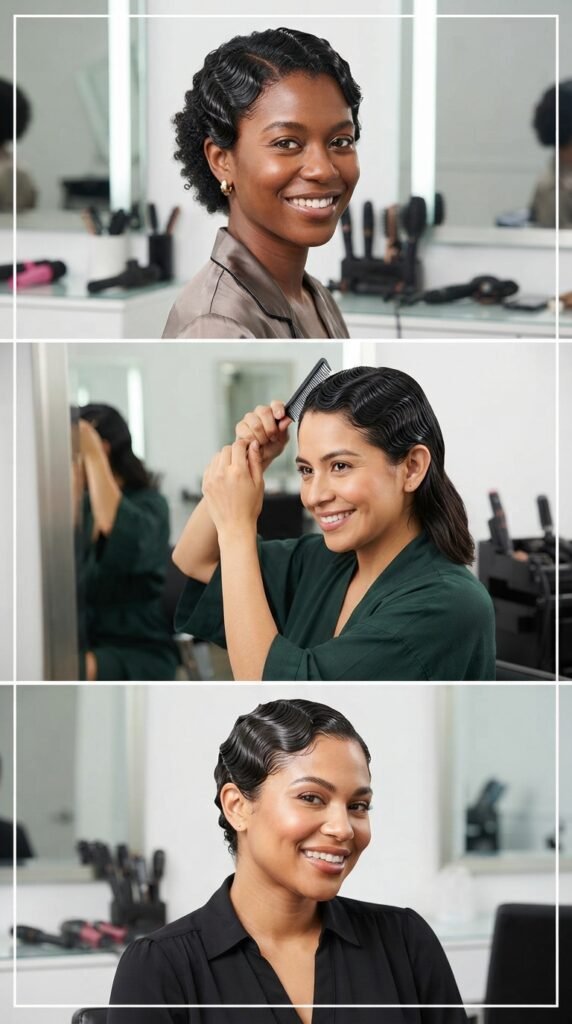
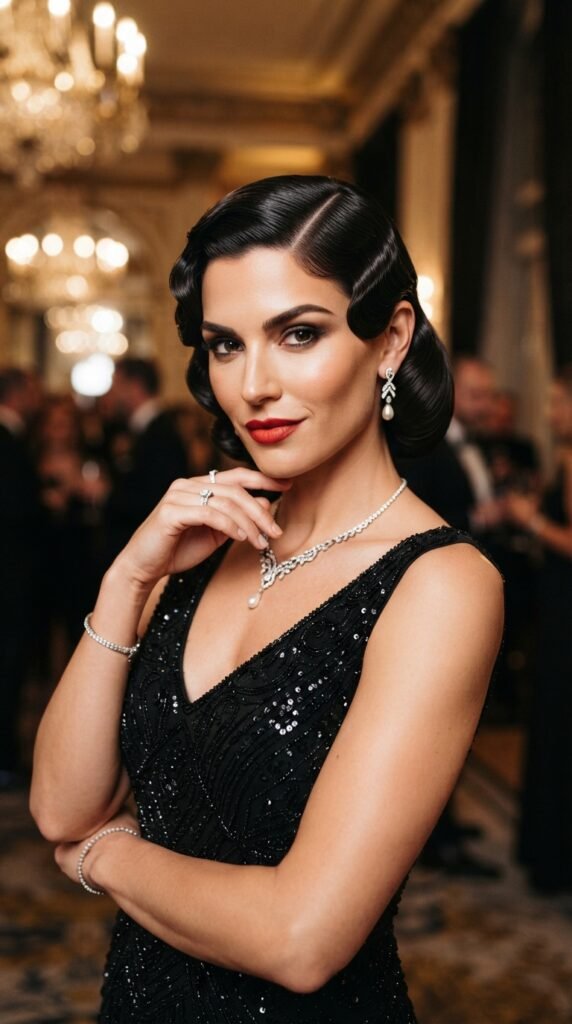
How to Get the “Old Money” Wave Pattern
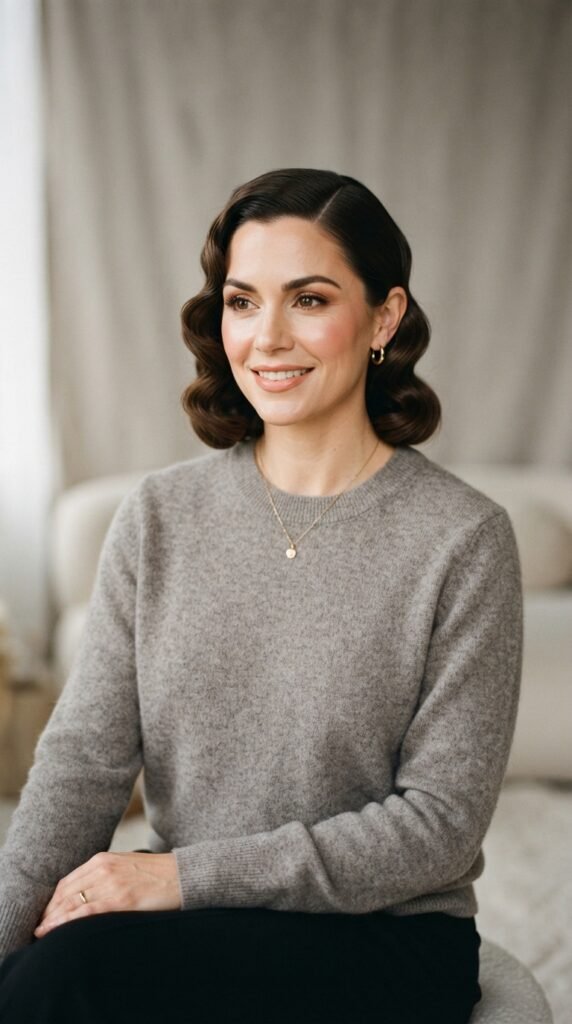
The old money hair look is all about structure that looks effortless. To nail this, keep your waves uniform. Don’t make them too big or too tight. Think of a gentle, rolling landscape. The deep side part is your best friend here. It adds instant sophistication.
Use your comb to keep the hair perfectly smooth. You want the wave to be the star, not flyaways. A tiny dab of hair oil on your fingertips can tame any frizz. This style pairs beautifully with a classic silk blouse or a simple gold necklace. It’s elegant without trying hard.
Adding Volume for an Asymmetrical Lob
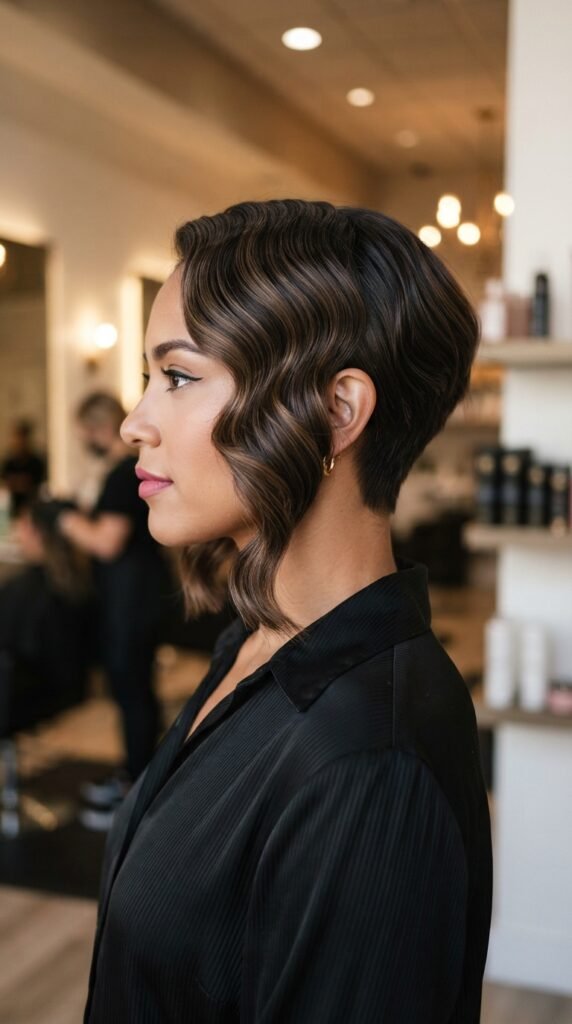
If you have an asymmetrical lob, finger waves are your secret weapon. The shorter back is perfect for tight, neat waves, while the longer front can handle bigger, more relaxed curves. It creates a beautiful contrast. Focus the volume on the longer side.
To add volume, lift the wave slightly at the root as you form it. Don’t press your fingers down too hard. You want a little bubble of height at the crown. This keeps the asymmetrical cut looking modern and fresh, not flat. It’s a very 2026 way to style a classic cut.
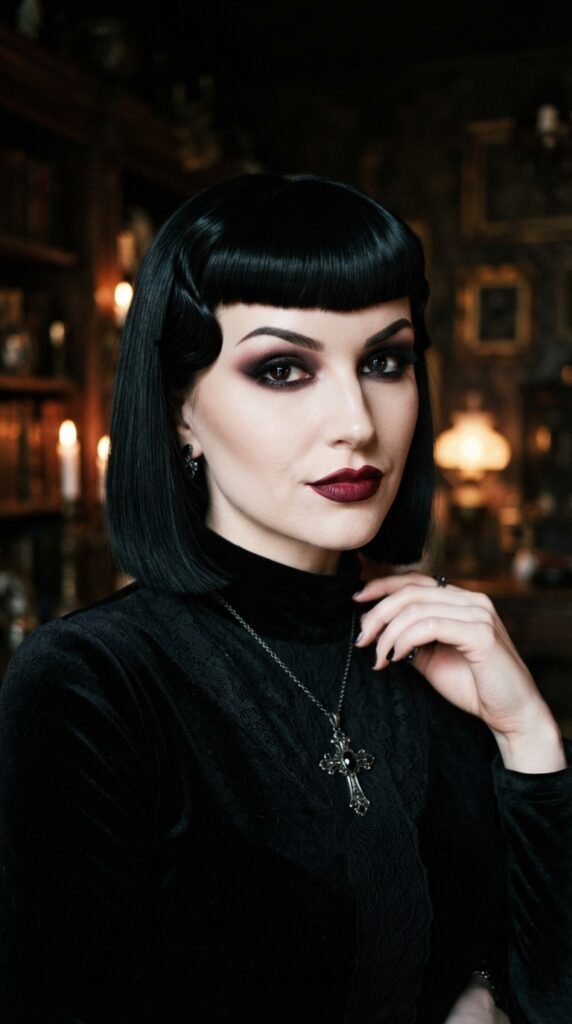
The “Romantic Goth” Variation
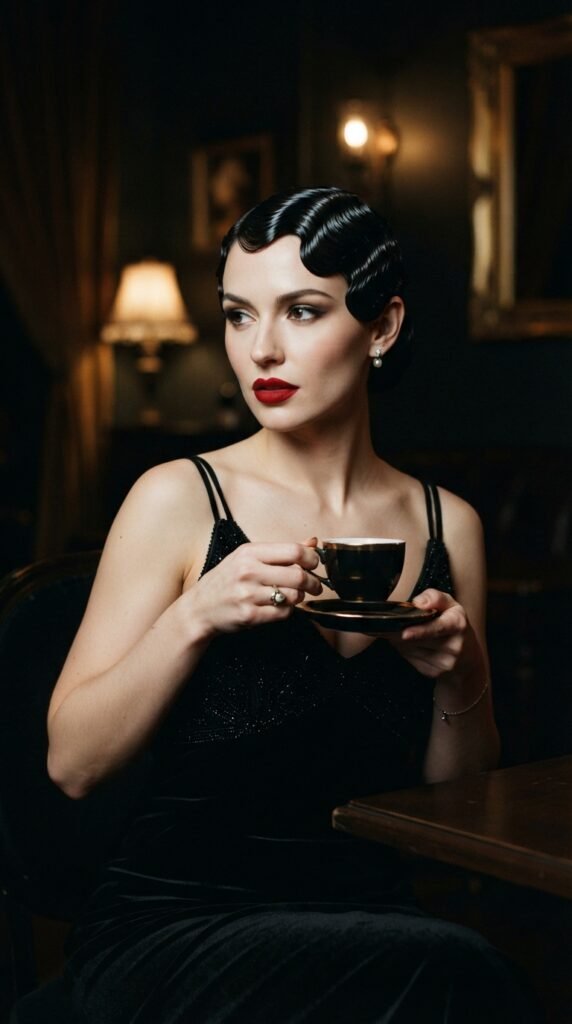
For my friends who love a darker aesthetic, this is your call. The romantic goth hairstyles trend is huge for 2026. Finger waves are perfect for it. Use a bit of extra water to get a super glossy, almost wet look. Make your waves very defined and tight. Think classic 1920s meets modern edge.
Pair it with a dark lip and a velvet top. The contrast between the rigid waves and the soft fabric is stunning. You can also let a few strands out around your face for a softer, more romantic feel. It’s spooky chic without being costume-y.
How to Get “Glitchy Glam” Texture
Okay, this one is wild. Glitchy glam hair is all about mixing textures. Do traditional finger waves on the top half of your head, right around the crown. Then, leave the bottom half completely loose and wavy. The contrast between the sleek, structured top and the messy bottom is pure art.
It looks like you have two hairstyles in one. It’s perfect for a night out or a festival. To get the “glitch,” don’t make the waves perfect. Let one be slightly crooked. It adds character and screams confidence. Trust me, everyone will ask how you did it.
The Vampire Haircut Connection
Ever heard of the vampire haircut? It’s a blunt, sharp bob, often with heavy bangs. Finger waves pair with this like bread and butter. Imagine taking those blunt bangs and waving them to the side with your two fingers. It softens the bluntness but keeps the sharp edge.
It’s a very quiet luxury bob vibe if you keep the color natural. If you want drama, go for a jet-black or deep burgundy. The wave on the bangs draws the eye to your cheekbones. It’s a silhouette that is both powerful and delicate. Perfect for a modern muse.
Mastering the Hime Cut Waves

The hime cut is trending hard, and it loves finger waves. The key is to only wave the long side pieces, not the blunt bangs. Leave the bangs straight and smooth. Take the side pieces (the “hime” sections) and wave them gently from the mid-lengths to the ends.
This creates a beautiful, layered look. It’s modern and a little edgy, but the wave softens the severe lines of the cut. It’s a great way to update a classic Japanese-inspired hairstyle without losing its iconic shape. Try it with a bow for an ultra-feminine finish.
Curled Fingers for Short Hair (Bobs & Pixies)
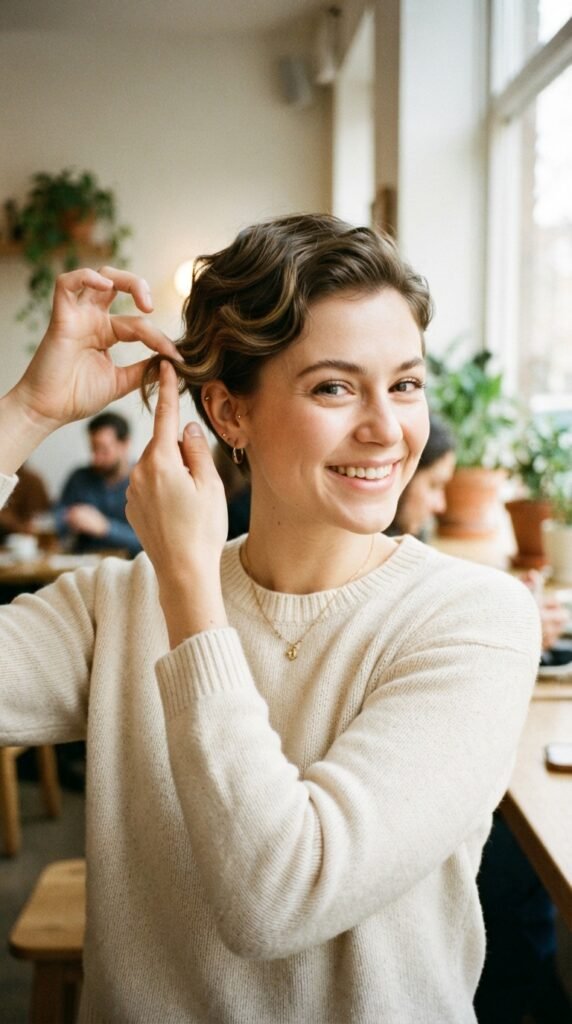
Short hair loves this trick too. If you have a bob or a pixie, you can’t use curling irons easily. Your fingers are the perfect tool. Work with one-inch sections. For a bob, focus on the ends to create a soft flip outwards or inwards.
For a pixie, use your fingers to create a wave that pushes hair away from your face. It adds so much movement to short cuts. It’s also perfect for growing out a pixie, because it helps blend the layers together. It’s the ultimate low-maintenance styling hack for short hair.
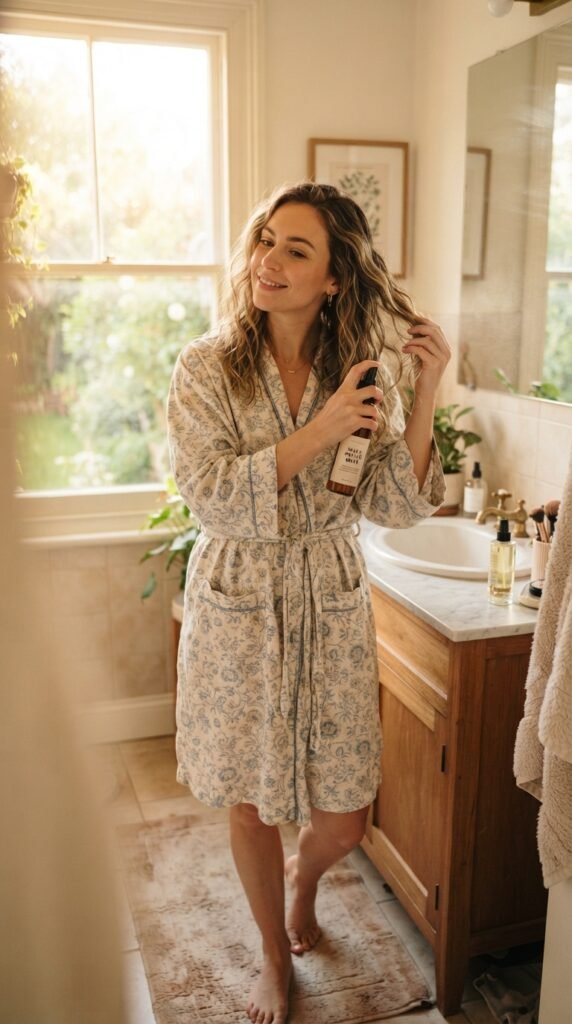
Making Waves Last All Day (No Hairspray Hack)
Here’s a secret to longevity. Don’t touch your hair while it dries. The waves set as the water evaporates. If you must go out, wear a loose headscarf to protect them from wind. When you take it off, the waves will be perfectly in place.
If you feel like they need a little hold, put a tiny drop of argan oil on your hands and smooth it over the waves. It adds shine without stiffness. They’ll last through work, dinner, and even a windy walk. It’s truly a heat-free miracle.
Common Mistakes (And How to Avoid Them)
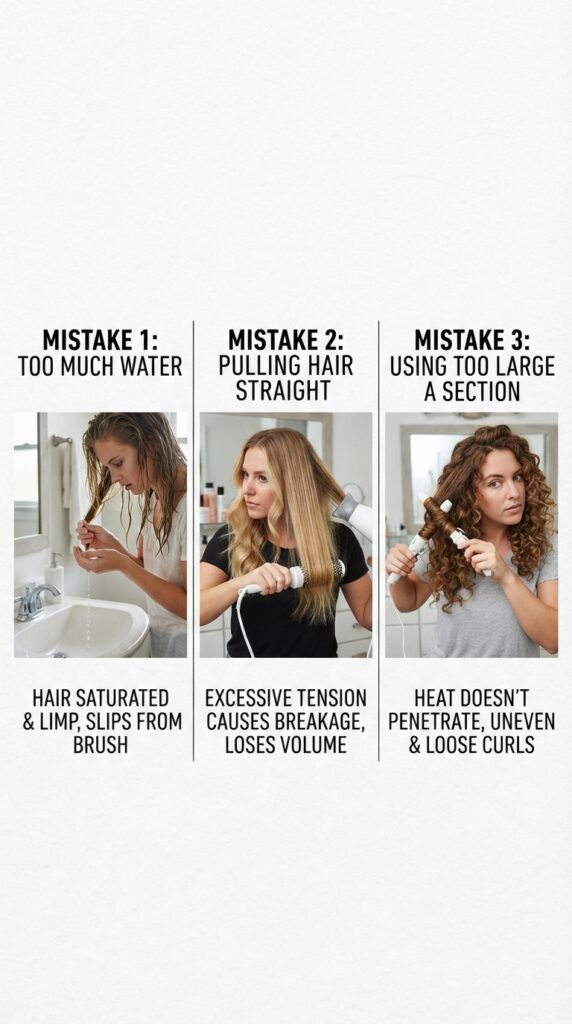
Don’t drown your hair. Too much water makes the waves limp. You want damp, not soaked. Also, don’t pull your fingers straight down the hair. You need to push them into the scalp to create the S-curve.
Another big mistake is taking too large a section. Keep sections one inch wide. If your hair is thick, go even smaller. And be gentle! Rough handling will break the wave. Treat your hair like silk. If it gets messy, just re-wet the section and start over. No big deal.
Finger Waves for Different Hair Textures
This works on straight, wavy, and even slightly curly hair. If you have naturally curly or coily hair, you will get a different texture. The wave will be more textured and voluminous, which is gorgeous. Just use a bit more water and a heavier comb.
For fine, straight hair, the waves will be very sleek and defined. You might need to hold each wave a bit longer (15 seconds). For thick hair, work in very small sections. The beauty is that every texture creates a unique, personal wave pattern. There is no wrong way.
Quick Routine for Busy Mornings
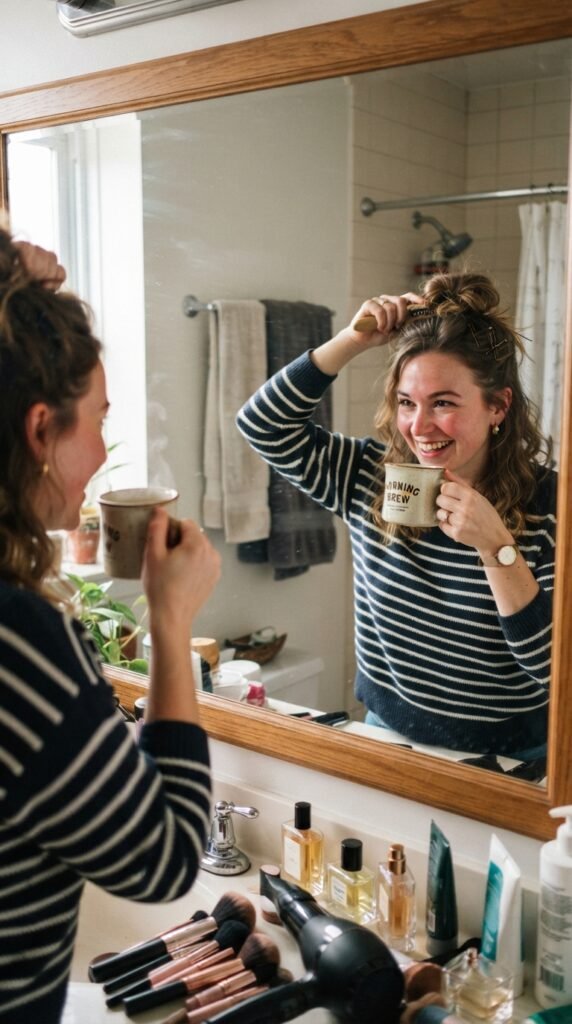
I do this in five minutes. I wake up, spritz my hair, part it, and start waving with my fingers while my coffee brews. I only wave the front sections—the parts people see. The back? I just let it be wavy or tuck it into a low bun.
It’s the ultimate shortcut. You get a polished look without the heat damage or the pin-induced headache. It’s my go-to for “I want to look put together but I am running late” days. It will become your new best habit too, I swear.
How to Dress Up Finger Waves
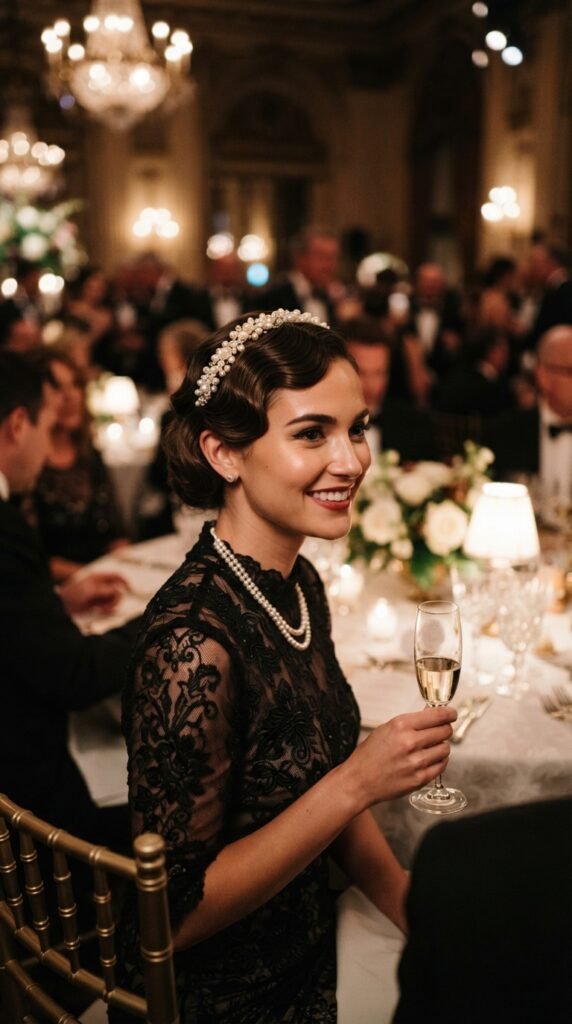
This style is a total chameleon. For a fancy event, add a sparkly headband just behind the wave line. It looks like a million bucks. Or, clip in a decorative barrette at your temple. It frames your face beautifully.
You can also pin one side back with a chic claw clip. It makes the waves look intentional and very editorial. It’s a style that goes from casual brunch to a red carpet with just one accessory change. That’s the power of a classic base.
Finger Waves with a Deep Side Part
The deep side part is the ultimate power move for finger waves. It creates instant drama and elongates your face. Start your part just above the outer corner of your eyebrow. Then, wave the larger section across your forehead, swooping it to the side.
This is the perfect technique for old money hair and quiet luxury. It’s so elegant. The rest of your hair can be waved gently or left straight. The deep side part makes even simple waves look like you spent an hour at a salon. It’s a classic red-carpet trick.
Evening Out the Waves with a Comb
Sometimes your waves can look a little messy. That’s okay. Use a fine-tooth comb to gently smooth them out. Start at the root and follow the curve of the wave. This will re-align the hairs and make the wave look cleaner.
Don’t pull the comb through forcefully. You want to coax the hair into shape. A little water on the comb helps. This is your secret for getting those perfect, pin-straight ridges without needing a curling iron. It’s a simple fix that makes a huge difference.
The “Second-Day Refresh” Routine
Day two hair is the best day for finger waves. Your hair already has some memory. Simply spritz the areas that have flattened. Use your fingers to re-form the S-curves. It takes less than 30 seconds per section.
You don’t need to re-wet your whole head. Just target the lazy waves. This refresh method is the key to making this style last for three or even four days. It’s economical and so gentle on your hair. Just spritz, shape, and go.
Why This Is Better Than a Curling Iron
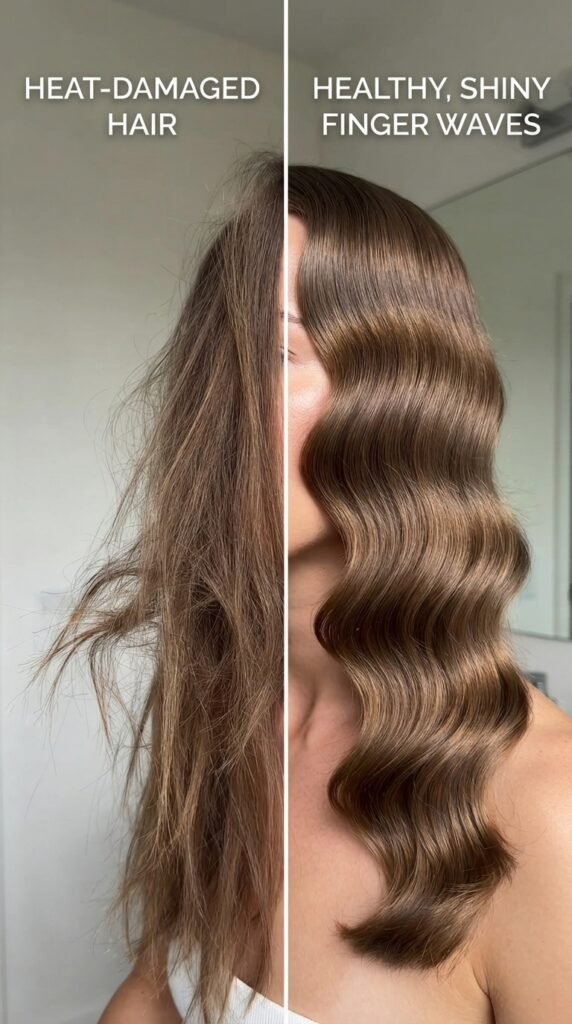
No heat at all. Zero. Zilch. Your hair stays healthy and shiny. Curling irons can fry your ends over time. Finger waves are completely risk-free. They are also faster because you don’t wait for a tool to heat up.
And they are more comfortable. No hot barrels near your neck or ears. Plus, the waves look more organic than uniform curls. They have a natural, almost liquid feel that heat just can’t replicate. Your hair will thank you so much.
The 2026 Hairstyle Status Update
This is the year of gentle, textured, human-looking hair. 2026 hairstyles are all about rejecting stiff, frozen looks. Finger waves fit perfectly into this. They are the ultimate expression of quiet luxury and effortless cool.
Whether you pair them with a vampire haircut or a hime cut, you are on trend. It’s a technique that has survived a century because it just works. It’s elegant, practical, and uniquely yours. I love that there is no algorithm for perfect hair—just your two fingers.
So, there you have it. Nineteen waves, zero pins, and a whole lot of confidence. It is honestly one of those skills that feels like a secret superpower. Once you learn it, you will find yourself using it all the time. It is the perfect blend of vintage charm and modern ease.
I hope you give it a try this week. Let your hair air dry while you sip your coffee, and see what beautiful shapes your fingers can create. It is a small act of self-care that leaves you feeling polished and put together without any effort.
Save this post to your Pinterest board so you can find it the next time you want a heat-free hair day. And please tell me in the comments—what is your go-to lazy hairstyle? I would love to know if this one becomes your new favorite.