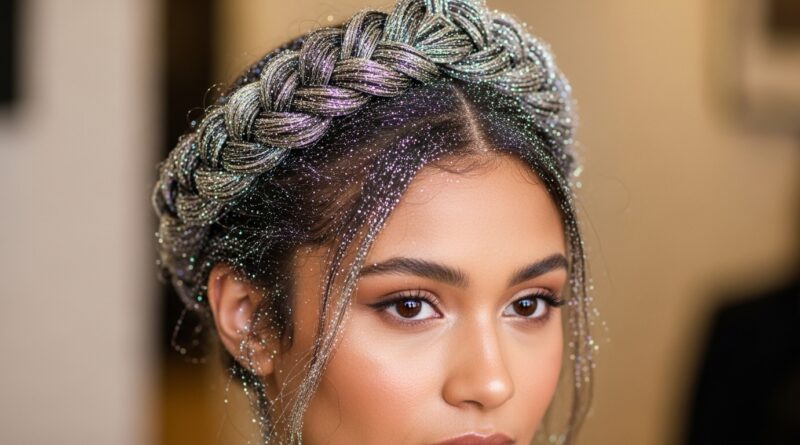
Shine 27 Pearl Dust Sprinkles Shimmering on Braided Surfaces
Okay, let’s be real. We’ve all seen those stunning, almost magical photos of braids that seem to have their own inner light. You know the ones—where it looks like someone captured moonlight woven right into the hair. I used to think that was just expert lighting and a ton of editing.
But guess what? It’s actually a super simple trick, and I’m obsessed with it. It’s called pearl dust, and it’s about to change your entire hair game, especially for special events or just when you want to feel a little extra.
This isn’t about full-on glitter (though I love that, too). This is about a soft, sophisticated shimmer that whispers “old money hair” but with a modern, ethereal twist. It works on everything from a simple three-strand braid to the most intricate styles.
Today, I’m breaking down exactly how to get that “shine 27” pearl dust effect on your braids. It’s quicker and easier than you think, and the result is pure, glitchy glam magic. Let’s get into it.
What Exactly Is Pearl Dust?
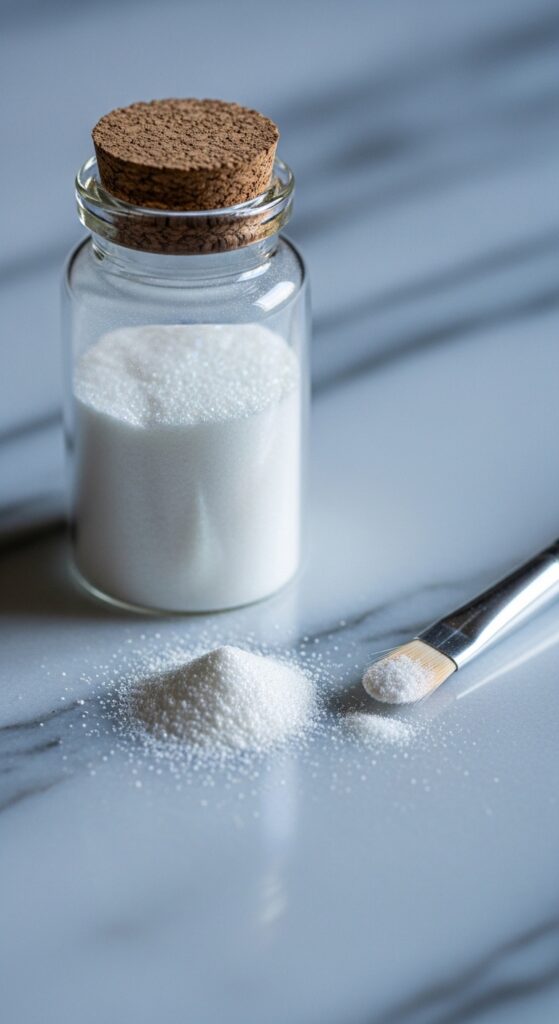
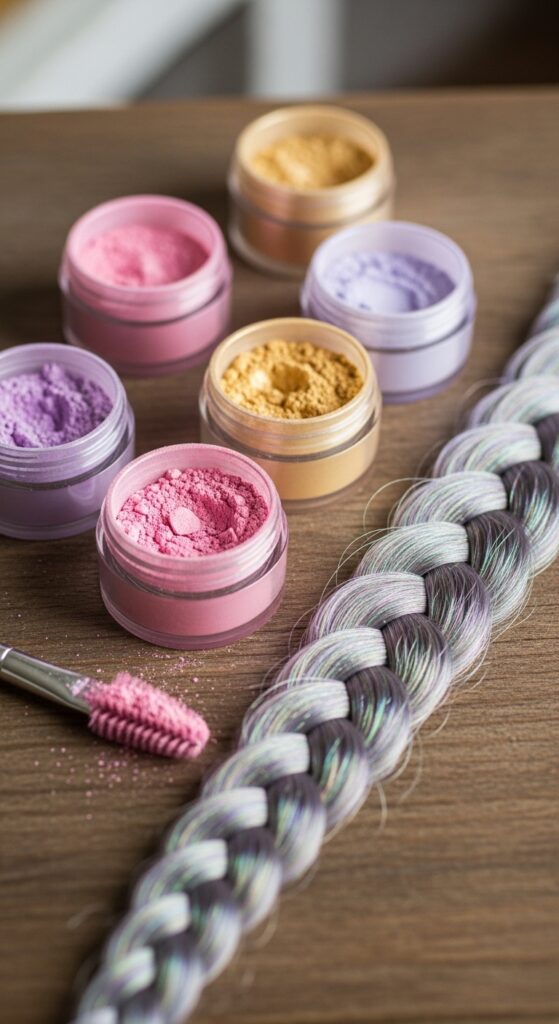
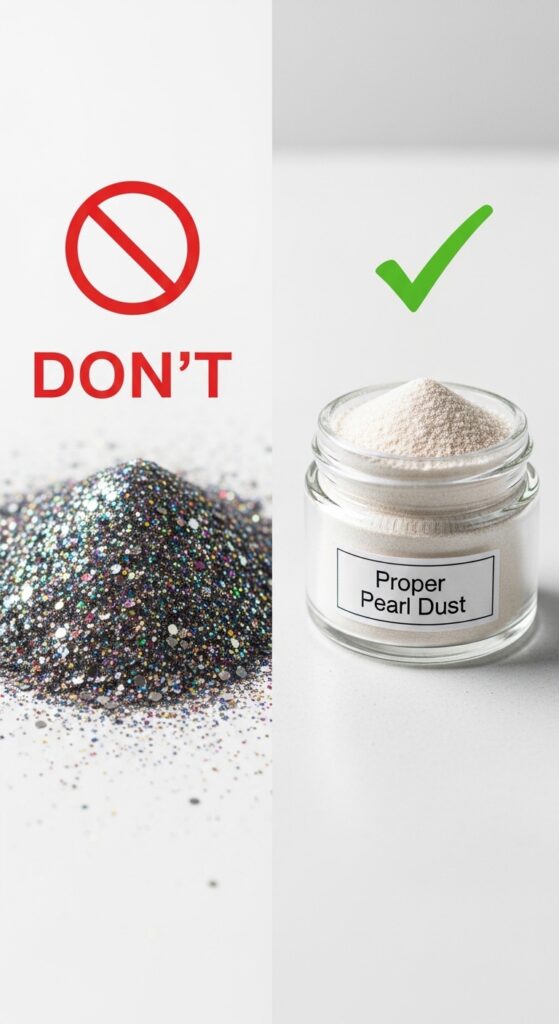
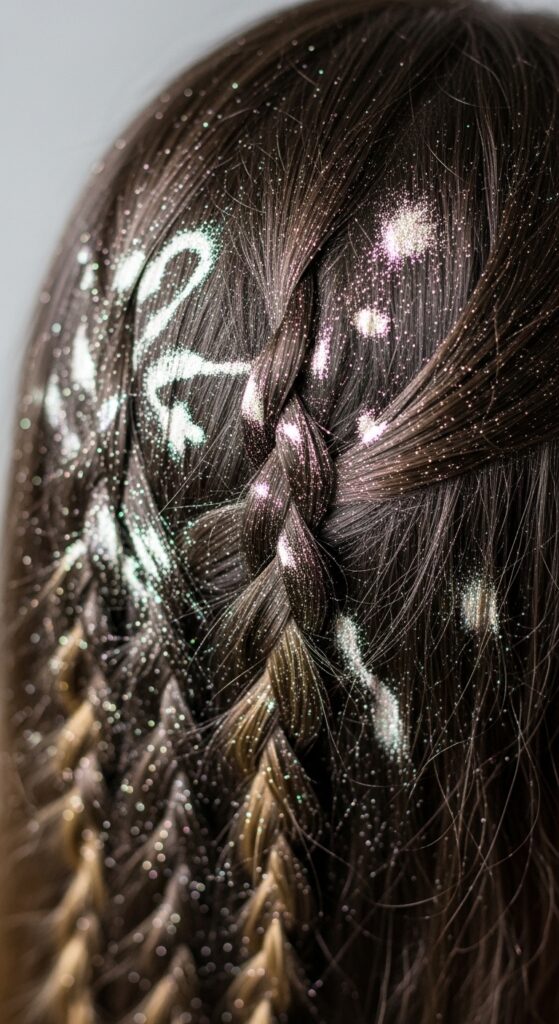
Pearl dust is a finely milled, cosmetic-grade powder. Unlike chunky glitter, it gives a soft-focus, luminous finish. Think of it as a highlighter for your hair. It catches the light in the most beautiful way, creating dimension and a subtle sparkle.
You can find it at most craft stores (look for the cosmetic-safe kind!) or online. It often comes in little jars. The key is that it’s safe for skin and hair, so you don’t have to worry about irritation.
Why It’s Perfect for Braids
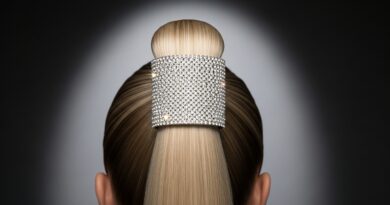
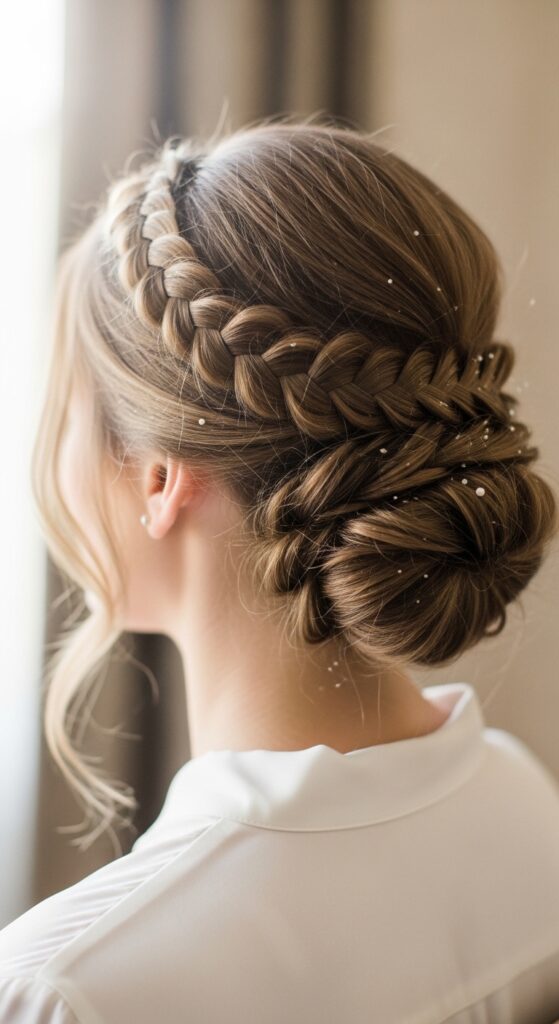
Braids have all these wonderful nooks, crannies, and textured surfaces. That texture is what grabs and holds the pearl dust, allowing the shimmer to really pop. A smooth hairstyle might let the dust slide off, but braids trap it perfectly.
This technique adds a luxurious detail that makes any braid look expensive and intentional. It’s that perfect blend of quiet luxury bob elegance and fantasy romance. It works for daytime when applied lightly, and absolutely stuns for evening.
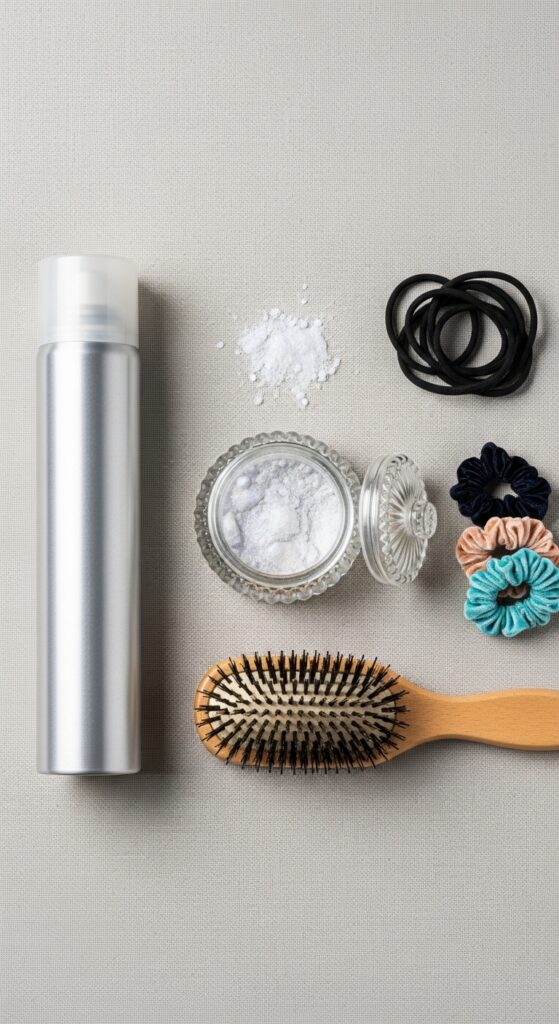
The Tools You’ll Need
Gathering your tools first makes the whole process smooth. You don’t need much! Here’s your checklist:
- Cosmetic-grade pearl dust (white or iridescent works best).
- A small, fluffy makeup brush or a clean eyeshadow brush.
- Hairspray (a light-hold or finishing spray is ideal).
- Your completed braided hairstyle.
- A towel to drape over your shoulders to catch any fallout.
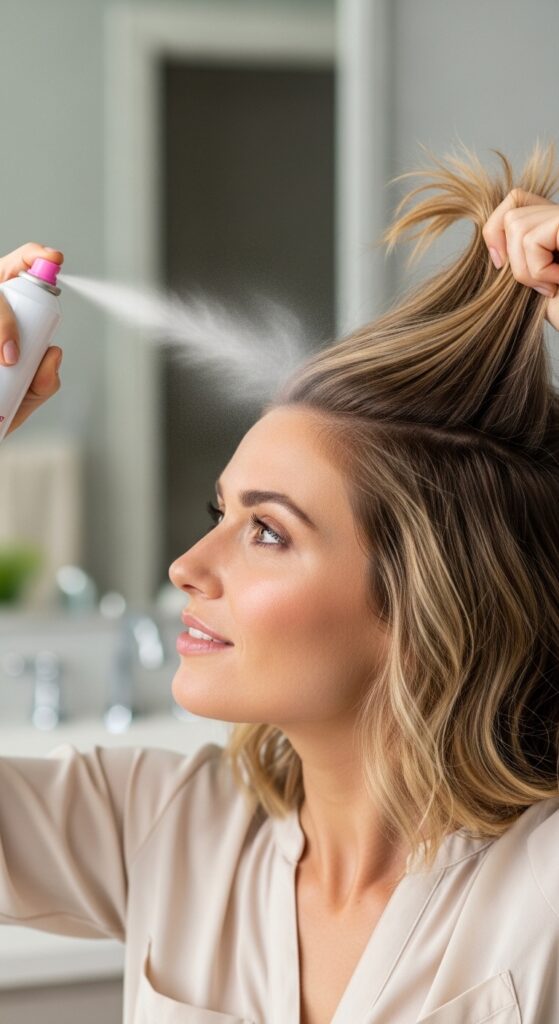
Step 1: Start with Day-Old Hair
This is my biggest tip for any great braid. Slightly dirty hair has more texture and grip. It will hold the braid better and grab the pearl dust more effectively than freshly washed, silky hair.
If you must wash your hair, spray some dry shampoo at the roots and along the lengths before braiding. This gives you that perfect, workable texture. It makes all the difference for volume and hold.
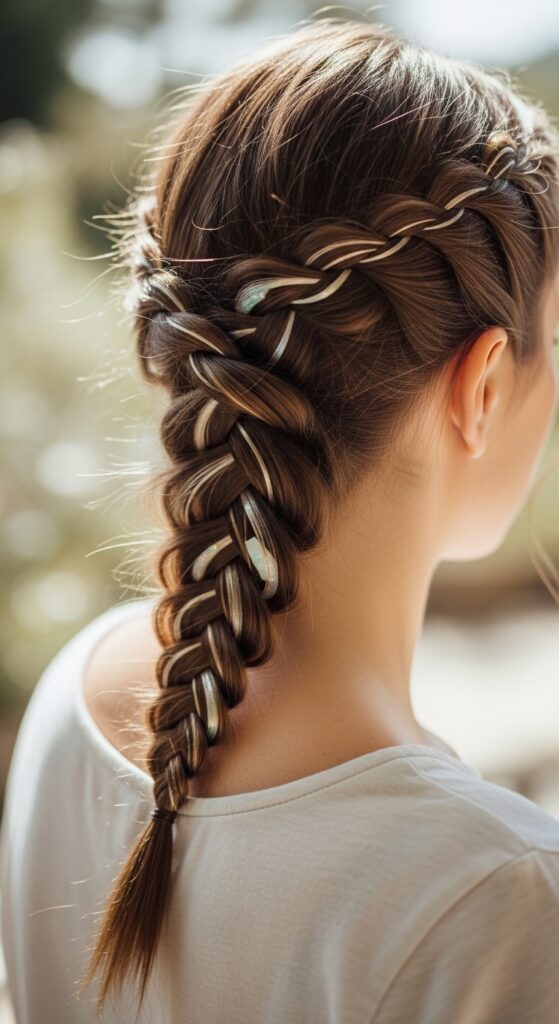
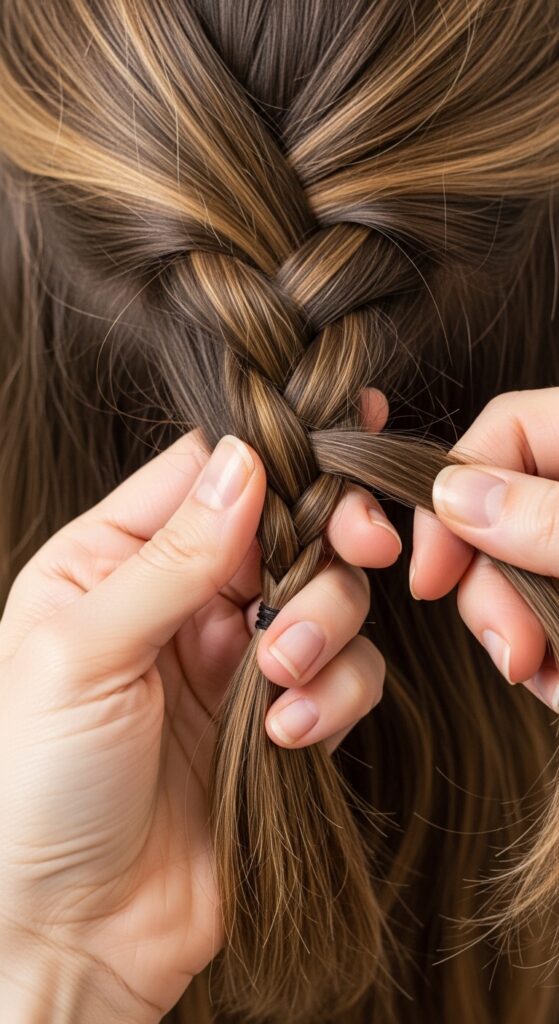
Step 2: Create Your Base Braid
You can use any braid for this! A classic three-strand, a fishtail, a Dutch braid, or even a complex halo braid. The more texture, the more shimmer it will hold. For a modern twist, try this on an asymmetrical lob styled into a side braid.
Braid your hair as you normally would, but keep it a tiny bit looser than usual. This allows you to gently pull on the sections later to pancake the braid, creating even more surface area for the dust.
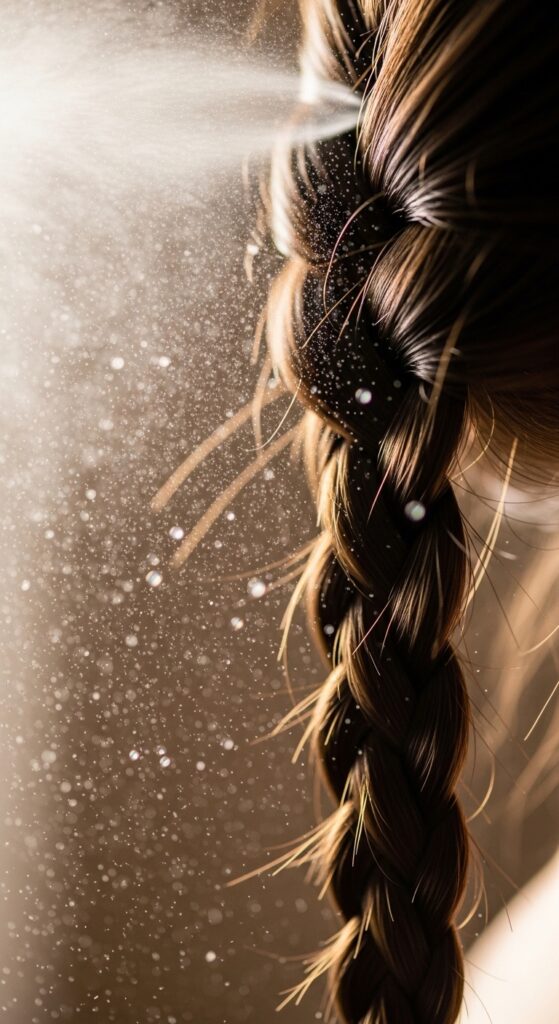
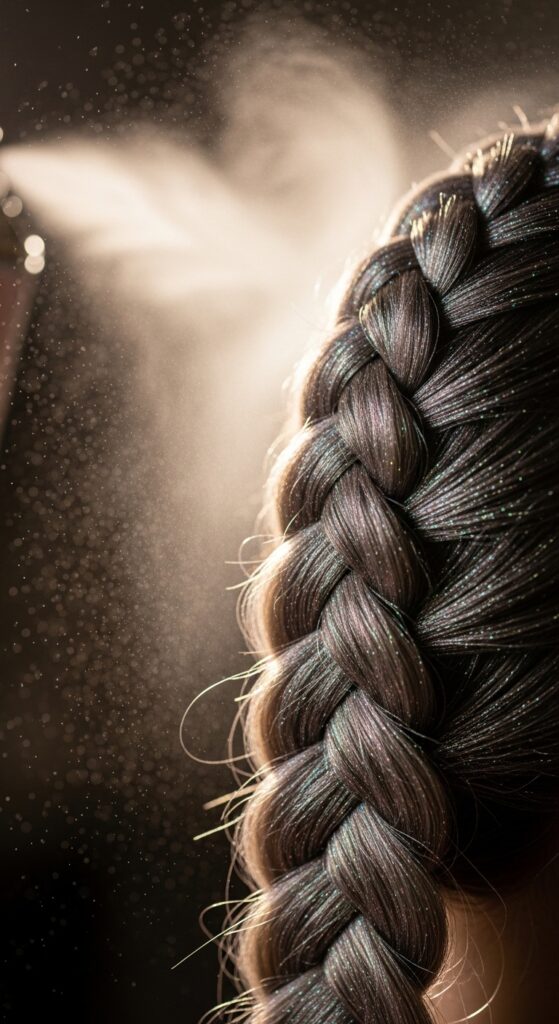
Step 3: The Light Hairspray Base
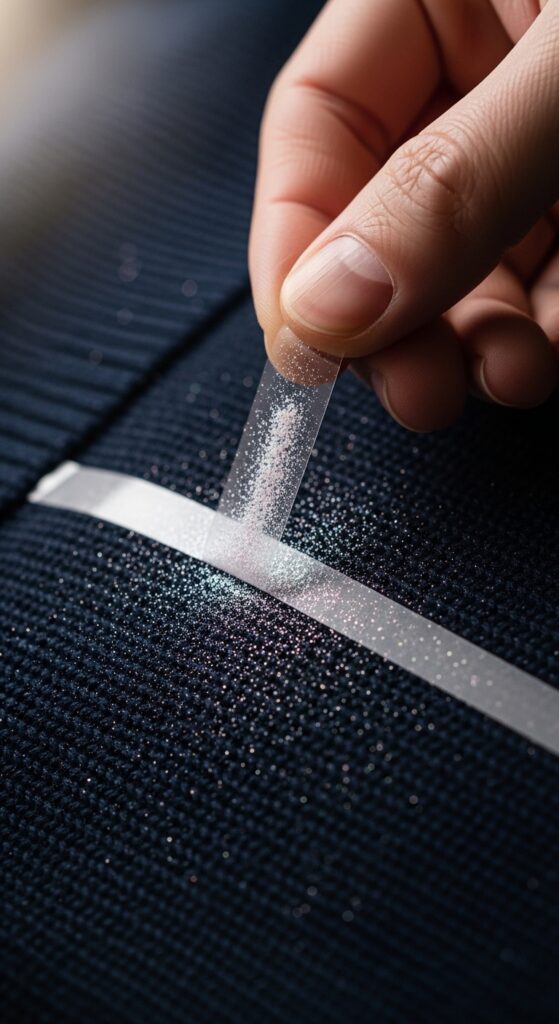
Before you apply any dust, you need a light tacky base. Hold your hairspray about 10 inches away from your braid and give it one or two very light mists. You don’t want it wet or crunchy, just slightly sticky to the touch.
This step is crucial. It acts like a primer, helping the powder adhere so it lasts all night and doesn’t just fall off onto your clothes. Think of it as double-sided tape for your shimmer.
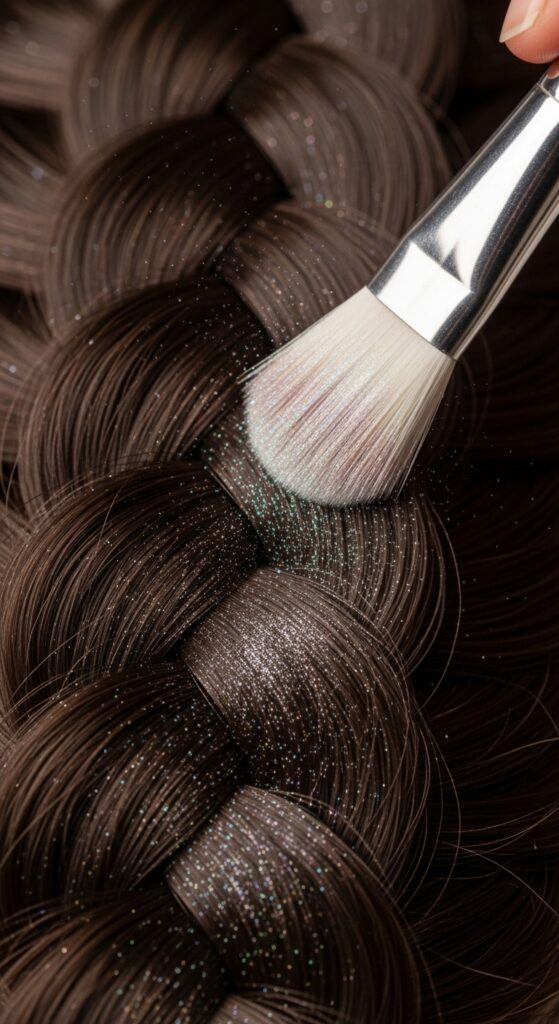
Step 4: Applying the Pearl Dust
Dip your fluffy brush lightly into the pearl dust. Tap off the excess. Gently sweep and press the brush onto the raised, outer surfaces of your braid. Focus on the areas that would naturally catch the light.
Use a pressing or stippling motion rather than a sweeping motion. This presses the powder into the hairspray base and into the crevices of the braid. Build the intensity slowly—you can always add more.
Step 5: Building Intensity
Want more drama? Repeat the process. Apply another very light mist of hairspray over the first layer of dust. Let it get tacky for a second, then press on another layer of pearl dust.
This layering technique creates a more opaque, shimmery effect. It’s perfect for those romantic goth hairstyles or vampire haircut vibes, where you want a stark, ethereal contrast against darker hair.
Step 6: The Final Seal
Once you’re happy with the level of shimmer, it’s time to lock it in. Hold your hairspray a full 12 inches away and give one final, ultra-fine mist over the entire braid.
This final seal sets everything without disturbing the powder or making it look clumpy. It ensures your “shine 27” sparkle lasts from the first photo to the last dance.
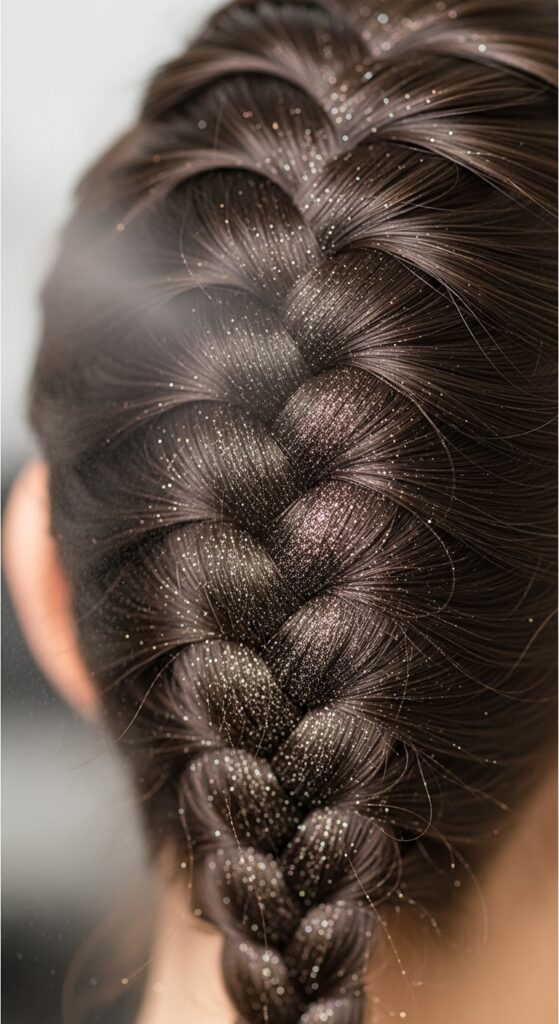
Best Braid Styles for Maximum Shimmer
Some braids are just made for this. Fishtail braids have incredible texture. Dutch braids have a beautiful, raised 3D effect. A simple milkmaid or crown braid offers a gorgeous, continuous surface to highlight.
For a trend-forward look, try it on face-framing braids with a hime cut. The contrast between the sharp cut and soft shimmer is everything. It’s a definite contender for top 2026 hairstyles.

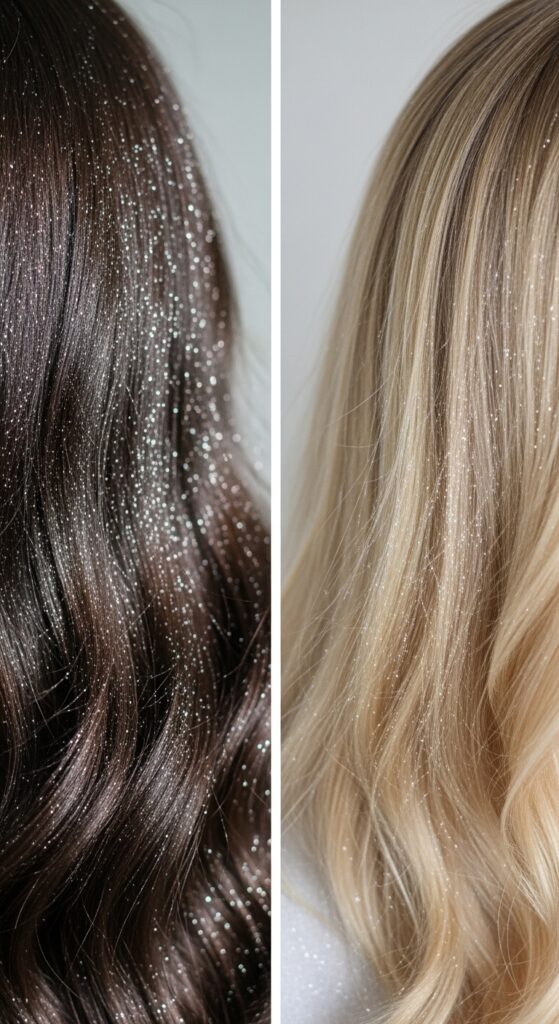
Color Magic: Dark Hair vs. Light Hair
The effect looks different but equally stunning on all hair colors. On dark brunette or black hair, the pearl dust creates a stunning moonlit, silvery contrast. It’s very romantic goth.
On blonde or light brown hair, it creates a more subtle, ethereal glow. It enhances the natural highlights and looks like your hair is just naturally luminous. Both are breathtaking.
Adding Color to Your Shimmer
Pearl dust often comes in other colors too! A pale gold can look sun-kissed and warm. A soft pink or lavender can add a fairy-like, whimsical touch to your look.
You can even mix colors. Try using a white pearl dust on most of the braid, then accent just a few sections with a hint of blue or pink for a true glitchy glam hair moment.
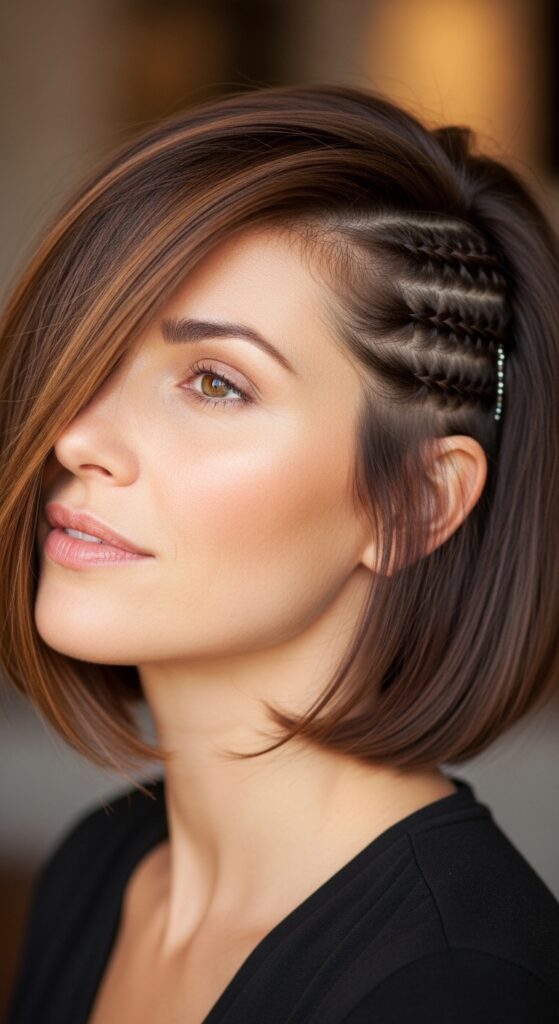
For Short Hair & Bobs
Yes, you can do this on short hair! If you have a quiet luxury bob or a sharp lob, create a small, accent braid along your part or behind your ear. Even a tiny, pearl-dusted braid makes a huge statement.
It’s a beautiful way to add a detail that feels luxurious and personal. It proves that shimmer isn’t just for long, flowing locks.
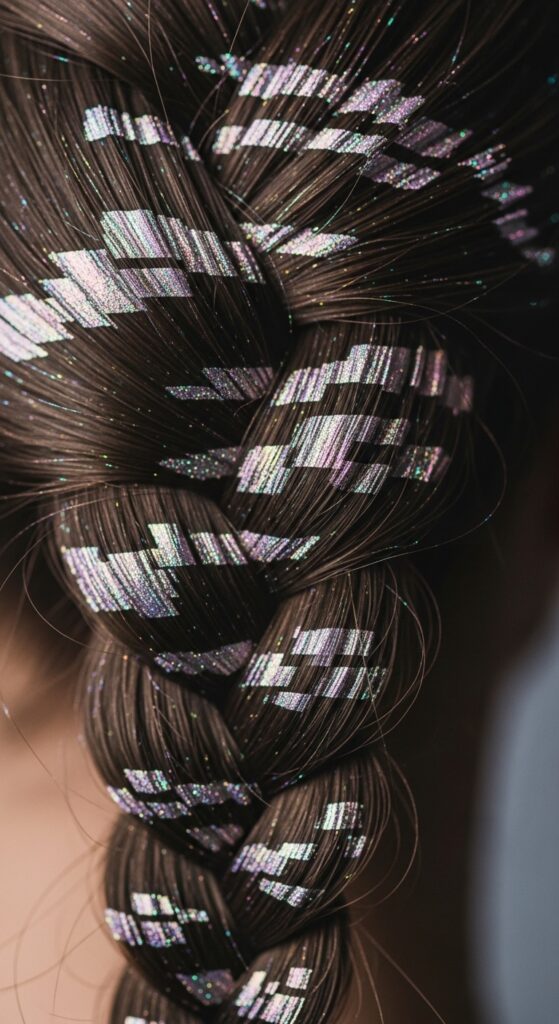
Creating a “Glitchy Glam” Effect
Glitchy glam hair is all about intentional, beautiful disruption. Use pearl dust to create this! Instead of dusting the whole braid, only apply it to every other section, or just on the little hairs that pull out deliberately.
You can also apply it heavily in one spot and lightly in another, creating a digital, pixelated effect of light. It’s unexpected and super cool.
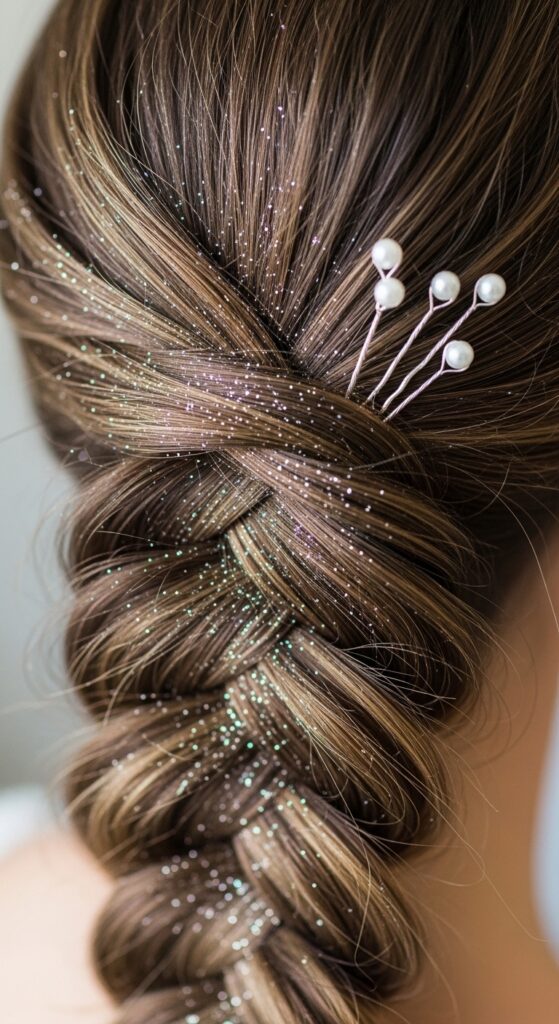
Pairing with Accessories
Pearl dust pairs beautifully with hair accessories. Think delicate pearl pins, thin metallic chains, or simple silk scarfs. The key is not to overpower the shimmer.
Slide a few pearl-ended pins into the braid near the shimmer. The pearls will reflect the dust, and the whole look will feel cohesive and incredibly elegant.
For a Wedding or Formal Event
This is the ultimate wedding guest or bridal hairstyle hack. It photographs like an absolute dream. For a bride, it’s a beautiful alternative to a veil or tiara, offering a subtle, magical glow.
Pair a pearl-dusted updo with simple diamond or pearl earrings. It’s the epitome of timeless, romantic beauty that still feels fresh and modern.
Everyday Subtle Version
You don’t need a special event to wear this! For daytime, use a tiny, tiny amount of dust on just the front pieces of a simple braid. Or, only dust the very end of your braid for a hint of sparkle.
It’s like a secret just for you (and anyone who happens to catch the light just right). It lifts a simple ponytail or braid into something special.

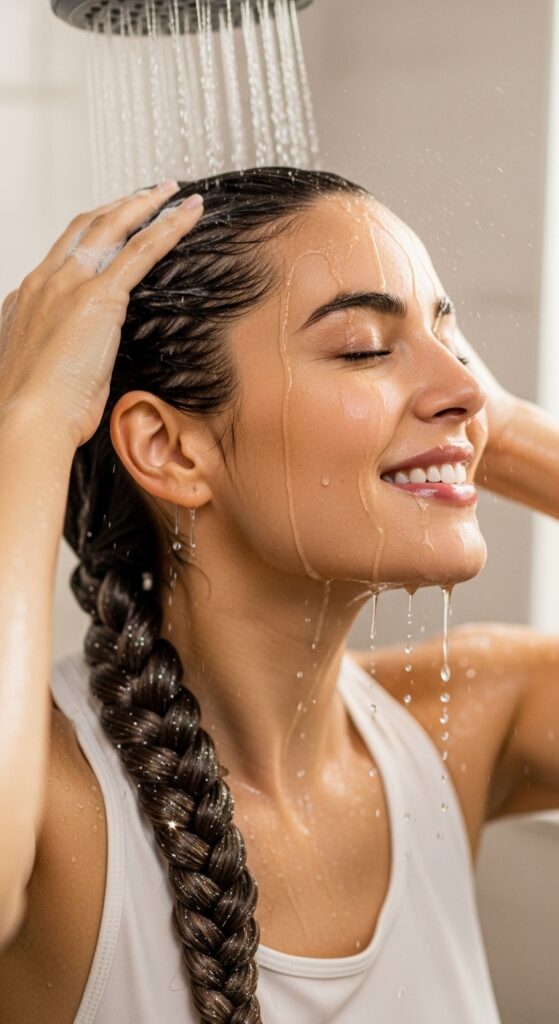
Removal & Clean-Up is Easy
Washing it out is simple—just shampoo as normal. The powder will rinse right out. To clean up any fallout on your skin or clothes, a piece of sticky tape or a lint roller works wonders.
Drape that towel over your shoulders during application to catch most of the fallout. A little prep makes clean-up a non-issue.
Common Mistakes to Avoid
The biggest mistake is using too much hairspray at the base. A soggy, sticky braid is hard to work with. Light mists are key. Also, avoid using craft glitter—it’s not eye-safe and is too harsh.
Finally, don’t rush. Building the shine slowly with layers looks far more professional and luxurious than dumping a lot of powder on at once.
Inspiring Style Combos
Imagine this with a sleek leather jacket for contrast—soft shimmer meets edge. Or with a flowing, romantic dress for a full fairy-tale look. It also complements clean-girl makeup perfectly.
It’s a versatile detail that can adapt to your personal style, whether that’s old money hair elegance or downtown cool.

Your Hair Health Comes First
Because you’re using cosmetic-grade powder and hairspray, this is a gentle style. Always wash it out at the end of the night. Follow with a nourishing conditioner if you have dry hair.
This shouldn’t cause any damage. It’s just sitting on the surface of the hair. Think of it like makeup for your hair—fun, temporary, and completely removable.
Experiment and Make It Yours
That’s the real fun. Try it on different braids. Mix pearl dust with a tiny bit of hair oil for a wet-look shimmer. Apply it just to your baby hairs.
There are no rules. This technique is a tool for you to play with and create a look that feels uniquely you. That’s where the best hair moments come from.
Final Thoughts From Me
I love this trick because it feels luxurious but is totally approachable. It’s that little extra effort that makes you feel put-together and special. In a world of complicated tutorials, it’s a five-minute upgrade with a ten-out-of-ten impact.
Whether you’re prepping for a big event or just want to make your Tuesday grocery run feel a bit more magical, a sprinkle of pearl dust can do the trick. It’s one of those details that always gets a “How did you do that?!” which is the best compliment.
So, there you have it—your complete guide to catching the light in the most beautiful way. I hope this inspires you to look at that little jar of pearl dust and see all the possibilities. It’s more than just a powder; it’s a tiny bottle of hair magic.
The best part about hair is that it washes out. There’s no risk, only the potential for a really good hair day (or night!). So go ahead, raid the craft store, and add some shimmer to your braid repertoire.
Save this post to Pinterest to keep this guide handy for your next event! And I’d love to know—which braid are you going to try this on first? Drop a comment below and tell me your plans!