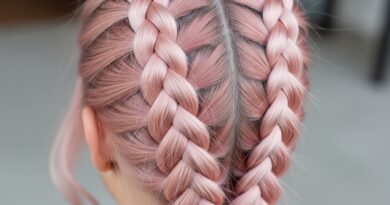
20 Easy Beach Wave Hairstyles Salt Spray Techniques Effortless Coastal Vibes
If there’s one thing I’ve learned from years of messy buns and last-minute plans, it’s that beachy waves are the ultimate secret weapon. They instantly make you look like you just stepped off a seaside vacation—even if you’re just heading to the grocery store. And the best part? You don’t need a trip to the ocean or a fancy salon. All you really need is a good salt spray and a few easy techniques you can do at home.
In this post, I’m sharing 20 super simple ways to get those effortless, coastal vibes using salt spray. We’re talking five-minute routines, tricks for every hair length, and a few product hacks you probably already have in your bathroom. Whether you have a blunt bob, long layers, or something in between, these tips will give you that soft, textured look that says “I woke up like this” (but better). Let’s dive in, friend.
1. Start with Damp, Not Wet Hair

The biggest mistake I used to make was spraying salt spray on soaking wet hair. It just drips everywhere and dilutes the product. Instead, towel-dry your hair until it’s just damp—like 80% dry. This is the perfect canvas for the salt spray to actually cling and create texture.
Give your hair a good shake, then mist the salt spray evenly from mid-lengths to ends. Don’t soak your roots unless you want volume, but keep it light. Scrunch gently with your hands, and let it air-dry for a few minutes before moving to the next step.
2. The Classic Scrunch and Air-Dry

This is the laziest, most reliable technique in the book. After applying salt spray, tilt your head to one side and gently scrunch your hair upward toward your scalp. Keep scrunching every few minutes as it dries. That movement helps the salt crystals form little bends and waves.
If you have fine hair like me, avoid touching it too much once it’s dry, or it can get frizzy. Use a light-hold hairspray if you want the waves to last all day. It’s basically the 2026 hairstyles version of “no effort, big payoff.”
3. Braid It While You Sleep

Want beach waves without holding a hair tool? Put your slightly damp hair into one or two loose braids before bed. Spritz a little salt spray into each section before braiding. When you wake up, take the braids out and run your fingers through—you get these soft, lived-in waves that look just like the ocean did it.
For a more modern vibe, try a single side braid (like the asymmetrical lob styling trick popular in 2026). The waves will fall in a slightly different direction, which feels fresh and effortless. Bonus: no heat damage.
4. Twist Sections with Your Fingers

If you don’t have time for a braid, just twist small sections of your damp, salt-sprayed hair around your finger. Hold each twist for 10–15 seconds, then release. Do this all over your head, focusing on the front pieces and the crown. The result is a messy, organic wave pattern that looks like you spent an hour at the beach.
This technique works especially well for shorter cuts like the quiet luxury bob. It gives that soft, undone texture without looking like you tried. Plus, you can leave the rest of your hair straight for a cool hybrid look.
5. The Diffuser Trick for Faster Waves
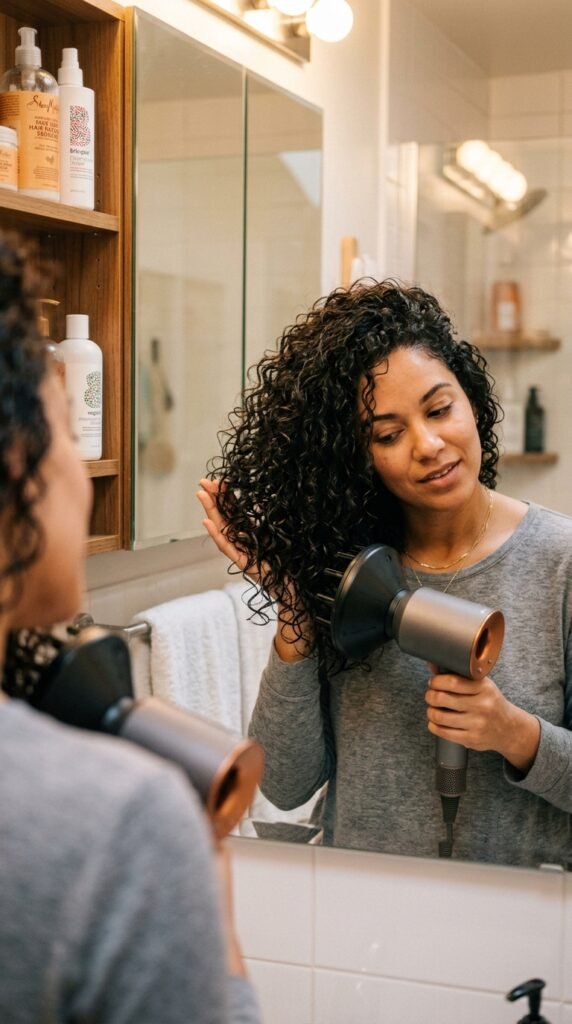
I know air-drying is the dream, but sometimes you’re in a rush. That’s when a diffuser is your best friend. After applying salt spray, flip your head upside down and use the diffuser on low heat. Cup your hair in the diffuser, lift it toward your scalp, and hold for a few seconds. Repeat until mostly dry.
This method gives you more volume and those perfect “crunchy” waves that you can break up with your fingers. For a glitchy glam hair effect, use cool shot at the end to lock in the texture. It’s like instant vacation hair, no plane ticket needed.
6. The “Bun Method” for Quick Texture

When you’re short on time, pull your damp, salt-sprayed hair into a high, loose bun. Not a sleek ballet bun—a messy one. Let it sit for 15–30 minutes while you do your makeup or make breakfast. When you take it down, you’ll have soft, twisted waves with a little volume at the crown.
This works great for medium to long hair. If you have a hime cut or any blunt layers, those pieces will naturally fall differently and add a cool, choppy texture. I love this on second-day hair too—just re-spritz a little water and salt spray, re-bun, and you’re good.
7. Use a Wide-Tooth Comb Once It’s Dry

Here’s a trick that changed everything for me: after your hair is completely dry and you’ve scrunched it, run a wide-tooth comb through it just once or twice. It breaks up the tight curls and creates those loose, beachy “S” waves. You don’t want to overdo it—two strokes is usually enough.
This is especially helpful if you have a vampire haircut (think long, blunt with face-framing layers) because it separates the ends and keeps the shape intact while still looking relaxed. You get that “I just got out of the ocean” texture without the tangles.
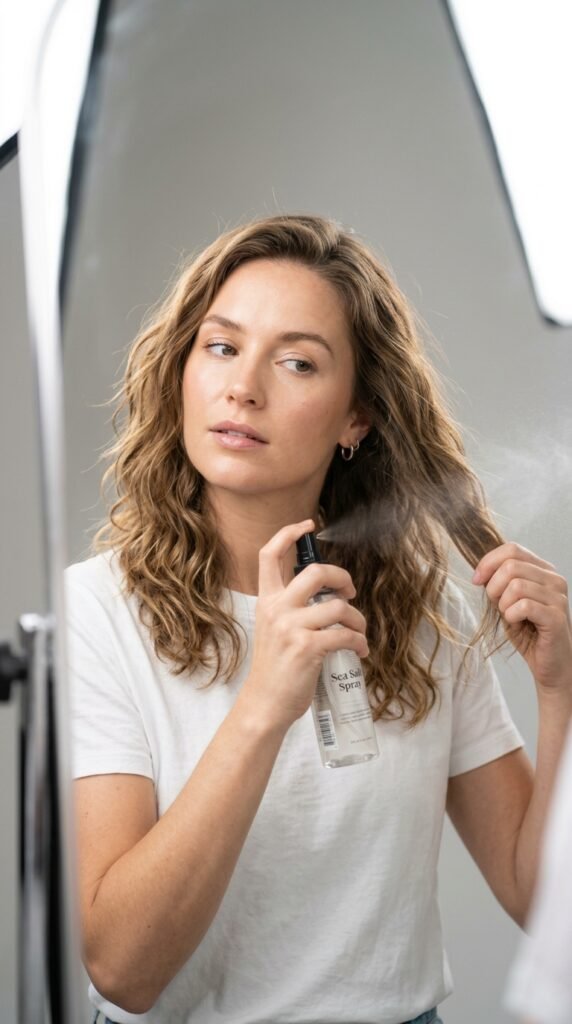
8. Salt Spray on Dry Hair for Refresh

Yes, you can use salt spray on dry hair! I do this all the time to revive day-old waves. Lightly mist your hair, focusing on the ends, and scrunch with your hands. The water reactivates the salt and adds a little grit, so your waves bounce back. It’s like a reset button for your hair.
This is perfect for when you want an old money hair vibe—clean, effortless, and a little polished but never stiff. It also works well on straight hair if you just want a subtle texture for the day. Just don’t soak it; a few spritzes do the trick.
9. The “Twist and Pin” for Defined Waves

If you want more defined, uniform waves, section your damp hair into four to six twist sections, then pin each twist flat against your head with a bobby pin or claw clip. Let them dry completely—either air-dry or use a diffuser. Unpin and you’ll have soft, spiraled waves that look like you used a wand.
This is a great technique for the romantic goth hairstyles crowd—those darker, witchy waves look amazing when they’re slightly more defined and dramatic. Plus, the pins keep the hair off your face while it dries, which is a bonus on a busy morning.
10. Focus on the Ends for a “Lived-In” Look
I used to spray salt spray all over, but I learned that focusing on the ends gives a more natural, beachy result. The ends are the oldest part of your hair, so they’re naturally drier and more porous—they soak up the product perfectly. Spritz the last 4–5 inches of your hair and scrunch just those sections.
This technique is ideal for asymmetrical lob cuts where the ends are heavier on one side. It adds texture where you want it without making the roots look greasy. The result is a light, airy wave that moves beautifully and doesn’t weigh you down.
11. The “Plop” Method for Curly Waves
If you have naturally curly or wavy hair, the plop method is a game-changer. After washing and applying salt spray, flip your hair forward and lay it on a cotton t-shirt placed on a flat surface. Fold the bottom of the shirt up over the back of your head, then tie the sleeves at the nape of your neck. Let it sit for 20–30 minutes.
When you take it down, your waves will be bouncier and more defined without frizz. This is a favorite trick in the 2026 hairstyles community for achieving those “effortlessly undone” curls that look like they belong on a beach in Malibu. Plus, no heat needed.
12. Use a Texturizing Spray as a Base

Before you reach for the salt spray, try a light layer of texturizing spray first. It gives your hair a little more “grip” so the salt spray can really hold onto each strand. It’s like primer for your waves. I use a dry texture spray at the roots, then salt spray on the ends.
This combo is perfect for the quiet luxury bob—it adds a subtle piece-y texture that makes the cut look intentional and high-end. The whole look says “I have a beach house” without being extra. Just two spritzes and a scrunch.
13. Create a “Deep Part” for Wave Separation

Once your hair is dry and waved, change your part. If you usually wear a middle part, switch it to a deep side part. This instantly lifts the roots on one side and makes the waves fall in a more flattering way. It also creates more movement and volume without any product.
I love this for old money hair because it looks polished but not stiff. A deep part paired with soft waves gives a very Jackie O / yacht club vibe. And it takes two seconds to do. Just run a comb through your part and let the waves adjust naturally.
14. The “Flat Iron Wave” Hack
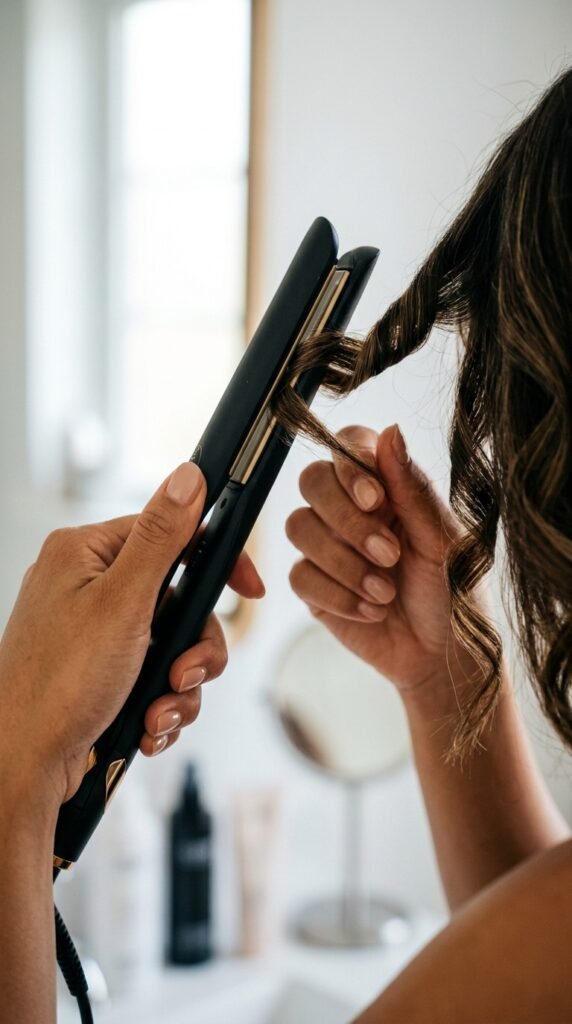
If you want a bit more structure but still love the salt spray texture, use a flat iron—but only to create “S” waves, not straight lines. Clamp a small section near the root, twist the iron 180 degrees away from your face, and glide down. It creates a soft wave that’s more polished than scrunching alone.
Spray salt spray on each section before you iron it. The heat activates the salt and helps the wave hold longer. This is perfect for glitchy glam hair—that modern, slightly surreal texture that’s trending for 2026. You get a wave that’s structured but still looks real.
15. Use a Sea Salt Paste for More Grip
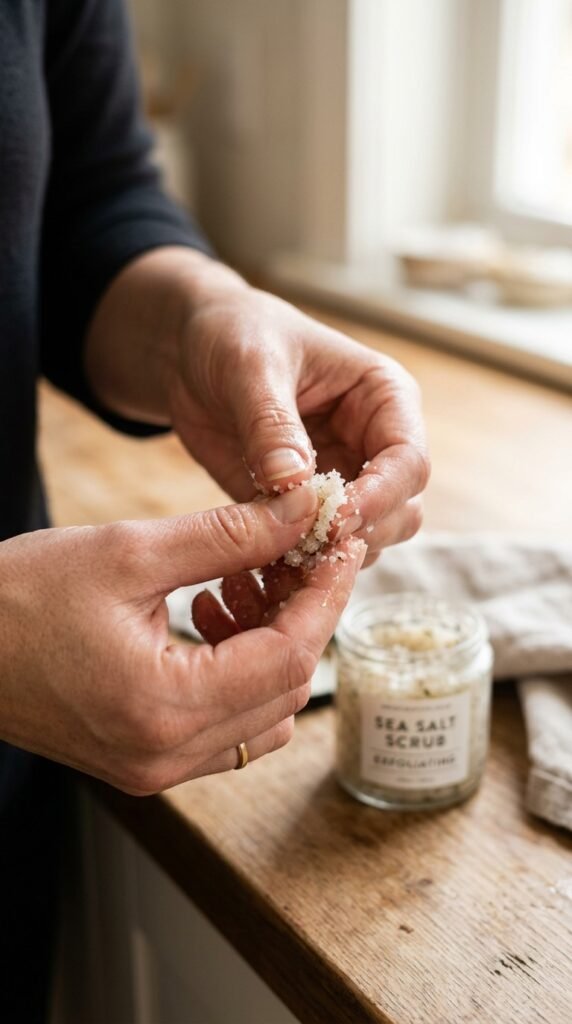
If your hair is super slippery or fine, regular salt spray might not give you enough hold. That’s when a sea salt paste or a salt-infused hair clay comes in. Rub a pea-sized amount between your palms, then work it through the mid-lengths and ends of your damp hair. Scrunch as usual.
This gives you that “just got out of the ocean” texture with more staying power. It’s fantastic for romantic goth hairstyles where you want a slightly gritty, lived-in feel. The paste also adds a tiny bit of separation between waves, which looks super chic.
16. The “Cuff” Method for Volume at the Crown
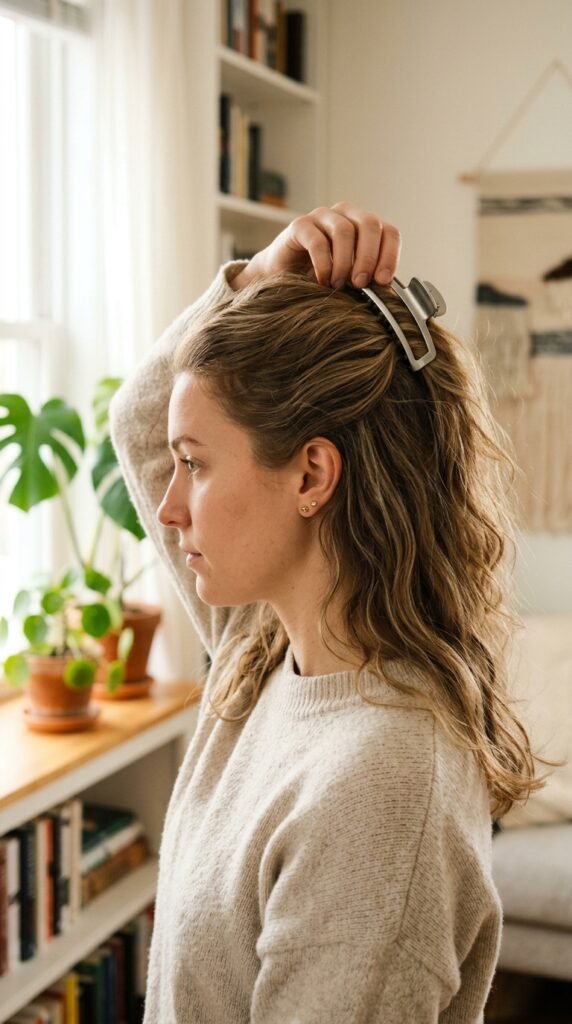
If your waves look flat at the top, use a claw clip to lift the roots while your hair dries. After applying salt spray, gather a small section of hair at the crown, lift it straight up, and clip it into a “poof” shape. Let it dry in that lifted position. When you unclip, you’ll have natural volume that lasts.
This trick works wonders for vampire haircut styles that rely on face-framing movement. The volume at the crown balances the heavy ends, giving you an overall balanced, dramatic silhouette. It’s a tiny step with a big payoff.
17. Finish with a Light Hairspray (Not Heavy!)

The final step to keep your beach waves from falling flat is a very light hairspray. I’m talking a flexible hold, not that sticky shellac from high school. Hold the can about 12 inches away and give a quick, even mist all over. This locks in the texture without making your hair feel crunchy.
For quiet luxury bob lovers, this is the secret to making your waves last all day at the office or a brunch. It’s like putting a seal on your hard work—but the softest, most invisible seal possible. Your hair will still move and swing, but the wave shape stays put.
18. Try a “Reverse Bun” for Heat-Free Volume

Here’s a variation of the bun method: put your damp hair into a very high topknot—right on the top of your head. Spritz salt spray on the bun itself. After 20–30 minutes, take it down. The hair at the crown will have extra volume, and the ends will form soft, bouncy waves that fall longer than usual.
This is my go-to for hime cut styles because it keeps the long, straight sections intact while giving the layered bits a wave. You get that classic “princess” silhouette with a beachy twist. It’s also one of the fastest techniques when you’re running late.
19. Use Cold Water at the End of Your Shower
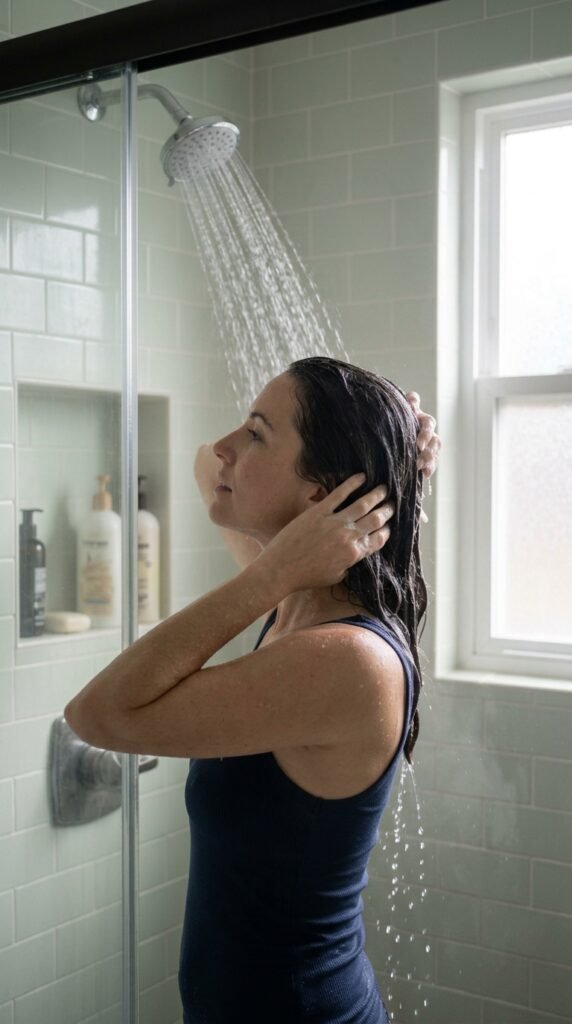
Before you step out of the shower, do a quick cold water rinse on your hair. The cold temperature helps seal the hair cuticle, which makes your waves smoother and shinier. Then, while your hair is still damp, apply your salt spray as usual. The cold rinse also helps reduce frizz.
This is a pre-step that makes every other technique work better. For 2026 hairstyles that focus on “effortless” texture, this little ritual makes a big difference. Your waves will look more like intentional beach curls and less like you forgot to brush your hair.
20. Don’t Be Afraid to Mix with Other Products
Salt spray is amazing, but it can be drying. I always mix a drop of leave-in conditioner or a lightweight hair oil in with my salt spray. I either apply the conditioner first, then the salt spray, or I mix a few drops of oil directly into the spray bottle. This keeps your hair from feeling like straw, especially if you’re using it daily.
This combo is perfect for old money hair—that effortless, expensive-looking texture that’s healthy and shiny. The oil gives the salt spray a little slip, so your waves look glossy instead of matte. Experiment with different ratios until you find what your hair loves. It’s your hair, after all.
I hope you found a few new tricks to try the next time you want that easy, beachy look without leaving your house. The best part about salt spray is that it works with almost any hair type, texture, or cut. Whether you have a sharp asymmetrical lob, a romantic goth-inspired midi cut, or something totally unique, these techniques are designed to make you look and feel like you just stepped off the shore.
Remember, the goal isn’t perfection. It’s that relaxed, “I’m having a good hair day” energy. So grab your spray bottle, put on a playlist, and give yourself ten minutes of hair time. You deserve to feel effortless today.
Save this post to Pinterest so you never forget these techniques—your future self will thank you when you have a busy morning.
What’s your go-to salt spray technique? Drop it in the comments below—I’d love to try something new from you!